Jump in the Fun, Love Every Mile


Hey friend!
So you’re thinking about doing the Manaslu Circuit Trek. Good choice! Like, really good choice. This trek is something special, and I’m excited for you.
But here’s the thing I learned the hard way: showing up unprepared to this trek is not a good idea. Trust me, I met people along the trail who hadn’t trained at all, who brought the wrong gear, who had no idea what they were getting into. Some of them turned back. Some of them made it but looked absolutely miserable the whole time.
I don’t want that to be you.
I want you to stand on top of Larkya La Pass at 5,160 meters with a huge grin on your face, feeling strong and proud, not wondering if you’re going to make it down alive.
So let me share everything I learned about preparing for this amazing adventure. Everything from getting your body ready to packing your bag to handling the altitude. All in simple, friendly words. Like we’re sitting together over tea and I’m telling you what I wish someone had told me.
Ready? Let’s go!
First Things First: What Are You Getting Into?
Before we talk about training and packing, let’s be real about what this trek actually involves.
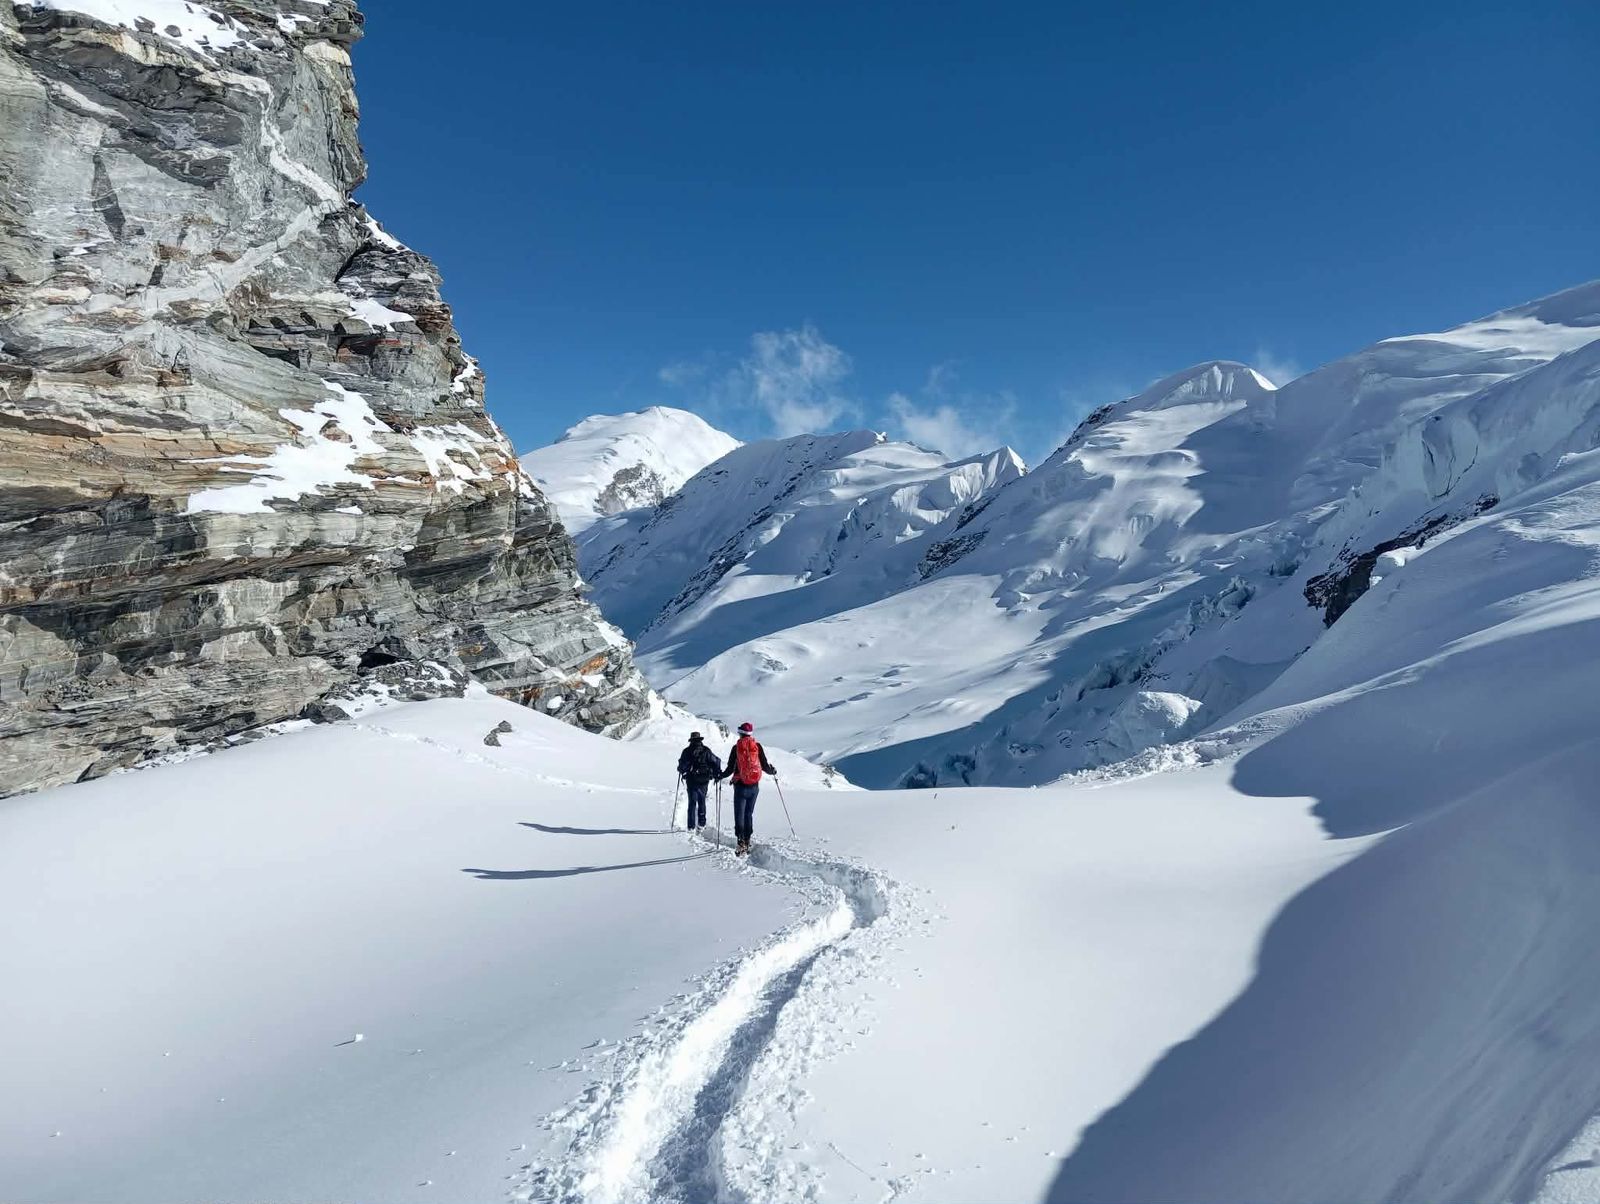
The Manaslu Circuit takes you around Mount Manaslu, the eighth highest mountain in the world at 8,163 meters. You’ll walk about 170 to 180 kilometers over 12 to 16 days. Most days you’ll walk 6 to 8 hours on trails that can be rocky, steep, and sometimes a little scary.
You’ll start down low where it’s warm and green, with forests and villages and rushing rivers. Then you’ll climb higher and higher until everything turns rocky and cold and the air gets thin. The highest point is Larkya La Pass at 5,160 meters. That’s higher than anything in the European Alps, just so you know.
The trails are not super technical. You won’t need ropes or climbing gear. But they are demanding. Your legs will hurt. Your lungs will work hard. Some days you’ll wonder why you signed up for this.
But then you’ll round a corner and see mountains so beautiful they’ll make you cry. You’ll sit in a tiny teahouse with a family who shares their dal bhat and their smiles. You’ll stand at the pass with prayer flags whipping in the wind and feel like you’re on top of the world.
That’s what you’re preparing for. And it’s so worth it.
Getting Your Body Ready: Training That Actually Works
Okay, let’s talk about training. I know, I know. Training sounds boring. But here’s the truth: the fitter you are, the more you’ll enjoy this trek.
When you’re fit, you can actually look up at the mountains instead of staring at your feet. You can have energy at the end of the day to talk with other trekkers. You recover faster and feel better.
When you’re not fit, every day is a struggle. You’re always tired. The views don’t matter because you’re just trying to survive.
So let’s get you fit. Nothing crazy. Just smart training.
How Much Time Do You Need?
Give yourself at least 8 to 12 weeks before your trek. If you have more time, even better. If you have less, that’s okay too—just do what you can.
I started training about three months before my trek. I’m not an athlete. I have a normal desk job. But I stuck with it, and by the time I hit the trail, I felt ready.
Up high, there’s less oxygen. Your heart has to work harder to pump blood. Your lungs have to work harder to grab every bit of oxygen they can.
So you need to build up your cardiovascular system. This means activities that get your heart pumping and keep it pumping.
Easy ways to train cardio:
Brisk walking (start with 30 minutes, work up to 2 hours)
Jogging or running if that’s your thing
Cycling (outside or stationary bike)
Swimming
Stair climber at the gym
Actually climbing stairs in a building or stadium
Try to do cardio 4 or 5 times a week. Mix it up so you don’t get bored. And here’s a secret: the best cardio for trekking is walking uphill with a backpack. More on that later.
Your legs will carry you every single step of this trek. Up hills, down hills, over rocks, through mud. They need to be strong.
You don’t need to become a bodybuilder. Just do some basic exercises that target the muscles you’ll use.
Easy leg exercises:
Do these 3 times a week. Start with 2 sets of 10 reps for each exercise. Work up to 3 sets of 15 reps. Add weight if it gets too easy—hold dumbbells or wear a backpack.
Your core muscles—your stomach and lower back—help you stay balanced on rough trails. When you’re carrying a backpack for hours, a strong core makes a huge difference.
Easy core exercises:
Again, 3 times a week. Your back will thank you later.
The Most Important Training: Hike With Your Pack
Okay, this is the secret sauce. About a month before your trek, start going on actual hikes with your actual backpack.
Put 5 to 8 kilograms in your pack at first. Water bottles, books, whatever. Just get some weight in there. Wear the boots you’ll wear on the trek. Use trekking poles if you plan to use them.
Go for long walks on weekends. Find hills if you can. If you live in a flat area, find a tall building and walk stairs for an hour. It’s boring but it works.
Each week, add a little more weight. By the end, you should be comfortable carrying 10 to 12 kilograms for several hours.
This does two things: it gets your body used to the weight, and it breaks in your boots. Please, please break in your boots before Nepal. Blisters on the trail are no joke.
A Simple Weekly Training Plan
Here’s what I did. Feel free to copy it or adjust for your life:
Nothing crazy, right? Just consistent.
Understanding Altitude: The Biggest Challenge
Let me be honest with you. Altitude is no joke. It affects everyone differently. I saw super fit people struggle with it and average people do fine. There’s no predicting.
But you can prepare and you can be smart about it.
When you go high quickly, your body doesn’t have enough oxygen. For most people, this causes mild symptoms like headache, tiredness, and trouble sleeping. This is normal and usually goes away as you acclimatize.
But sometimes it gets worse. Really bad. Like, life-threatening bad. Fluid can build up in your lungs or brain. This is rare but serious.
The key is to recognize symptoms early and never ignore them.
Symptoms to Watch For
If you have serious symptoms, you must go down immediately. Not tomorrow. Not after breakfast. Now.
This is the number one rule. Walk slower than you think you need to. Let other people pass you. The mountain will still be there. Your goal is to get there safely, not quickly.
Aim for 3 to 4 liters every day. Not coffee or tea (though those are fine too). Actual water. Dehydration makes altitude sickness worse.
This is the golden rule of acclimatization. During the day, hike up to a higher point. Then come back down to sleep. This helps your body adjust.
On your rest days, do exactly this. In Samagaon, for example, hike up to Manaslu Base Camp or Birendra Lake, then come back down to sleep.
Your itinerary has rest days built in. Use them. They’re not for lying around (though that’s okay too). They’re for helping your body adapt. Do the short hikes your guide suggests.
If you feel bad, tell someone. Your guide. Your trekking mates. Don’t be tough and try to push through. That’s how people get in trouble.
Diamox is a medication that helps with acclimatization. Talk to your doctor about it before your trip. Some people take it, some don’t. I didn’t take it and was fine, but many people find it helpful.
Packing: What to Bring (And What to Leave Behind)
Okay, packing. This stressed me out before my trek. What do I need? What’s extra weight? What if I forget something important?
Here’s the thing: you can’t bring everything. You have to carry your bag or a porter carries it. Either way, weight matters.
Let me break down exactly what you need, in simple categories.
The Most Important Rule: Layers
The weather in the mountains changes constantly. Morning might be freezing. Afternoon might be warm. Evening might be freezing again. Wind. Sun. Maybe snow.
The solution is layers. You add or remove layers as you go.
Think of it like this:
Upper body:
Lower body:
Feet:
Gear: What You Actually Need
Sleeping:
Trekking:
Remember: charging electronics at teahouses costs money. Usually 100 to 300 rupees per device. So bring a fully charged power bank.
You don’t have to bring everything from home. Kathmandu has tons of shops where you can buy or rent gear. The Thamel district is full of them.
You can rent sleeping bags for about $2 per day. Buy trekking poles for $12 to $16. Get cheap but decent gloves and hats.
This saves weight on your flight and lets you travel lighter. I rented a down jacket in Kathmandu and it worked great.
Permits and Paperwork: The Boring Stuff You Can’t Skip
Okay, let’s talk about permits. It’s not exciting, but you need to know it.
The Manaslu region is a restricted area. That means you can’t just show up and start walking. You need special permits and you must be with a guide.
Your trekking agency will handle all of this for you. You just need to provide passport photos and pay the fees. It’s one less thing to worry about.
Why? Because if something goes wrong up there, help is far away. A helicopter rescue can cost $5,000, $10,000, even more. Insurance will cover that.
I used World Nomads and it worked fine. But there are many companies. Just read the fine print and make sure altitude trekking is covered.
When you go makes a big difference. Here’s the simple breakdown:
Autumn (September to November) – BEST TIME
This is when I went and it was perfect. The weather is stable. The skies are clear. The views are incredible. Days are pleasant, nights are cold.
The only downside? It’s the busiest time. More trekkers on the trail. But “busy” on Manaslu is still nothing like Everest or Annapurna.
Spring (March to May) – ALSO GREAT
Spring is almost as good as autumn. The weather is stable. The lower forests are full of rhododendron flowers in bloom. Beautiful!
Skies can be a little hazier than autumn, but still great.
Winter (December to February) – FOR EXPERIENCED TREKKERS ONLY
Winter is cold. Really cold. Snow can block the pass. Some teahouses close. Trails can be icy and dangerous.
If you’re an experienced winter trekker, go for it. If this is your first Himalayan trek, probably not a good idea.
Monsoon (June to August) – AVOID
Rain. Lots of rain. Landslides. Leeches. Mud. Clouds hiding the mountains. Trails are slippery and dangerous.
Just don’t. Come in autumn or spring.
Teahouses: Where You’ll Sleep and Eat
You’ll stay in teahouses along the trail. They’re basic but comfortable and warm.
What to Expect
What to Eat
Pro tip: Dal bhat every day might sound boring, but it’s exactly what your body needs. Carbs for energy, protein for muscles, warm and satisfying.
Teahouse Etiquette
You must trek with a guide in Manaslu. It’s not optional. But honestly, it’s a good thing.
Why a Guide Is Worth It
My guide was amazing. He grew up in a village near the trail. He knew every family in every teahouse. He told me stories about the mountains and the people. I would have missed so much without him.
A porter carries your heavy bag so you only carry a small daypack. It costs extra but it’s worth considering.
Pros:
Cons:
I hired a porter and it was great. I carried maybe 5 kilos in my daypack. He carried the rest. By the end of the day, I was tired but not destroyed. I think it helped me enjoy the trek more.
If you’re on a tight budget, you can carry your own bag. Lots of people do. Just make sure you train with weight before you go.
Money Matters: Budgeting for Your Trek
Let’s talk money. How much does this all cost?
A full package with an agency usually includes:
I went mid-range and felt it was good value. Good guide, good service, no surprises.
Your package might not include everything. Budget extra for:
So if you’re in a group of 4 with one guide, each person tips about $3 per day for the guide. Something like that.
I tipped my guide and porter separately at the end. They worked so hard for me. It felt good to show appreciation.
Before You Go: Final Preparation Checklist
You’re getting close! Here’s a checklist for the weeks before your trek:
2-3 Months Before
1 Month Before
1-2 Weeks Before
Day Before Departure
A Few More Tips From My Experience
Look, preparing for a trek like Manaslu can feel overwhelming. There’s so much to think about. Training, gear, permits, altitude. It’s a lot.
But here’s the thing: thousands of people do this trek every year. Regular people like you and me. People with desk jobs and families and not much mountain experience. If they can do it, you can do it.
The key is preparation. Show up ready. Train your body. Pack smart. Respect the altitude. Listen to your guide.
Do those things, and you’ll have the time of your life. You’ll stand at Larkya La Pass with prayer flags flying and mountains all around, and you’ll feel so proud of yourself. You’ll have stories to tell for the rest of your life.
I’m so excited for you. This trek changed something in me. Made me quieter inside. Made me appreciate simple things. Made me feel strong and capable in a way I hadn’t felt before.
I hope it does the same for you.
If you have questions, ask them. Talk to people who’ve done it. Read more blogs. Join trekking forums. The more you know, the more confident you’ll feel.
And then? Book that flight. Lace up those boots. Go see those mountains.
You won’t regret it. I promise.
Namaste, friend. See you on the trail.