Discovering the flora and fauna of NEPAL : CHITWAN NATIONAL PARK

The scenic and a breathtaking adventurous subtropical lowland of southern Nepal , Chitwan National Park stands as one of the interesting site for wildlifes conservation in whole asia. In recogonition of its unique biological resources of outstanding universal value, UNESCO designated Chitwan National Park as a World Heritage Site in 1984.

Travellers seeking for exploring nature except snowcapped mountains and thrilling jungle safaris, vibrant cultural immersion and canoe rides ; Chitwan National Park may be the best eco-tourism destination.

Prolouge of the wondering Chitwan National Park :

Chitwan National Park is where Nepal’s conservation journey began. Established in 1973 as the country’s first national park, it covers a vast stretch of subtropical lowlands in south-central Nepal. The landscape is a stunning mix of river valleys and rolling hills, creating a perfect sanctuary for wildlife.
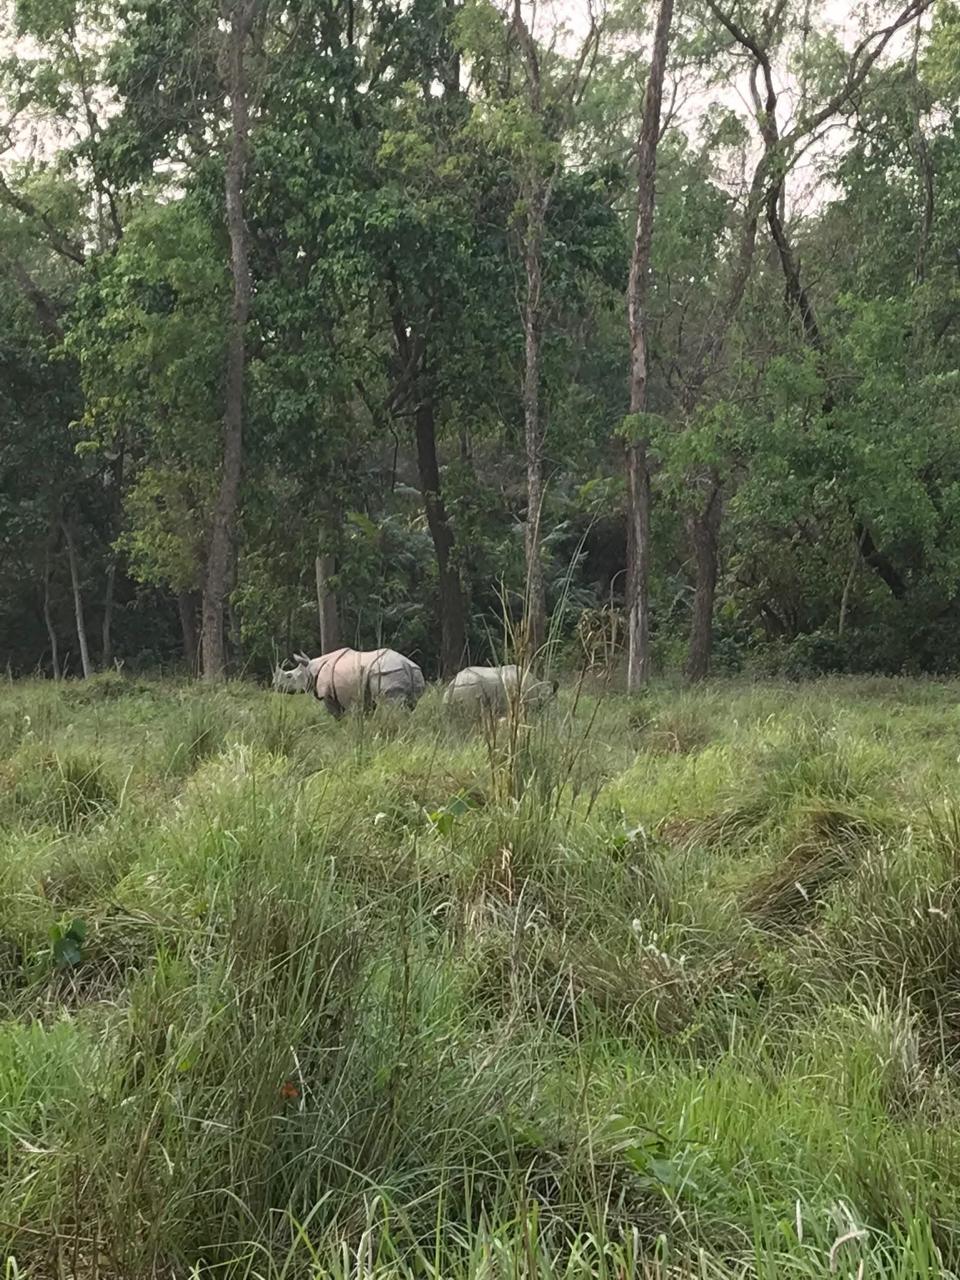
This park is a crucial refuge for some of the world’s most endangered species also designated among the most precious natural treasures on Earth. It holds the distinction of being Nepal’s first national park, a pioneering step in the nation’s commitment to conservation. World-renowned as one of Asia’s best wildlife viewing destinations, it is a realm where the impossible becomes probable, where the shadows reveal the rarest creatures on the planet. It is famous for protecting the endangered one-horned rhinoceros ghariyal-gohi ,Bengal tiger, offering a refuge to these majestic beasts against the encroaching tide of modernity.This is a place where the subtropical lowlands of the Terai burst forth in a riot of life. Here, the air is alive with the calls of over 600 bird species, the ground trembles under the weight of giants, and the rivers glide silently through ancient forests. Join us as we unravel the mysteries of Chitwan, exploring every facet of its existence, from the smallest insect to the mightiest predator, and from the logistics of your journey to the depths of its cultural heart.

The Monarchs of the Jungle: A Wildlife Odyssey

To speak of Chitwan is to speak of its rulers. The park is a sanctuary for the second-largest population of Greater One-horned Rhinoceros in the world. Seeing these prehistoric-looking beasts, with their armor-plated skin and singular horn, grazing peacefully in the tall elephant grass is a sight that etches itself into the memory forever. They are the tanks of the Terai, symbols of a bygone era, thriving here in numbers that offer hope for their species’ survival.
But the rhino shares its throne with another, more elusive sovereign. Chitwan stands as a beacon of hope for the Bengal tiger. It is one of the National Parks in the world that has more than 128 adult tigers in the same habitat. This statistic is monumental. It signifies a density of predators that is rare in the modern world. As we detailed in our previous chronicles, the park’s alluvial floodplains provide the perfect cover for these striped phantoms. The resurgence of the tiger here—from a precarious population of just 25 individuals decades ago to the robust numbers we see today—is a story of resilience and rigorous protection.

Beyond these two icons, the park is a haven for a multitude of other species. It is home to the formidable Gaur Bison, the world’s largest wild cattle, often spotted descending from the Churia Hills. The rivers are the domain of the Gharial Crocodile, a bizarre and fascinating reptile with a long, slender snout, fighting for survival against the currents of time. Furthermore, the park is a global hotspot for avifauna, harboring more than 6% of the world’s bird species. From the critically endangered Bengal Florican to the vibrant Indian Paradise Flycatcher, the skies and trees of Chitwan are a perpetual symphony of color and sound.

The Landscape: Hills, Valleys, and Wetlands

The geography of Chitwan is a masterpiece of natural architecture. The rugged Churia Hills rise like the spine of a sleeping dragon, covered in dry scrub and pine, providing a stark contrast to the lush valleys below. Nestled within this topography is the serene Madi Valley, a landscape of tranquil beauty that complements the dense jungles.

A jewel in this crown is the Bishajari Lake, a magnificent wetland complex. Recognized as a Ramsar site, it is a Wetland of international importance. This designation is not given lightly; it marks the lake as a crucial habitat for waterfowl, marsh mugger crocodiles, and countless aquatic species. The shimmering waters of Bishajari, surrounded by dense forests, offer a reflective pause in the frantic energy of the jungle, a place where nature breathes in stillness.

The park’s ecosystem is a delicate balance of riverine forests, sal trees, and expansive grasslands. This diversity is what allows it to support such a high density of life. The buffer zone with an area of 729.37 sq km acts as a transitional shield, connected by four districts: Chitwan, Parsa, Makwanpur, and Nawalparasi. This buffer zone is vital, allowing the local communities to coexist with the wildlife, creating a model of harmony between man and nature.

Conservation in Action: Breeding Centers

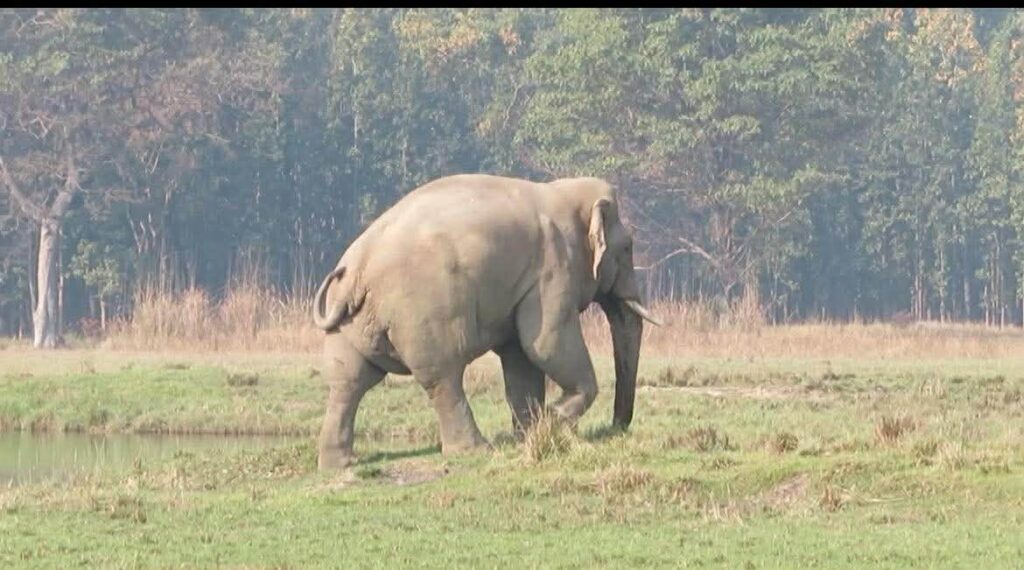
Chitwan is not just a park; it is a laboratory of life. The dedication to preserving its inhabitants is evident in the specialized facilities located within its boundaries. The park hosts a specialized Elephant Breeding Center, where these gentle giants are raised and cared for. Visiting the center offers a unique glimpse into the lives of the elephants and the mahouts who dedicate their lives to them.
Similarly, the Gharial Crocodile Breeding Center is a hub of herpetological conservation. Here, eggs are hatched, and young reptiles are reared to a size where they have a fighting chance in the wild rivers. But the circle of conservation is complete only when all links are protected. Recognizing the critical decline of scavengers, the park also features a Vulture Breeding Center. Vultures are nature’s sanitation crew, and their survival is essential for the health of the ecosystem. These centers represent the proactive, scientific approach that defines Chitwan’s management.

Accessibility: The Gateway to the Wild

One of the most compelling aspects of Chitwan is its accessibility. Unlike remote wildernesses that require arduous days of trekking, Chitwan National Park is easily accessible from most of the cities of Nepal.
The journey itself is part of the adventure. The recently constructed road at the landslide occurring Mugling-Naranghad section of the East-West highway has made Chitwan more accessible than before. This engineering feat has smoothed out the journey, reducing travel time and enhancing safety.
For those starting their journey in the capital, every morning many tourist buses leave from Kathmandu to Sauraha, which is near the park entrance. It is a comfortable ride through winding hills and along the Trishuli River. For those seeking speed and aerial views, a flight to Bharatpur from Kathmandu followed by a 45-minute drive to Sauraha is also an option. The flight whisks you from the chaotic valley to the flat plains in a matter of minutes.

Travelers coming from other hubs will find the park equally convenient. From the scenic city of Pokhara and the birthplace of the Buddha, Lumbini, the protected area is within a driving distance of 4 to 5 hours. This connectivity makes Chitwan a perfect anchor for any Nepal itinerary, linking the mountains, the cities, and the plains in a seamless loop.

Entrances and Logistics: Gateway to Adventure

To manage this vast expanse of wilderness, the park authorities have established multiple entry points. There are 12 entrance gates to the park, each serving as a portal to a different facet of the jungle.

  1. Ghatgain via Patihani
  2. Bhimle via Meghauli
  3. Khagendramalli via Bhandara
  4. Sauraha via Tandi (Ratna Nagar) – This is the most popular entry point for tourists.
  5. Laukhani via Pragatinagar
  6. Amaltari via Danda
  7. Sanachuri
  8. Bankatta via Madi
  9. Kasara via Jagatpur – Often used for deeper jungle excursions.
  10. Kujauli via Rajahar
  11. Nandabhauju
  12. Bagai

Each gate offers a slightly different perspective of the park, and your choice may depend on the specific activities or zones you wish to explore. ART Nepal Treks handles all these logistics, ensuring you enter through the gate best suited for your wildlife aspirations.

Planning Your Visit: Fees and Permits

To preserve the sanctity of the park and fund conservation efforts, entry fees are mandatory. It is important to be aware of the current rates to plan your budget effectively. For the year 2026, the Chitwan National Park entry fees are structured as follows:

  • Foreigners: 2,000 NPR per person per day.
  • SAARC Nationals: 1,000 NPR per person per day.
  • Nepalis: 150 NPR per person per day.
  • Children under 10: Free entry.

These fees grant you access to the pristine wilderness, but they are just the beginning. Mandatory permits are required, and separate fees apply for activities like jeep safaris, canoeing, and guides. Navigating this fee structure can be complex for a solo traveler, but with ART Nepal Treks, all permits and logistical hurdles are handled seamlessly, leaving you free to immerse yourself in the experience.

Things to Do: Exploring Nature’s Beauty at its Finest

Chitwan is a playground for the spirited traveler. The array of activities available ensures that there is never a dull moment. Here is a curated list of experiences that ART Nepal Treks highly recommends:

  • Go on a Jungle Safari This is the quintessential Chitwan experience. Whether in a sturdy 4WD jeep or atop a trained elephant (where permitted), venturing into the heart of the jungle is a thrill like no other. The jeep safari allows you to cover vast distances, penetrating deep into the grasslands where the tigers roam.
  • Go Canoeing in the Rapti River Drifting silently down the Rapti River in a traditional dugout canoe is a study in patience and observation. It is the best way to see the mugger crocodiles basking on the banks and the vibrant water birds hunting in the shallows. The silence of the water allows you to hear every rustle in the trees.
  • Go Bird Watching With over 543 species recorded, Chitwan is a birder’s paradise. The early morning chorus is deafening in its beauty. Guided walks can help you spot rare species like the Great Hornbill or the elusive Bengal Florican.
  • Enjoy a Scrumptious Breakfast in the Jungle Imagine sitting by the riverbank or in a clearing, surrounded by the morning mist, as a freshly prepared breakfast is laid out. It is a sensory delight, combining the taste of local cuisine with the ambiance of the wild.
  • Visit the Gharial and Elephant Breeding Centers Educational and inspiring, these visits offer insight into the conservation efforts that keep the park alive. Watching the baby elephants play or the juvenile gharials splash is a heartwarming experience.
  • Walk Through the Jungle For the adrenaline junkie, a guided jungle walk is incomparable. Accompanied by experienced naturalists, you will track wildlife on foot, learning to read the signs of the forest—the pugmarks, the droppings, the broken branches. It brings you face-to-face with the raw reality of nature.
  • Spend a Night in a Watchtower To truly understand the rhythm of the jungle, one must stay the night. Spending a night in a machan (watchtower) offers a nocturnal symphony of sounds—the chirping of crickets, the alarm calls of deer, and perhaps the roar of a tiger under the starlit sky.
  • Watch the Sunset Over the Jungle As the day ends, the sky over the Rapti River turns into a canvas of orange and purple. Watching the sun dip below the horizon while elephants bathe in the river is a soul-soothing spectacle.
  • Explore Local Villages and Tharu Culture The natural heritage of Chitwan is intertwined with its cultural heritage. Visiting the local villages allows you to meet the indigenous Tharu people. Their unique culture, traditional stick dances, and resilient lifestyle offer a profound connection to the land.
  • Walk or Cycle Around Sauraha The tourist hub of Sauraha is charming in its own right. Renting a bicycle or taking a leisurely walk through its streets offers a closer look at local life and the vibrant atmosphere of the tourist town.
  • Visit Beesh Hajari Taal A trip to the Ramsar site is a must for nature lovers. The tranquility of the lake and the abundance of birdlife make it a perfect spot for reflection and photography.

The Rhythm of the Seasons: Best Time to Visit

Timing your visit is crucial for a successful expedition. Most trips to Chitwan National Park run from late September to May, specifically designed to avoid the monsoon rains that fall between mid-June and mid-September. During the monsoon, 80 percent of Nepal’s rain falls in this period, turning the rivers into raging torrents and the roads into mud, while the leeches emerge in force.
The post-monsoon period is magical. October to early March is the best time to visit Chitwan for pleasant 25°C temperatures. The air is fresh, the humidity is low, and the jungle is lush and green after the rains. This is the perfect time for comfortable safaris and long walks.
However, the brave and the dedicated might prefer the heat. If you can stand the heat, come in April and May, the end of the dry season. This is when wildlife gathers at waterholes, making sightings more predictable as animals are forced out of the dense cover to drink. Be prepared, though, for meltingly hot temperatures in the mid-40°Cs. It is a challenging environment, but the rewards in terms of wildlife photography are immense.
Winter has its own charm. January is the coldest month, skimming freezing at night. Packing warm clothes for the evenings and early morning safaris is essential. The days, however, are crisp and clear.
The air quality also plays a role in your experience. There is high humidity from late November until the monsoon, but November, December, and January offer good visibility and clear views of the Himalayas. Imagine seeing the snow-capped peaks of the Annapurna range rising like a mirage above the jungle plains. At other times, haze and pollution from traffic, industry, brick kilns, and waste burning can obscure the view, reminding us of the proximity of civilization to this wild haven.

Conclusion: A Call to the Wild

Chitwan National Park is not just a destination; it is an emotion. It is the thrill of the chase, the serenity of the river, the heat of the day, and the chill of the night. It is the roar of the tiger and the song of the bird. It is a story of survival and success.
At ART Nepal Treks (Expedition Pvt Ltd), we are committed to curating an experience that goes beyond the ordinary. We weave together the threads of adventure, comfort, and deep ecological understanding. Whether you are a solo traveler seeking solace, a family looking for adventure, or a photographer chasing the perfect shot, Chitwan awaits with open arms. Come, let us tread softly through the tall grass, and let the jungle reveal its secrets to you

Frequently Asked Questions (FAQs) about Chitwan National Park

  • Why is Chitwan National Park considered a World Heritage Site? A: Chitwan was designated a World Heritage Site (Natural site) by UNESCO due to its outstanding universal value. It is recognized for its unique ecosystem, the alluvial floodplains of the Terai, and its exceptional biodiversity. It plays a critical role in conserving key species like the Greater One-horned Rhinoceros and the Bengal Tiger, hosting the second-largest population of Greater One-horned Rhinoceros in the world.
  • Q: What makes the tiger population in Chitwan special? A: Chitwan is a global stronghold for the Bengal tiger. It is one of the National Parks in the world that has more than 128 adult tigers in the same habitat. This high density allows for significant genetic diversity and offers visitors one of the best chances in Asia to spot this elusive predator in the wild.
  • Q: How do I get to Chitwan National Park? A: The park is easily accessible from most of the cities of Nepal. You can take a tourist bus from Kathmandu to Sauraha, which is a popular option. Alternatively, you can fly from Kathmandu to Bharatpur and drive for 45 minutes. It is also a 4 to 5-hour drive from Pokhara and Lumbini. The recently constructed road at the landslide occurring Mugling-Naranghad section has significantly improved access.
  • Q: What are the entry fees for Chitwan National Park in 2026? A: The entry fees are set at 2,000 NPR for foreigners, 1,000 NPR for SAARC nationals, and 150 NPR for Nepalis per person per day. Children under 10 are free. Remember that mandatory permits are required, and separate fees apply for activities like jeep safaris, canoeing, and guides.
  • When is the best time to visit the park? A: The ideal time depends on your preference. October to early March offers pleasant 25°C temperatures. If you want to see wildlife gathering at waterholes, visit in April and May, though expect heat in the mid-40°Cs. Avoid the monsoon season (mid-June to mid-September) when 80 percent of Nepal’s rain falls. November, December, and January offer the best visibility and clear views of the Himalayas.
  • What activities are available inside the park? A: There is a wealth of things to do, including going on a Jungle Safari, Canoeing in the Rapti River, Bird Watching, and visiting the Elephant, Gharial Crocodile, and Vulture Breeding Centers. You can also Walk Through the Jungle, Spend a Night in a Watchtower, visit the Ramsar site (Bishajari Lake), and experience the Tharu culture in local villages.
  • Q: What is the significance of the Bishajari Lake? A: The Bishajari Lake is a Ramsar site, signifying it is a Wetland of international importance. It is a crucial habitat for aquatic life and birds, adding to the rich biodiversity of the park.
  • How many entrance gates does the park have? A: There are 12 entrance gates to the park, including Sauraha via Tandi (Ratna Nagar), Kasara via Jagatpur, and Bhimle via Meghauli, among others. Each gate provides access to different zones of the park.

Upper Mustang Tiji Festival Jeep Tour – 12 Days Complete Guide (2026)

Introduction: A Journey to the Forbidden Kingdom

Imagine standing within the ancient mud-brick walls of Lo Manthang, the last remaining Tibetan Buddhist kingdom, as masked monks whirl in sacred dance while centuries-old drums echo through the arid Himalayan desert. This is the Upper Mustang Tiji Festival —a three-day spectacle of faith, myth, and cultural preservation that draws travelers from across the globe.

The 12-day Upper Mustang Tiji Festival Jeep Tour offers the perfect blend of cultural immersion and off-road adventure. Unlike traditional trekking, this journey takes you through Nepal’s most remote landscapes in the comfort of a 4WD jeep, making the forbidden kingdom accessible without sacrificing the thrill of exploration .

What is the Tiji Festival?

The Tiji Festival, also known as Tenchi, is an ancient Buddhist ritual celebrated annually in Lo Manthang, Upper Mustang. The name derives from Tenpa Chirim, meaning “benefit of Buddha’s teachings and all sentient beings” .

The Myth Behind the Festival

The festival reenacts a captivating mythological story: centuries ago, a demon created havoc in the Mustang region, causing severe water shortages in this already arid land. Dorje Jono (also called Vajrakila or Vajrakumar), a deity in Vajrayana Buddhism, was forced to fight his own demonic father to save the kingdom. After an epic battle, Dorje Jono emerged victorious, banishing the demon and restoring peace and prosperity .

Historical Significance

The Tiji Festival traces its origins to the early 15th century, introduced by Khenchen Sonam Lhundrup, son of Mustang’s second king. It was later revived in the 17th century by King Samdup Rabten and Sakya master Ngawang Kunga Sonam, who performed special Vajrakila rituals for peace and protection. The tradition was restored again in 1963 and continues uninterrupted to this day .

When is Tiji Festival 2026?

The Tiji Festival follows the Tibetan lunar calendar and typically falls in May. For 2026, the festival will be celebrated on:

Date Day

  • May 14, 2026 First Day
  • May 15, 2026 Second Day
  • May 16, 2026 Third Day

Plan your arrival in Lo Manthang by May 13, 2026, to settle in before the festivities begin.

What Happens During the Three Days?

Day 1 – The Opening Rituals: The festival begins with monks from Chhode Monastery performing preliminary rituals. A massive traditional thangka (religious painting) nearly the height of a two-story building is displayed from the King’s Palace—a highlight visible only during Tiji .

Day 2 – The Sacred Dances: Masked monks perform intricate cham dances, symbolizing the preparation for battle against negative forces. Each dance step represents elements of Vajrakila meditation practice .

Day 3 – The Victory & Purification: The final day features the climactic reenactment of Dorje Jono’s victory. Monks dramatically cast out tormas (ritual cakes) to symbolically banish negativity and evil spirits from the region, based on astrological guidance. The celebration concludes with feasting and community gatherings .

Why Choose the Jeep Tour Over Trekking?

  • Feature Jeep Tour Trekking
  • Physical Difficulty Easy – suitable for all ages Moderate to Strenuous
  • Duration 12 days 15-18 days
  • Max Altitude 3,950m (Lo La Pass) Similar but slower ascent
  • Comfort 4WD vehicle, lodge stays Walking daily, lodge stays
  • Best For Cultural focus, time-limited travelers Adventure seekers, hikers
  • The Jeep Tour eliminates the physical strain of long-distance trekking while still allowing you to experience the rugged beauty of Upper Mustang. You’ll cover more ground, visit more villages, and arrive in Lo Manthang well-rested for the festival .

Detailed 12-Day Itinerary

Day 1: Arrival in Kathmandu (1,350m)
Upon arrival at Tribhuvan International Airport, your tour representative will greet you and transfer you to your hotel in Thamel, Kathmandu’s vibrant tourist hub. Spend the afternoon exploring the bustling streets, handicraft shops, and cozy cafes. In the evening, attend a briefing session where your guide will explain the journey ahead, share insights about the Tiji Festival, and answer any questions .

Day 2: Kathmandu to Pokhara (822m) – 25-min Flight
Take a scenic 25-minute flight from Kathmandu to Pokhara. Choose a window seat for breathtaking views of the Annapurna, Dhaulagiri, and Machhapuchhre (Fishtail) mountain ranges. Upon arrival, check into your hotel and enjoy a free afternoon. Options include:

A relaxing boat ride on Phewa Lake

Visiting the World Peace Pagoda for sunset views

Exploring Lakeside’s shops and restaurants

Day 3: Pokhara to Tatopani (1,190m) – 5-6 Hours Drive
Your jeep adventure begins! Depart Pokhara in a sturdy 4WD jeep, following the Kali Gandaki River—one of the deepest gorges in the world. The road winds between the Annapurna and Dhaulagiri massifs, offering spectacular mountain views at every turn. Arrive at Tatopani, famous for its natural hot springs. Soak in the mineral-rich waters to soothe travel fatigue—locals believe these springs have healing properties .

Day 4: Tatopani to Kagbeni via Jomsom & Muktinath (2,850m) – 5-6 Hours Drive
Today’s journey takes you deeper into the valley. Stop at Marpha, a charming Thakali village renowned for its apples, apple pies, and apple brandy. Continue to Jomsom, the district headquarters, before taking a detour to Muktinath Temple (3,710m)—a sacred pilgrimage site for both Hindus and Buddhists. Witness pilgrims bathing under 108 water spouts and lighting butter lamps. End the day at Kagbeni, the official gateway to Upper Mustang, where your permits will be checked .

Day 5: Kagbeni to Charang (Tsarang) – 4-5 Hours Drive
Enter the restricted Upper Mustang region—a landscape that transforms into a surreal desert plateau of red, ochre, and grey cliffs dotted with ancient caves and stupas. Visit Chhusang, Samar, and Ghiling en route. Arrive at Charang (3,560m), a village with a rich history. Explore its ancient monastery and fortress-style houses that reflect Tibetan architectural influence .

Day 6: Charang to Lo Manthang (3,810m) – 2-3 Hours Drive
A short but unforgettable drive brings you to Lo Manthang, the walled capital of the former Kingdom of Lo. Pass the longest mani wall in Upper Mustang and marvel at the stark, beautiful landscape. Upon arrival, check into your lodge and take a preliminary walk through the ancient city. Visit the King’s Palace, a five-story whitewashed structure—though currently not open for interior visits, the exterior is magnificent .

Day 7-9: Three Days of Tiji Festival Celebration (3,810m)
Three full days are dedicated to experiencing the Tiji Festival in all its glory:

Day 7 (Festival Day 1): Attend the opening ceremonies at the monastery courtyard. Witness the display of the giant thangka and observe monks preparing the sacred space. Visit Namgyal Gompa and Tingkhar village in the morning before the afternoon rituals begin.

Day 8 (Festival Day 2): Explore Chhoser village and its famous sky caves—ancient cliff dwellings carved into the rock face. If you’re lucky, you might spot blue sheep along the way. Return to Lo Manthang for the afternoon’s masked dances and ceremonies.

Day 9 (Festival Day 3): The festival’s grand finale! Witness the dramatic expulsion of the tormas (ritual cakes), symbolizing the banishment of evil. Explore Champa Lhakang (a temple with a massive Buddha statue) and the Thubchen Gompa with its exquisite mandala paintings. Join locals in the final celebrations.

Day 10: Lo Manthang to Jomsom (2,720m) – 5-6 Hours Drive
Bid farewell to Lo Manthang and begin the return journey. Retrace your route through Charang, Ghami, and Kagbeni, where permits are again checked. Arrive in Jomsom by evening. Enjoy exploring the local market, sampling apple products, and perhaps tasting local apple whiskey .

Day 11: Jomsom to Pokhara (822m) – 7-8 Hours Drive
Descend from the high-altitude desert back to the lush greenery of the Pokhara Valley. The return drive offers a different perspective on the landscapes you crossed earlier. Check into your hotel and enjoy a relaxing evening by Phewa Lake .

Day 12: Pokhara to Kathmandu – 8-9 Hours Drive or Flight
Drive back to Kathmandu (205 km) following the Trishuli and Marsyangdi Rivers. Alternatively, take a short flight back. Upon arrival, transfer to your hotel. Spend your final evening shopping for souvenirs or enjoying a farewell dinner .

Permits & Costs for 2026

Upper Mustang Restricted Area Permit – Important 2026 Update!
Starting 2026, the permit structure for Upper Mustang has been significantly revised:

Previous System New System (2026 Onwards)
USD 500 for fixed 10 days (regardless of stay) USD 50 per person per day
No flexibility Pay only for days you actually spend in Upper Mustang
This change makes shorter trips more affordable and offers greater flexibility for customized itineraries .

Important Regulations:

  • A minimum of two participants in a group is still required
  • A government-licensed guide is mandatory throughout your stay in Upper Mustang

Other Permits Required:

  • Annapurna Conservation Area Permit (ACAP)
  • TIMS Card (Trekkers’ Information Management System)

Tour Costs for 2026

Typical costs for a 12-day Upper Mustang Tiji Festival Jeep Tour:

Group Size Cost Per Person (USD)

  • 1 person $2,499 – $3,200
  • 2 persons $2,199 – $2,299
  • 3-4 persons $1,899 – $2,199
  • 5+ persons $1,699 – $1,999

Note: Prices vary by operator and inclusions. Group tours are generally more affordable .

What’s Typically Included:

  • Airport transfers
  • Accommodation (3-star hotels in cities, tea houses/lodges during the tour)
  • All meals during the tour (breakfast, lunch, dinner)
  • English-speaking licensed guide
  • 4WD jeep with experienced driver
  • All permits (Upper Mustang Special Permit, ACAP, TIMS)
  • Guide’s salary, insurance, and expenses

What’s Not Included:

  • International airfare
  • Nepal visa fee
  • Travel insurance (mandatory)
  • Personal expenses (snacks, beverages, souvenirs)
  • Tips for guide and driver
  • Extra nights in Kathmandu due to itinerary changes

Preparation Guide

Physical Preparation
While the jeep tour is rated Easy, you’ll still be at high altitudes (up to 3,950m) and may do short walks to monasteries and villages. Being in good general health is recommended. No intense training is required .

Packing List Essentials

Clothing:

  • Warm layers: fleece jacket, down jacket (temperatures can drop below freezing at night)
  • Waterproof/windproof outer shell
  • Comfortable walking shoes/boots
  • Thermal underwear
  • Hat, gloves, and scarf
  • Sun hat and sunglasses

Other Essentials:

  • Water bottle with purification tablets/filter (plastic bottles are discouraged)
  • High SPF sunscreen and lip balm
  • Personal medications and basic first aid
  • Power bank (electricity can be unreliable)
  • Headlamp/flashlight
  • Camera with extra batteries
  • Cash (ATMs are unavailable in Upper Mustang)

Documents:

  • Passport with at least 6 months validity
  • Nepal visa (available on arrival at KTM airport)
  • Travel insurance documents
  • Passport photos for permits

Acclimatization Tips

  • Drink plenty of water throughout the journey
  • Avoid alcohol during the first few days at altitude
  • Walk slowly and listen to your body
  • Inform your guide immediately if you experience headache, nausea, or dizziness

Cultural Etiquette & Responsible Tourism

Respecting Local Customs

  • Photography: Always ask permission before photographing people, especially monks and during religious ceremonies. Photography may be restricted inside monasteries and during certain rituals.
  • Dress Modestly: When visiting monasteries or during the festival, cover shoulders and knees. Remove shoes before entering temple buildings.
  • Circumambulation: Walk around stupas, mani walls, and monasteries in a clockwise direction.
  • Pointing: Avoid pointing your feet at people or religious objects.

Environmental Responsibility

  • No plastic bottles: Use reusable water bottles. Most lodges offer boiled water for a small fee.
  • Leave no trace: Carry out what you carry in.
  • Support local economy: Buy from local shops and eat at local establishments .

Frequently Asked Questions

  1. Is the Tiji Festival Jeep Tour suitable for children?
    Yes, the tour is rated Easy and suitable for children aged 5 and above, provided they are in good health .
  2. What is the maximum altitude on this tour?
    The highest point is Lo La Pass at 3,950 meters (12,959 feet). Lo Manthang itself is at 3,810 meters .
  3. How is the road condition?
    The roads are rugged—expect a bumpy but thrilling ride. 4WD jeeps are specially equipped for these conditions .
  4. What about mobile and internet connectivity?
    Mobile service is available in Pokhara and Jomsom but is limited or absent in Upper Mustang. WiFi is available at some lodges for a fee .
  5. Do I need travel insurance?
    Yes, travel insurance is mandatory. Ensure your policy covers high-altitude travel (up to 4,000m) and emergency evacuation .
  6. What is the best time to visit Upper Mustang?
    May is ideal because of the Tiji Festival. April-October generally offers good weather, with May being particularly pleasant .

Conclusion

The Upper Mustang Tiji Festival Jeep Tour is more than a vacation—it’s a once-in-a-lifetime opportunity to witness a living tradition that has survived for over 800 years in one of the world’s most remote and culturally rich regions. From the dramatic landscapes of the Kali Gandaki Gorge to the sacred dances within Lo Manthang’s ancient walls, every moment of this 12-day journey is imbued with wonder and meaning.

With the new permit system for 2026 making travel more flexible and affordable, there’s never been a better time to embark on this adventure. Whether you’re a culture enthusiast, a photographer, or simply a curious traveler, the Tiji Festival awaits.

Island Peak Climbing Guide: Imja Tse 6,189m

Namaste well come to Nepal Dreaming of climbing Island Peak? Our comprehensive guide covers everything from permits and cost to the grueling summit day, gear checklists, and vital safety tips for this classic Himalayan trekking peak.

Introduction: The Island in the Sky

There is a moment just before dawn, high on a frozen ridge, when the world’s highest mountains begin to glow. You are clipped into a fixed rope, your breathing steady but labored in the thin air, as the first rays of sunlight set fire to the iconic peak of Ama Dablam. Behind you, the immense bulk of Lhotse and the summit of Everest itself pierce the jet-black sky. Below, the valley is a sea of ice and cloud. You are not just trekking; you are climbing. You are on Island Peak .

Locally known as Imja Tse, Island Peak (6,189m / 20,305ft) is one of Nepal’s most coveted “trekking peaks.” Its name is wonderfully descriptive: from the village of Dingboche, it appears as a solitary island emerging from a frozen ocean of ice and rock . For many adventurers, it represents the perfect bridge—a transition from avid trekker to technical mountaineer.

While often described as an “easy” 6,000-meter peak, that is a relative term in the Himalayas. This climb demands respect, preparation, and a healthy dose of courage. It combines the stunning cultural immersion of the Everest Base Camp (EBC) trek with a genuine mountaineering challenge: glacier travel, crevasses, and a steep headwall that requires the use of crampons and jumars .

Whether you are a seasoned hiker looking for your first taste of altitude or an aspiring Everest summiteer using this as a training ground, this guide will walk you through every step of the journey. We will cover the nitty-gritty of costs and permits, the physical and mental preparation required, and what it actually feels like to stand on that tiny summit, surrounded by the giants of the Khumbu.

Chapter 1: Understanding the Mountain – Difficulty, Seasons, and Statistics

Before you book a flight, it is vital to understand what you are signing up for. Island Peak is graded PD (Peu Difficile / A Little Difficult) on the Alpine grading system, with a “+” for the final headwall . But what does that actually mean for you?

1.1 Technical Difficulty

The climb is not technically extreme, but it is undeniably challenging.

  • The Approach: The journey involves trekking for over a week just to reach Base Camp. This is as much a test of endurance as the climb itself.
  • Glacier Travel: From High Camp, you will navigate the Imja Glacier. This involves walking on snow and ice, often roped up, navigating around crevasses .
  • The Headwall: The crux of the climb is a 100-meter ice wall, often called the “Yellow Tower.” Depending on conditions, the slope can reach 45 to 80 degrees . This is where you will use a jumar (ascender) on fixed lines to pull yourself up. For many, this is the most thrilling and intimidating part of the climb.
  • The Summit Ridge: Once over the headwall, you traverse a narrow, exposed knife-edge ridge to the summit. The drop on either side is severe, but the fixed ropes provide security .

1.2 The Best Time to Climb

Choosing the right season is critical for success.

  • Spring (March to May): This is the most popular season. The weather is generally stable, temperatures are warmer, and the famous rhododendrons are in bloom at lower elevations. However, the trails are busier, and the climbing permit costs are higher .
  • Autumn (September to November): Offers crystal-clear skies and fantastic visibility. It is colder than spring, especially on summit day, but the winds are often lighter, and the crowds have thinned out .
  • Winter & Monsoon: Climbing during the winter (Dec-Feb) is possible but brutally cold with high winds. The monsoon (June-Aug) brings heavy snow and rain, making the route dangerous and unlikely to be attempted .

1.3 Fatality Rate and Safety

It is important to address the elephant in the room: risk. Island Peak has a low fatality rate (less than 1%), making it statistically safer than many other Himalayan peaks . However, deaths do occur, and they are almost always due to three factors:

  1. Altitude Sickness (AMS, HACE, HAPE): The number one cause of serious incidents. Climbers ignore symptoms and push for the summit .
  2. Falls: Slipping on the ice wall or ridge due to poor crampon technique or exhaustion.
  3. Objective Hazards: Unpredictable weather, hidden crevasses, or serac falls .

The takeaway: This is a real mountain. Success is not guaranteed, and safety requires humility. Listen to your body, listen to your guide, and be willing to turn back.

Chapter 2: Preparing for the Push – Training and Acclimatization

You cannot “tourist” your way up Island Peak. You need to be an athlete. The fitter you are, the more you will enjoy the experience, and the safer you will be.

2.1 The Physical Training Regimen

Start training at least 3 to 6 months before your departure . Your training should mimic the demands of the climb: long duration, with a loaded pack.

  • Cardiovascular Endurance: The summit push takes 10-14 hours. You need a massive aerobic base.
  • Activities: Long-distance running, cycling, swimming. Aim for 4-5 sessions a week.
  • Stairmaster/Stair Climbing: This is your best friend. Do this with a weighted backpack (10-15kg) for 1-2 hours at a time .
  • Strength Training: Focus on muscular endurance, not just power.
  • Legs: Lunges, squats, step-ups.
  • Core: Planks, leg raises. A strong core is essential for balance on uneven terrain with a heavy pack.
  • Back and Shoulders: Rows and deadhangs to prepare for carrying a pack and using jumars on ropes .
  • Weekend Hikes: Get out on the trails with your weighted pack. Practice walking uphill for 6-8 hours to condition your feet and mind.

2.2 Technical Skills

You don’t need to be a rock star, but you must be proficient in basic mountaineering skills. Your guide will hold a training session at Base Camp, but prior knowledge is a huge advantage.

  • Cramponing: Learn to walk without tripping, and how to kick your front points into a steep slope.
  • Rope Skills: Be comfortable using a jumar (ascender) to go up a fixed line, and an ATC or Figure-8 to rappel down. Know how to tie a Prusik knot for safety .
  • Ice Axe Arrest: Know how to stop yourself if you fall on a snow slope.

2.3 The Art of Acclimatization

The itinerary is designed around one thing: getting your body used to the lack of oxygen.

  • The Golden Rule: Climb High, Sleep Low: You will spend days hiking to a higher altitude and then descending back to camp to sleep. This stimulates your body to produce more red blood cells .
  • Hydrate, Hydrate, Hydrate: You need to drink 4-5 liters of water per day. Dehydration feels like altitude sickness and vice versa. Don’t let that happen .
  • Medication: Many climbers use Diamox (Acetazolamide) to help prevent AMS. Consult your doctor about dosage and potential side effects (it makes your fingers and toes tingle) .
  • Listen to Your Body: Know the symptoms of AMS (headache, nausea, dizziness), HAPE (fluid in lungs, gurgling breath), and HACE (fluid in the brain, loss of coordination, confusion). The only real cure for severe altitude sickness is descent .

Chapter 3: The Paperwork – Permits, Costs, and Red Tape

Climbing in a National Park requires a lot of official documentation. Most of this is handled by your trekking agency, but it is wise to know the costs involved.

3.1 Required Permits

You cannot just show up and climb. You need:

  1. Island Peak Climbing Permit: Issued by the Nepal Mountaineering Association (NMA). The cost varies by season: $250 in Spring, $125 in Autumn .
  2. Sagarmatha National Park Entry Fee: $30 per person .
  3. Khumbu Pasang Lhamu Rural Municipality Fee: A local tax of $20 .
  4. TIMS Card (Trekkers’ Information Management System): $10 .
  5. Garbage Deposit: A $500 deposit is required, which is refunded when you prove you’ve brought your waste back from the mountain .

3.2 Total Cost Breakdown

So, how much does it actually cost? For a full-service, guided expedition, you can expect to pay between $2,450 and $3,500 .

What’s Included (in a typical package):

  • Domestic flights (Kathmandu – Lukla – Kathmandu)
  • 3 nights hotel in Kathmandu
  • Teahouse accommodation during the trek
  • All meals (breakfast, lunch, dinner) on the trail
  • Experienced, licensed trekking and climbing guides (Sherpa)
  • Porter service for your main duffel bag
  • All permits and fees listed above
  • Group climbing gear (ropes, ice screws)
  • Base Camp tent accommodation (dining tent, kitchen tent)

What’s NOT Included (Your additional budget):

  • International flights to Nepal ($800 – $1,200)
  • Nepal Visa ($50 for 30 days)
  • Travel Insurance (Mandatory, must cover helicopter evacuation up to 7,000m)
  • Personal climbing gear (boots, harness, etc.)
  • Tips for guides and porters ($150 – $200 is standard)
  • Hot showers, battery charging, Wi-Fi on the trail
  • Lunches and dinners in Kathmandu

Chapter 4: The Journey – A Day-by-Day Itinerary

The magic of Island Peak is the journey to get there. Here is a typical 17-day itinerary that blends the classic EBC trek with the climb.

Part 1: The Trek In

  • Days 1-2: Kathmandu (1,400m): Arrival, gear checks, and last-minute shopping in the bustling streets of Thamel .
  • Day 3: Fly to Lukla (2,860m) & Trek to Phakding (2,610m): The infamous landing at Lukla airport is an adventure in itself. A short, easy walk to Phakding to start the trek.
  • Day 4: Trek to Namche Bazaar (3,440m): A steep uphill day crossing high suspension bridges, culminating in your first view of Everest.
  • Day 5: Acclimatization Day in Namche: Hike to the Everest View Hotel for your first panorama of the giants. Rest is crucial here .
  • Day 6: Trek to Tengboche (3,867m): A beautiful descent and final climb to the famous Tengboche Monastery, with stunning views of Ama Dablam.
  • Day 7: Trek to Dingboche (4,360m): Entering the high alpine zone. The trees disappear, replaced by scrub and massive mountain views.
  • Day 8: Acclimatization Day in Dingboche: A short hike up the ridge behind the village to help adaptation .
  • Day 9: Trek to Chhukung (4,730m): A short walk further up the valley. This is your launching point for the mountain.

Part 2: The Climb

  • Day 10: Trek to Island Peak Base Camp (5,100m): A few hours walk across moraine to a makeshift campsite at the foot of the glacier. In the afternoon, your guides will give a training session on using crampons, ice axes, and jumars .
  • Day 11: Base Camp to High Camp (5,600m): A steep, grueling climb up a rocky moraine to High Camp. This is a basic camp on the glacier itself. Go to bed early; the summit push starts soon .
  • Day 12: Summit Day (6,189m) and return to Chhukung: The biggest day of your life.
  • 2:00 AM: Wake up, drink hot tea, and force down some breakfast.
  • 3:00 AM: Headlamps on. You start climbing the glacier in the dark, roped up.
  • Dawn: You reach the base of the headwall. The sky lights up. You put on your jumar and start the steep climb.
  • Summit: After the ridge, you are there. Embrace your guide. Take photos. You are above 8,000-meter peaks.
  • Descent: The most dangerous part. Rappel down the headwall and carefully pick your way back to High Camp, then all the way down to Chhukung. You will be walking for 12-14 hours .

Part 3: The Journey Home

Days 13-17: The Retrace: Follow the same route back down the valley to Lukla, celebrating each step with decreasing altitude. Fly back to Kathmandu for a well-deserved hot shower and a steak dinner .

Chapter 5: Gearing Up – The Ultimate Packing List

Packing for Island Peak is a science. You need to be warm, safe, and mobile. You can rent heavy technical gear (boots, down suit) in Kathmandu or Chhukung to save on luggage costs .

The Layering System

  • Base Layers (Wicking): 2-3 long-sleeve merino wool tops, 2 pairs thermal bottoms. NO COTTON .
  • Mid Layers (Insulation): A fleece jacket, a light-weight down jacket (for camp), and a heavy-weight down suit or expedition parka for the summit push .
  • Shell Layer (Protection): A waterproof/breathable Gore-Tex jacket and pants. This is your shield against wind and snow .

The Feet

  • Mountaineering Boots: The most important decision. You need insulated, double-plastic boots rated to at least -20°C (e.g., La Sportiva G2 SM, Scarpa Phantom Tech) .
  • Socks: Liner socks (thin silk/synthetic) to prevent blisters, and thick wool trekking socks. Pack at least 5 pairs.
  • Gaiters: To keep snow out of your boots .

Technical Gear

  • Crampons: 12-point steel, must be compatible with your boots .
  • Ice Axe: A technical ice axe (50-60cm) .
  • Harness: An alpine climbing harness with adjustable leg loops .
  • Helmet: UIAA/CE certified .
  • Carabiners & Slings: 4 locking screw-gate carabiners, 2 non-locking, 2 prusik loops .
  • Ascender (Jumar): For climbing the fixed ropes .
  • Belay Device (ATC/Figure 8): For rappelling down .

Accessories (Critical)

  • Headlamp: With fresh batteries and spares. Essential for the 3 AM start .
  • Sunglasses & Goggles: Category 4 glacier glasses for the snow, and ski goggles for the windy summit push .
  • Sunscreen & Lip Balm: SPF 50+. The sun at altitude is brutal.
  • Water Bottles: 1-liter wide-mouth Nalgene bottles are best. They won’t crack when they freeze, and you can put hot water in them at night to put in your sleeping bag .
  • Thermos: For hot drinks on summit morning.

Chapter 6: Stories from the Ice – A Personal Reflection on the Summit Push

To make this guide truly human, let’s step into the boots of a climber on that final morning.

The 2 AM alarm is a wretched sound. You are sleeping at 5,600 meters in a tiny tent, your breath frosting the inside of the fabric. You are wearing every layer you own, and you are still cold. Your mind races: Why am I doing this?

But then you unzip the tent. The sky is an explosion of stars, so close you feel you could touch them. The jet-black silhouette of Lhotse looms overhead. Your guide, Phurba, hands you a cup of sweet, hot tea. “Okay, sir?” he asks, with a smile that suggests he has done this a hundred times. You nod, because it’s easier than explaining the fear.

You click on your headlamp and join the chain of lights snaking up the glacier. The only sounds are the crunch of crampons on ice and your own heavy breathing. You focus on the beam of light in front of you, placing one foot in front of the other. “Climb high, sleep low,” you mutter, a mantra against the fatigue.

You reach the base of the headwall just as the sky turns from black to deep blue, then pink. You look up. It is a wall of blue ice, stretching up into the clouds. It is terrifying. Phurba clips you into the fixed rope. “Jumar up. Don’t look down.” You kick your front points into the ice, slide the jumar up the rope, and stand. Kick, slide, stand. The world narrows to the next kick, the next inch. Your arms burn. Your lungs burn. But you feel a fierce, primal joy.

Then, suddenly, the angle eases. You are over the wall. The summit ridge stretches before you, a knife-edge of snow. You walk it carefully, deliberately, and then… there is nowhere else to go. You are on top.

The wind is howling, but you don’t feel it. You are wrapped in the warmth of achievement. Everest is a plume of snow to the north. Makalu floats on the eastern horizon. Ama Dablam, that perfect peak you have stared at for days, is now far below you. You hug Phurba. You have done it. The “island in the sky” is under your feet.

The descent is a long, brutal trudge. The euphoria fades, replaced by exhaustion. Your knees scream. You trip on your crampons. The trail back to Chhukung seems to go on forever. But when you finally collapse into a teahouse chair and someone puts a cold beer in your hand, you feel a deep, bone-level satisfaction. You are a different person than the one who left.

Conclusion: More Than Just a Summit

Climbing Island Peak is a commitment. It requires your money, your time, your sweat, and your courage. It is a journey through the heart of Sherpa culture, past prayer flags and ancient monasteries, to the very edge of the earth’s ability to support human life.

It is a profound teacher. It teaches you patience during acclimatization, resilience in the face of exhaustion, and humility in the face of the mountains. It strips away the noise of modern life and leaves you with something essential: the rhythm of your breath, the support of your team, and the raw beauty of the natural world.

Whether you stand on the summit or make the wise decision to turn back, you will leave the Khumbu with a new understanding of yourself. So, train hard, pack smart, and go with respect. The island is waiting.

Frequently Asked Questions (FAQs)

Q: Is Island Peak a “walk-up”?
A:
Absolutely not. While it is considered a trekking peak, it involves steep ice climbing (using ropes and jumars), glacier travel, and serious exposure. It is a mountaineering expedition .

Q: Do I need prior climbing experience?
A:
While some do it as their first climb, it is highly recommended to have experience with basic cramponing and altitude. At a minimum, you should be extremely fit and attend the guide’s training sessions with focus .

Q: What if I get altitude sickness?
A:
Your guides are trained to spot symptoms. The only treatment for severe AMS is immediate descent to a lower altitude. Always be honest with your guide about how you are feeling .

Q: Can I rent gear in Nepal?
A:
Yes. You can rent almost everything in Kathmandu (boots, down suit, sleeping bag, crampons). The quality varies, so rent from a reputable shop. It is a great way to save money and luggage space .

Q: How heavy is my pack?
A:
Porters will carry your main duffel (up to 12-15kg) during the trek. You will carry a daypack (30-40L) containing your water, snacks, camera, and extra layers. On summit day, your daypack will be light but vital. Have a safe journey make fun!

Gosaikunda Lake:A Holy Journey to Lord Shiva’s Home in the Sky

Have you ever dreamed of visiting a place that feels like it’s floating in the clouds? A place where the water is so blue it looks like someone poured the sky into a giant bowl, and the mountains stand like ancient guards watching over everything?

Welcome to Gosaikunda Lake.

Tucked away high up in the mountains of Nepal, at a place called 4,380 meters above sea level, lies this magical lake. To get there, you have to walk for days. It’s cold. It’s tough. Your legs will ache and you’ll struggle to breathe because the air is so thin. But when you finally stand there, looking at those sacred waters, you’ll understand why people have been making this journey for thousands of years.

This is not just a lake. It’s a story. It’s a prayer. It’s an adventure. And today, I’m going to tell you everything about it.

The Story Behind the Lake

Let me take you back a really long time ago. We’re talking about the beginning of everything, according to Hindu stories.

Once upon a time, the gods (we call them Devas) and the demons (Asuras) decided to work together. Yes, you heard that right. The good guys and the bad guys joined hands because they wanted something special. They wanted to churn the great cosmic ocean to get a magic drink called Amrit. If you drank this Amrit, you would live forever.

So they started churning. They used a huge mountain as their stick and a giant snake as their rope. They pulled and pulled, and the ocean began to swirl. Many wonderful things came out of the ocean. But then, something terrible happened.

A dark, poisonous cloud rose from the depths. It was called Halahala. This was no ordinary poison. It was so powerful, so deadly, that just breathing near it could destroy the entire world. The gods and demons panicked. They ran away, screaming for help. The heat from the poison was burning everything.

Who could possibly save them? There was only one person powerful enough. Lord Shiva.

Shiva, the great god who sits in meditation high in the Himalayas, saw the suffering. He saw that all of creation was about to end. Without thinking twice, he stepped forward. He opened his mouth and swallowed the poison.

But he didn’t swallow it all the way. He held it in his throat. Why? Because he wanted to save the world but also protect his own body. The poison was so strong that it turned his neck blue. That’s why he is also called Neelkantha, which means “the one with the blue throat.”

Can you imagine the burning sensation? Having poison stuck in your throat? Shiva was in agony. The heat was unbearable. He needed relief. He needed cold. So he came up to the mountains, to a place he loved, and struck the ground with his mighty trident, his Trishul.

Where the trident hit the earth, water gushed out. It was cool, clean, and pure. It filled the hole and became a lake. Shiva drank the water and bathed in it, and finally, the burning stopped. That lake was Gosaikunda.

Isn’t that a beautiful story? Every time I think about it, I imagine Shiva standing there, tired but relieved, surrounded by snow and silence. And that’s why people come here. To bathe in the same water that cooled Lord Shiva’s throat. To wash away their own pains. To feel close to something divine.

A Special Place for Special People

Gosaikunda is not just for Hindus. Yes, it’s a very important place for them, especially for those who worship Shiva. But people from other religions, especially Buddhists, also respect this place deeply. The mountains around here are home to many Buddhist communities, and you’ll see prayer flags fluttering in the wind, sending good wishes across the land.

The lake is surrounded by other smaller lakes. In fact, there are said to be 108 lakes in this area. That number, 108, is very special. In Hinduism and Buddhism, it represents the universe, the wholeness of everything. Each lake has a name. There’s Saraswati Kunda for the goddess of knowledge. There’s Bhairav Kunda for the fierce form of Shiva. It’s like a family of lakes, each with its own personality and power.

If you visit during the full moon in August, you will see something amazing. That day is called Janai Purnima, or the festival of the sacred thread. Thousands and thousands of people walk up here. Old people, young children, everyone. They come to take a holy dip in the lake. They believe that bathing here washes away all their sins and blesses them with good health and happiness.

The scene is unbelievable. The usually quiet lake becomes a sea of people. You hear chanting, ringing bells, and prayers. Pilgrims offer coins, flowers, and food to the gods. They tie sacred threads around their wrists. The energy is electric, even though you’re so high up in the cold mountains. It’s a feeling you’ll never forget.

Why You Should Go There (Even If You’re Not Religious)

Okay, so maybe you’re not into mythology. Maybe you don’t believe in gods and goddesses. That’s fine. Gosaikunda has something for you too.

This place is a trekker’s dream. Imagine walking through forests of rhododendron, Nepal’s national flower. In spring, these trees explode with red and pink flowers. It’s like walking through a painting. You’ll cross streams gushing with icy water. You’ll climb stone steps carved into the hillsides by people long ago. You’ll pass through villages where life is simple and people smile at you even though they have very little.

Every step you take brings you higher. The air gets thinner. Your breath gets heavier. But the views get better. You see snow-capped peaks appearing on the horizon. You see yaks grazing on tough grass. You hear the wind whistling through the prayer flags.

And then, after days of walking, you finally reach the top. You see the lake.

It’s so blue. Not the blue of a swimming pool. It’s a deep, rich, almost unreal blue. Surrounded by brown and grey mountains, with patches of snow, the lake sits there like a precious jewel. The water is so cold it will numb your fingers instantly. But you don’t care. You just sit there and stare.

That feeling, my friend, is worth every step of the journey. It’s peace. It’s accomplishment. It’s awe. It’s realizing how small you are, but also how amazing it is to be alive.

How to Get There: The Road to Heaven

So, you’re convinced. You want to go. Let’s talk about how to actually do it.

First, you have to get to Nepal. You’ll probably fly into Kathmandu, the capital city. Kathmandu is a crazy, busy, colorful place. Spend a day or two there. Visit the temples. Eat the food. Get ready for your adventure.

From Kathmandu, you need to get to a town called Dhunche. It’s about a 7-8 hour drive. The road is bumpy. It winds through mountains and along rivers. You’ll be tired when you get there. But that’s where your trek begins.

There are two main ways to do the Gosaikunda trek.

The Short and Sweet Way

If you don’t have much time, you can do a shorter trek. You start in Dhunche and walk to a place called Chandanbari. Then you go to a beautiful lake called Bhairav Kunda. From there, you climb up to Lauribina Pass and then down to Gosaikunda. After visiting the lake, you can return the same way. This takes about 5 to 7 days.

The Long and Beautiful Way

If you have more time and you want to see more, take the longer route. This one goes through the famous Langtang Valley. The Langtang Valley is called the “Valley of Glaciers.” It’s stunning. You walk through dense forests, cross rivers on suspension bridges, and stay in small teahouses run by friendly local families.

You go from Dhunche to Syabrubesi, then to Lama Hotel, then to Langtang village, then to Kyanjin Gompa. From there, you cross a high pass called Lauribina La to reach Gosaikunda. This route takes about 10 to 14 days. It’s harder, but the views are even more incredible.

What’s a Teahouse?

You might be wondering, “Where do I sleep?” Don’t worry, you don’t need to carry a tent. Along the trekking routes in Nepal, there are small lodges called teahouses. They are simple. You get a small room with a bed and a blanket. Sometimes the walls are just plywood. The toilet might be outside. But they are warm, safe, and the food is good.

You’ll eat dal bhat (rice and lentil soup) mostly. It’s the perfect food for trekkers. It gives you energy and keeps you warm. You’ll also find noodles, soup, and tea. Lots and lots of tea. Ginger tea, milk tea, black tea. It’s the best thing after a long day of walking.

When to Go: Picking the Right Time

The mountains have seasons, and you need to pick the right one.

The Best Time: Autumn (September to November)

This is the perfect time. After the summer rains, the air is clear and clean. The skies are blue. You can see the mountains so clearly they look like you can touch them. The weather is not too hot and not too cold. During the day, you might even walk in just a t-shirt. At night, it gets cold, but that’s okay. This is when most people go.

The Second Best Time: Spring (March to May)

Spring is also wonderful. The weather is getting warmer. The best part is the flowers. The rhododendons bloom, and the hillsides turn red and pink. It’s beautiful. Sometimes in spring, there can be hazy skies, but it’s still a great time to trek.

The Time to Avoid: Winter (December to February)

Winter is cold. Really cold. At Gosaikunda, the temperature drops way below freezing. The lake might even freeze over. Snow blocks the trails. It’s dangerous for normal trekkers. Only go in winter if you are very experienced and have proper gear. And even then, be careful.

The Time to Really Avoid: Monsoon (June to August)

This is the rainy season. It rains almost every day. The trails become slippery mud. Leeches come out and suck your blood (yuck!). Landslides can block the paths. The views are cloudy. Plus, it’s the hottest time of year, so you sweat in the rain. Not fun. Don’t go in monsoon unless you really love a challenge.

What You Need to Take: Packing Smart

You don’t need to carry your whole house. But you need the right things. Let’s make a simple list.

Clothes

  • Base Layer: This is the layer that touches your skin. Get thermal tops and bottoms. They keep you warm and dry.
  • Mid Layer: This is for insulation. A fleece jacket or a light down jacket is perfect.
  • Outer Layer: This is your shield. You need a waterproof and windproof jacket. It might snow or rain anytime.
  • Trekking Pants: Comfortable pants that dry quickly. Don’t wear jeans. If jeans get wet, they are heavy and cold and take forever to dry.
  • Warm Hat and Gloves: Your head and hands get cold first. Pack a woolen hat and warm gloves. Bring an extra pair of gloves in case one gets wet.
  • Socks: Bring at least 3 or 4 pairs of good, thick trekking socks. Keep your feet happy.

Gear

  • Good Hiking Boots: This is the most important thing. Your boots should be waterproof and comfortable. Break them in before you go. Don’t wear new boots on the trek.
  • Backpack: A comfortable backpack that fits you well. Around 40-50 liters is enough.
  • Sleeping Bag: Teahouses give you blankets, but they can be old and thin. Bring your own sleeping bag. Make sure it’s rated for cold temperatures (at least -10°C or lower).
  • Water Bottle: Bring a thermos or a metal bottle. You can fill it with hot water at night to keep you warm in your sleeping bag.
  • Headlamp: With fresh batteries. The teahouses can be dark at night.

Other Important Stuff

  • Sunscreen and Sunglasses: The sun at high altitude is very strong. It can burn your skin and hurt your eyes, especially when it reflects off snow.
  • Lip Balm: Your lips will get dry and crack. Bring lip balm with SPF.
  • First Aid Kit: Bring basic medicines. Painkillers, bandages, antiseptic cream, and most importantly, medicine for upset stomach. Also bring Diamox. This helps with altitude sickness. Talk to a doctor before you go.
  • Toilet Paper and Wet Wipes: Teahouses might not have these. Always carry your own.
  • Power Bank: Electricity is limited in the mountains. You might only get a few hours to charge your phone, and it might cost money. Bring a fully charged power bank.
  • Trekking Poles: These are a lifesaver. They help your knees on the downhill and give you balance on rough trails.

The Danger You Must Respect: Altitude Sickness

This is the most serious part of the trek. Gosaikunda is very high. At 4,380 meters, the air has much less oxygen than what you’re used to. Your body needs time to adjust. If you go up too fast, you can get altitude sickness.

What Does It Feel Like?

At first, you might just have a headache. You might feel tired, dizzy, or sick to your stomach. You might not want to eat. This is mild altitude sickness. It’s common. The cure is to rest, drink lots of water, and not go higher until you feel better.

The Dangerous Kind

If you ignore the mild symptoms and keep climbing, you can get very sick. This is serious. You might have a really bad headache that won’t go away. You might vomit. You might feel confused or unable to walk straight. You might have trouble breathing, even when you’re resting.

This is a medical emergency. There is only one cure. You must go down immediately. Go to a lower altitude as fast as you can. Do not wait. Do not hope it will get better. Going down saves lives.

How to Avoid It

  • Go Slowly: This is the golden rule. Don’t rush. Walk slowly. Take breaks. Enjoy the views. Let your body get used to the height.
  • Drink Water: Drink lots and lots of water. Staying hydrated helps.
  • Don’t Climb Too High Too Fast: A good rule is to not sleep more than 300-500 meters higher than where you slept the night before.
  • Listen to Your Body: If you feel bad, tell someone. Rest for a day. If you don’t feel better, go down. There is no shame in turning back. The mountain will still be there another time.

Permits and Paperwork

You can’t just walk into the mountains. You need permission. It’s easy to get, but you must have it. There are two main permits.

  1. Langtang National Park Entry Permit: Gosaikunda is inside Langtang National Park. You need this permit to enter. You can get it at the Nepal Tourism Board office in Kathmandu or at the park entrance in Dhunche. It costs about 3,000 Nepali Rupees (around 25 US dollars).
  2. TIMS Card (Trekkers’ Information Management System): This is like a registration card for trekkers. It helps keep you safe. If there’s an emergency, they know where you are. You can get this in Kathmandu through a trekking agency or at the Nepal Tourism Board. It costs about 2,000 Rupees (around 17 US dollars) for individual trekkers.

Keep these permits safe. You will be checked at several points along the trail.

The People You’ll Meet

One of the best parts of trekking in Nepal is the people. The trails are full of wonderful humans.

First, there are the locals. The people who live in these mountains are mostly from the Tamang and Sherpa communities. They are some of the kindest people on earth. They run the teahouses. They cook your food. They smile at you even when they are working hard. Many of them are Buddhists, and you’ll see their monasteries and prayer wheels along the way.

Then, there are the other trekkers. You’ll meet people from all over the world. Germany, Australia, Japan, America, everywhere. You’ll share stories over dinner. You’ll cheer each other on. You might make friends for life.

And of course, there are the guides and porters. Many trekkers hire them. A guide knows the trails, the weather, and the culture. They keep you safe and teach you things. A porter carries your heavy bag. These are strong, amazing people who make a living helping others see their beautiful homeland. If you hire a porter, treat them with respect. Pay them fairly. Give them food and a place to sleep.

Reaching the Top: The Big Moment

After days of walking, you finally reach Lauribina Pass. This is the last big climb before the lake. It’s steep and tiring. Your heart pounds in your chest. Every step is hard. You stop to catch your breath every few minutes.

Then, you make it over the pass. And there it is.

Gosaikunda.

It’s bigger than you imagined. The water is so clear and so blue. The mountains rise up on all sides, some with snow on their peaks. It’s quiet. So quiet you can hear the wind and the sound of prayer flags flapping. The air is cold and thin and clean.

You walk down to the shore. There’s a small temple there. Pilgrims are praying. Bells are ringing. You dip your hand in the water. It’s freezing, so cold it hurts, but you don’t pull away. You feel something. Peace, maybe. Or awe. Or just the simple joy of being alive in such a beautiful place.

You stand there for a long time, just looking. You think about the story of Shiva and the poison. You think about all the people who walked this same path for thousands of years. You think about how far you’ve come.

It’s a moment you will remember forever.

Coming Back Down

What goes up must come down. The return trek is faster, but in some ways, it’s harder on your body. Your knees take a beating on the downhill. But it’s also a time to look back at what you’ve done. You pass the same villages and teahouses, but now you’re a different person. Stronger. More peaceful.

When you finally get back to Dhunche and climb into a jeep for the bumpy ride back to Kathmandu, you’ll feel strange. The noise of the city will shock you. The crowds will feel overwhelming. You’ll miss the mountains. You’ll miss the quiet. You’ll miss the simple life of walking, eating, and sleeping.

This is normal. The mountains change you. They get inside you. And soon, you’ll start dreaming of going back.

A Few Last Tips

Before you go, here are some small things to remember.

  • Bring Cash. There are no banks or ATMs in the mountains. You need cash to pay for your food, your room, and anything else you buy. Bring enough Nepali Rupees.
  • Charge Your Phone. Teahouses often charge money for electricity. It might be a few hundred rupees per hour. Bring your power bank.
  • Be Respectful. This is a holy place for many people. Dress modestly, especially near the lake. Don’t litter. Don’t pollute the water. Take your trash with you.
  • Buy a Local SIM Card. You can get a Nepali SIM card in Kathmandu. In some higher places, you might not have signal, but in many villages along the trail, you will.
  • Get Travel Insurance. This is very important. Make sure your insurance covers high-altitude trekking (up to 5,000 meters) and emergency helicopter evacuation. If something goes wrong, a helicopter rescue costs thousands of dollars. Insurance will save you.

Conclusion: The Lake That Calls You Back

Gosaikunda is more than a destination. It’s a journey of the body, mind, and spirit. Whether you go for the legend of Shiva, the challenge of the trek, or just the beauty of the mountains, you will find something there that speaks to you.

You will find hardship. You will find cold and tiredness and doubt. But you will also find warmth, kindness, and breathtaking beauty. You will find peace.

So pack your bags. Lace up your boots. Take a deep breath. And go. The mountains are waiting. Lord Shiva’s sacred lake is waiting. And the adventure of a lifetime begins with a single step.

Happy trekking, friend. See you on the trail. Have a wonderful Journey.

My Solo Annapurna Circuit Trek: 230km of Himalayas, Hot Springs, and High Passes

The Annapurna Circuit, often hailed as one of the world’s greatest long-distance treks, is a journey of breathtaking diversity and profound challenge. This classic route in the Nepalese Himalayas takes you on a 160-230 km loop around the majestic Annapurna Massif, leading you through verdant subtropical forests, traditional Gurung and Manangi villages, high-altitude deserts, and finally to the dizzying heights of the Thorong La Pass (5,416m) .

This comprehensive guide is designed to provide you with all the essential information for planning your adventure, covering everything from permits and itineraries to detailed packing lists and critical safety advice.

Trip Overview and Statistics

Before lacing up your boots, it’s crucial to understand the scale of the trek. The Annapurna Circuit is not just a walk in the hills; it’s a strenuous expedition that requires respect and preparation.

Feature Details

  • Location Annapurna Region, central Nepal
  • Total Length 160-230 km (100-145 miles), depending on route and transport use .
  • Maximum Altitude Thorong La Pass at 5,416 m (17,769 ft) .
  • Duration Typically 12-20 days .
  • Difficulty Challenging due to high altitude, long days, and remote terrain.
  • Accommodation Teahouses (simple lodges) .
  • Best Seasons Spring (March-May) and Autumn (October-November) .

The route encircles the Annapurna Massif, providing close-up views of some of the world’s highest and most spectacular peaks, including Annapurna I (8,091m), Dhaulagiri (8,167m), Machhapuchhre (6,993m), and Manaslu (8,163m) . The journey is a feast for the senses, offering a unique blend of natural beauty and cultural richness.

Best Time to Trek the Annapurna Circuit

Choosing the right time to trek is paramount for a safe and enjoyable experience. The weather in the Himalayas is seasonal and dictates trail conditions.

Autumn (September – November): This is the most popular and highly recommended season. The weather is stable with clear, blue skies offering unrivaled mountain views. The days are warm at lower elevations, but nights are cold. This is the peak season, so teahouses are busier, and booking ahead is wise .

Spring (March – May): The second-best time to trek. The weather is warmer, and the lower trails burst into color with blooming rhododendrons. However, haze can sometimes obscure the long-distance views, and there’s a chance of afternoon rain .

Winter (December – February): This is a challenging time for experienced trekkers only. The trail is covered in deep snow, and the Thorong La Pass is frequently closed due to avalanche risk and extreme cold, with temperatures dropping as low as -20°C .

Monsoon (June – September): Generally not recommended. While the northern part of the circuit lies in a rain shadow, the trekking trails can be wet, slippery, and leech-infested. Landslides are a common risk, and mountain views are often obscured by clouds .

Detailed Day-by-Day Itinerary (10-14 Days)

The classic Annapurna Circuit is walked counter-clockwise. This direction is safer and more sensible as it allows for a more gradual ascent, giving your body time to acclimatize to the altitude before tackling the Thorong La .

Here is a standard 14-day itinerary, which includes the popular side trip to the stunning Tilicho Lake.

Day Route Altitude Trekking Hours Highlights & Notes

  • Day 01 Drive from Kathmandu (1,400m) to Besisahar (760m) 760m 7 hrs drive Scenic drive along the Trishuli and Marsyangdi rivers .
  • Day 02 Drive from Besisahar to Chame (2,650m) 2,650m 5-6 hrs drive A bumpy but beautiful 4WD journey into the mountains. First views of Annapurna II .
  • Day 03 Trek from Chame to Upper Pisang (3,300m) 3,300m 5-6 hrs Trek through pine forests, cross suspension bridges, and see the massive Paungda Danda rock face .
  • Day 04 Trek from Upper Pisang to Manang (3,540m) 3,540m 5-6 hrs Stunning high route via Ghyaru and Ngawal villages with breathtaking views of the Annapurna range. Visit the Ngawal Monastery .
  • Day 05 Acclimatization Day in Manang 3,540m 3-4 hrs Crucial for safety. A short hike to Gangapurna Lake or the Manang Viewpoint (following ‘climb high, sleep low’) .
  • Day 06 Trek from Manang to Tilicho Base Camp (4,150m) 4,150m 5-6 hrs Leave the main circuit for the dramatic Tilicho Valley .
  • Day 07 Trek from Tilicho BC to Tilicho Lake (4,920m) and back to Kharka 4,150m (sleep) 7-8 hrs A challenging day to the world’s highest lake. The views of Tilicho Peak are unforgettable. Descend to sleep lower .
  • Day 08 Trek from Kharka to Yak Kharka (4,110m) 4,110m 4-5 hrs Rejoin the main circuit and continue up the valley. Look out for blue sheep .
  • Day 09 Trek from Yak Kharka to Thorong High Camp (4,900m) 4,900m 4-5 hrs A short but steep climb to the final stop before the pass. The air is thin here .
  • Day 10 Trek from High Camp to Muktinath (3,800m) via Thorong La Pass (5,416m) 5,416m (max) 8-10 hrs The biggest day. An early start for a strenuous climb to the pass. Celebrate at the top before a long descent to the holy temple of Muktinath .
  • Day 11 Drive from Muktinath to Jomsom (2,750m) and fly/Drive to Pokhara 2,750m 20 min flight / 5-9 hrs drive A scenic flight or a long jeep ride through the dramatic Kali Gandaki Gorge back to the lakeside city of Pokhara.
  • Day 12 Free day in Pokhara 850m – Rest, explore Lakeside, or go paragliding. A well-deserved break .
  • Day 13 Drive or fly from Pokhara to Kathmandu 1,400m 7 hrs drive / 25 min flight Return to the bustling capital .
  • Day 14 Final Departure – – Transfer to the airport for your flight home .

Note: This is a suggested itinerary. Treks can be shorter (e.g., 10-12 days by skipping Tilicho Lake and using more jeep transport) or longer for a more relaxed pace .

Permits and Essential Paperwork

You cannot trek the Annapurna Circuit without the correct permits. These are checked at several points along the trail.

Annapurna Conservation Area Permit (ACAP): This is required for entering the Annapurna region. You can obtain it in Kathmandu or Pokhara, and at some entry points like Besisahar and Chame .

Trekkers’ Information Management System (TIMS) Card: This is a registration card aimed at trekker safety and managing trekking traffic.

To obtain these permits, you will typically need:

  • Your passport.
  • Two or more passport-sized photos .
  • The necessary fees (approximately 5000 NPR, but it’s best to bring extra cash) .

The Ultimate Annapurna Circuit Packing List

Packing smart is essential. You need to be prepared for everything from warm valley floors to freezing, windy passes, but your pack must remain light enough to carry comfortably. The golden rule is to pack layers.

Clothing: The Layering System

  • Base Layers (Moisture-Wicking):
  • 2-3 sets of thermal tops and bottoms (merino wool or synthetic). Avoid cotton .

Insulating Layers (Mid-Layers):

  • A fleece jacket for moderate warmth.
  • A lightweight, packable down jacket for evenings and high altitudes. This is non-negotiable .

Outer Layer (Shell):

  • A waterproof and windproof shell jacket with a hood (Gore-Tex or similar).
  • Waterproof trekking pants .
  • Trekking Apparel:
  • 2-3 lightweight, breathable trekking shirts (long-sleeved for sun protection).
  • 1-2 pairs of lightweight, quick-dry trekking pants (zip-offs are a popular choice) .

Footwear

  • Trekking Boots: Sturdy, waterproof boots with good ankle support. Crucially, they must be well broken-in before you arrive in Nepal to avoid blisters .
  • Camp Shoes / Sandals: A lightweight pair of sneakers or sandals to give your feet a rest in the teahouses .
  • Socks: 4-5 pairs of wool or synthetic trekking socks. Avoid cotton .

Essential Gear

  • Backpack: A 50-65 liter backpack if you are carrying your own gear. If you hire a porter, a 20-30 liter daypack is sufficient for daily essentials .
  • Sleeping Bag: A must. Teahouse blankets are often insufficient. A bag rated to -10°C to -15°C is recommended for autumn and spring. For winter, you’ll need a -20°C bag .
  • Trekking Poles: Invaluable for reducing stress on your knees during long descents and providing balance on rocky trails .
  • Headlamp: Essential for early morning starts to catch the sunrise at the pass and for navigating dark teahouses. Bring spare batteries .
  • Water Bottles/Bladder: Carry at least 2-3 liters of capacity. A hydration bladder is very convenient for drinking on the move .
  • Water Purification: Iodine tablets, a filter, or a Steripen. Do not drink untreated water .
  • Power Bank: Charging facilities in teahouses are available but often cost money and can be unreliable .

Health, Hygiene, and First Aid

  • Sun Protection: High-altitude sun is intense. Bring sunglasses (with high UV protection), a sun hat, and SPF 30+ lip balm and sunscreen .
  • Toiletries: Quick-dry towel, biodegradable soap, wet wipes, hand sanitizer, and toilet paper .
  • Personal First Aid Kit: Include blister care (Compeed, mole skin), pain killers (like Ibuprofen), Imodium for stomach upsets, and any personal prescription medications .
  • Altitude Sickness Medication: Consult your doctor about Diamox (Acetazolamide) , which can help prevent and lessen the symptoms of AMS .

Documents and Miscellaneous

  • Passport and Permits: Keep them safe and dry in a waterproof bag .
  • Travel Insurance Documents: Your insurance must cover high-altitude trekking (up to 5,500m) and emergency helicopter evacuation. This is not optional .
  • Cash (Nepalese Rupees): ATMs are non-existent on the trail. You need cash to pay for accommodation, food, and any incidentals .
  • Snacks: Energy bars, nuts, and chocolate to keep you going between meals .

Accommodation and Food on the Trail

The Annapurna Circuit is a “teahouse trek,” meaning you don’t need to carry a tent or cooking gear.

Teahouses: These are basic but comfortable lodges found in every village. They provide a bed (often just a mattress), a communal dining room with a stove for heat, and shared squat toilets. Rooms are basic and unheated. In busy seasons, it’s wise to arrive early to secure a spot .

The Teahouse System: There is an unwritten rule that trekkers are expected to eat their meals at the teahouse where they stay. In return, the room is often provided for free or at a very nominal cost .

Food: The food is plentiful and hearty, designed to fuel trekkers. The menu is extensive but repetitive, mostly centered on Nepali and Tibetan dishes.

Staples: Dal Bhat (lentil soup, rice, and vegetables) is the king of trekking food. It’s nutritious, filling, and often unlimited seconds are available.

Other Options: Noodle soups, fried rice, momos (dumplings), pasta, pizza, porridge, pancakes, and bread.

Drinks: Tea (milk tea, ginger tea), coffee, hot lemon, and hot chocolate are available. Soft drinks and beer are also sold but become progressively more expensive as you gain altitude.

Health, Safety, and Responsible Trekking

Your safety in the mountains is your own responsibility. Being informed and cautious is key.

  • Acute Mountain Sickness (AMS): This is a serious risk on the Annapurna Circuit due to the high altitude of the Thorong La. Symptoms include headache, nausea, dizziness, and loss of appetite.
  • Prevention: The only cure for AMS is descent. To prevent it, ascend slowly, include acclimatization days (like Day 5 in Manang), stay hydrated, and avoid alcohol .
  • Action: If symptoms are severe or worsen, you must descend immediately. Do not ascend further.
  • Weather and Trail Conditions: Himalayan weather is unpredictable. Be prepared for sudden changes, including snow and high winds, even in peak season. The trail can be affected by landslides. Listen to local advice and your guide .
  • Guides and Porters: While the trail is well-marked, hiring a guide can enrich your experience with local knowledge and ensure your safety. Hiring a porter not only lightens your load but also directly supports the local economy. If you hire a porter, remember they are a fellow human being—treat them with respect, ensure they have proper gear, and pay them a fair wage .
  • Travel Insurance: We cannot stress this enough. Your insurance policy must cover trekking up to 5,500-6,000 meters and helicopter rescue. Keep a copy of your policy details with you .

Responsible Trekking: The mountains are a fragile environment.

Leave No Trace: Pack out all your non-biodegradable trash. Use biodegradable soaps.

Conserve Resources: Hot water for showers often comes from firewood. Be mindful of your usage. Electricity for charging may come from solar power, which is limited .

Respect Local Culture: Dress modestly, especially when visiting monasteries. Always ask for permission before taking photos of people. Learn a few words of Nepali, like “Namaste” (hello) and “Dhanyabad” (thank you).

Highlights and Side Treks

The main circuit is just the beginning. Several side treks offer even more adventure.

Tilicho Lake: At 4,919 meters, this is one of the highest lakes in the world. The side trip adds 2-3 days to your itinerary but rewards you with a surreal landscape of towering peaks reflected in the deep blue water.

Ice Lake: A challenging day hike from Manang to a stunning frozen lake at 4,600m, offering fantastic panoramic views as an acclimatization exercise.

Muktinath Temple: A sacred site for both Hindus and Buddhists, this temple of eternal flame and 108 water spouts is a culturally fascinating place to explore after your pass crossing .

The Annapurna Circuit is more than just a trek; it is a life-changing journey through some of the most spectacular landscapes on Earth. With careful preparation, the right gear, and a spirit of adventure, it is an achievable dream for any determined trekker. So, start planning, pack your bags, and get ready for the adventure of a lifetime in the heart of the Nepalese Himalayas.

Ama Dablam Expedition: Complete Guide with ART Nepal Treks & Expedition

Everything You Need to Know About Climbing the Mother’s Necklace

Introduction

Ama Dablam is one of the most beautiful mountains in the world. Located in the Everest region of Nepal, it stands at 6,812 meters (22,349 feet) high. Local people call it “Mother’s Necklace” because the hanging glacier on its side looks like a traditional pendant.

This guide covers everything about climbing Ama Dablam – from start to finish, day by day. It includes information about equipment, costs, difficulty, weather, and why people attempt this mountain. Whether you are planning to climb or just curious, this guide will help you understand what an Ama Dablam expedition involves.

PART 1: Understanding Ama Dablam

What Does the Name Mean?

In the Sherpa language, “Ama” means mother and “Dablam” means the traditional pendant necklace that mothers wear. The hanging glacier on the mountain’s southwest face looks like this pendant. So the name means “Mother’s Necklace.”

Where Is It Located?

Ama Dablam is in the Khumbu region of Nepal, part of the Himalayan mountain range. It sits right next to the trail to Mount Everest Base Camp. From its summit, you can see Everest, Lhotse, Makalu, and many other famous peaks.

Why Is It Famous?

Climbers call Ama Dablam “The Matterhorn of the Himalayas” because of its beautiful shape. It has steep ridges, a sharp summit, and that distinctive hanging glacier. Many people consider it one of the most beautiful mountains in the world.

First Ascent

The first successful climb of Ama Dablam was in 1961 by a team from New Zealand and the United States. Since then, thousands of climbers have attempted it. The standard route today is the Southwest Ridge, the same route used in the first ascent.


PART 2: Why Do People Climb Ama Dablam?

People have many reasons for wanting to climb this mountain. Here are the most common ones.

The Beauty

The mountain is stunning to look at. Many climbers say they first saw Ama Dablam while trekking to Everest Base Camp and knew they had to come back to climb it. The shape is perfect, the setting is dramatic, and the views from the top are incredible.

The Challenge

Ama Dablam is a real mountain climb. It requires technical skills – using crampons on ice, climbing on fixed ropes, and moving safely on steep terrain. It’s harder than trekking peaks but not as extreme as the highest Himalayan climbs. For many climbers, it’s the perfect step up to bigger mountains.

The Altitude Experience

At 6,812 meters, climbers experience serious altitude. The body has to work hard with less oxygen. This prepares people for even higher climbs like Everest or Lhotse. Many use Ama Dablam as training for 8,000-meter peaks.

The Adventure

The whole experience is an adventure – flying into Lukla, trekking through Sherpa villages, living at base camp, and climbing a beautiful mountain. Every day brings something new.

The Achievement

Standing on any mountain summit feels good. Standing on a mountain as beautiful and challenging as Ama Dablam feels even better. It’s something most people will never do, and climbers take pride in that achievement.

PART 3: How Difficult Is Ama Dablam?

Technical Difficulty

On a scale of Himalayan climbing, Ama Dablam is considered moderately difficult. Here’s what climbers face:

Rock Climbing: There are sections of rock climbing, especially the Yellow Tower near the summit. This requires using hands and feet to pull up over rocks. The climbing is not extremely hard (rated around 5.7 in climbing grades), but doing it at 6,300 meters with a heavy pack makes it much harder.

Ice Climbing: Between Camp 1 and Camp 2, there is steep ice climbing. Climbers use crampons to kick into the ice and ice axes for balance and pulling. The ice can be hard and requires good technique.

Fixed Ropes: Most of the route above base camp has fixed ropes. Climbers attach themselves to these ropes using devices called ascenders (for going up) and descenders (for going down). This makes the climb safer but still requires effort to pull yourself up.

Exposure: Many parts of the route have big drops. Looking down, you see a long way. This can be scary for people afraid of heights. Climbers must stay calm and focused.

Physical Difficulty

Climbing Ama Dablam requires good physical fitness. Here’s what the body goes through:

Long Days: Summit day can be 10-12 hours of continuous climbing. This requires endurance.

Heavy Pack: Climbers carry packs with water, food, extra clothes, and climbing gear. The pack weighs 10-15 kg.

Altitude: At 6,800 meters, there is half the oxygen compared to sea level. Every movement takes more effort. Breathing is hard. Sleep is poor. Appetite disappears.

Cold: Temperatures can drop to -30°C at night. The body burns energy just staying warm.

Mental Difficulty

The mental challenge is as big as the physical one. Climbers face:

Fear: The exposure, the risk, the unknown – all create fear. Climbers must manage this fear and keep moving.

Discomfort: Being cold, tired, hungry, and scared for days is uncomfortable. Climbers must accept this discomfort.

Decision Making: At high altitude, thinking becomes hard. But climbers must make good decisions – when to go up, when to rest, when to turn around.

Patience: The expedition takes three weeks. Climbers must be patient with the process, with the weather, with their bodies.

Who Can Climb Ama Dablam?

A person with good fitness, some climbing experience, and strong mental preparation can climb Ama Dablam. Most climbers are:

  • Age 25 to 60
  • In good physical shape
  • Comfortable on steep terrain
  • Able to handle cold and discomfort
  • Willing to follow guides’ instructions

Previous climbing experience is helpful but not always required if you join a guided expedition that provides training.


PART 4: Equipment Needed

Proper equipment is essential for safety and comfort. Here is a complete list of what climbers need.

Footwear

  • Climbing Boots: Insulated plastic boots or double boots rated for cold temperatures. Boots must be compatible with crampons. Popular brands include La Sportiva, Scarpa, and Millet.
  • Camp Boots: Lightweight insulated boots for walking around base camp. Some climbers use down booties inside the tent.
  • Trekking Shoes: Light shoes for the trek to base camp.

Climbing Gear

  • Crampons: Steel spikes that attach to boots for walking on ice. They must fit your boots properly.
  • Ice Axe: One technical ice axe for steep climbing. Some climbers bring two.
  • Climbing Harness: A comfortable harness that fits over all clothing layers.
  • Helmet: Protects from falling rocks. Essential on Ama Dablam.
  • Ascender (Jumar): A device that slides up the fixed rope but locks if you fall.
  • Descender (ATC or Figure 8): For controlling speed when going down ropes.
  • Carabiners: 5-6 locking carabiners and several non-locking ones.
  • Sling and Cord: For tying into anchors.
  • Prusik Loops: For emergency rope ascending.

Clothing (Layering System)

  • Base Layer: Merino wool or synthetic long underwear top and bottom. Wicks sweat away from skin.
  • Mid Layer: Fleece jacket and pants for insulation.
  • Insulation Layer: Down jacket and pants for extreme cold. Used at high camps and on summit day.
  • Outer Layer: Waterproof and windproof shell jacket and pants. Protects from wind and snow.

Gloves:

  • Thin liner gloves for dexterity
  • Medium insulated gloves for general climbing
  • Thick expedition mittens for extreme cold and summit

Headwear:

  • Warm hat (wool or fleece)
  • Balaclava or face mask
  • Neck gaiter

Sleeping Gear

  • Sleeping Bag: Rated to at least -20°C, but -30°C is better. Down is warmer and lighter than synthetic.
  • Sleeping Pad: Insulated air pad. Regular foam pads are not warm enough at high camps.
  • Pillow: Small inflatable or stuff sack with clothes.

Camp and Cooking Gear

  • Headlamp: With extra batteries. Essential for summit day start.
  • Water Bottles: Insulated wide-mouth bottles so water doesn’t freeze. Two 1-liter bottles minimum.
  • Thermos: For hot drinks at camp.
  • Pee Bottle: Wide-mouth bottle for nighttime use. Essential at high camps where going outside is dangerous.
  • Spoon/Bowl: For eating at base camp.
  • Water Treatment: Tablets or filter for treating water.

Personal Items

  • Sunglasses: 100% UV protection with side shields. Essential for snow blindness prevention.
  • Goggles: For bad weather and summit day.
  • Sunscreen: High SPF, water resistant.
  • Lip Balm: With SPF.

First Aid Kit: Including:

  • Personal medications
  • Pain killers
  • Blister treatment
  • Altitude sickness medication (Diamox)
  • Antibiotics
  • Anti-diarrhea medication

Toiletries: Toothbrush, toothpaste, wet wipes, hand sanitizer, small towel.

Camera: For recording the experience.

Power Bank: For charging devices. No electricity on the mountain.

Books/Kindle: For rest days.

Documents

  • Passport (valid 6+ months)
  • Nepal visa (can get on arrival)
  • Travel insurance certificate
  • Flight tickets
  • Emergency contact information

Group Equipment (Provided by Expedition Company)

  • Tents at base camp and high camps
  • Kitchen tent and dining tent at base camp
  • Cooking equipment and fuel
  • Fixed ropes on the mountain
  • Communication devices (satellite phone, radio)
  • Medical oxygen and mask (for emergencies)
  • First aid kit and stretcher

Equipment Cost

Buying all personal equipment new costs approximately $4,000 to $6,000. Many climbers already own some items. Renting gear in Kathmandu is possible and costs less.


PART 5: Expedition Costs

Climbing Ama Dablam requires significant financial investment. Here is a breakdown of typical costs.

Guided Expedition Package

Most climbers join a guided expedition. Package prices vary based on services included:

Budget Companies: $5,000 to $7,000

  • Basic services
  • Smaller teams
  • Simpler food and accommodation

Mid-Range Companies: $8,000 to $12,000

  • Good services
  • Experienced guides
  • Better food and comfort

Luxury Companies: $15,000 to $25,000

  • Premium services
  • Western guides plus Sherpa support
  • Better tents, food, and equipment
  • More personal attention

What’s Included in Package

Typical inclusions:

  • Airport pickup and dropoff in Kathmandu
  • Hotel accommodation in Kathmandu (with breakfast)
  • Welcome and farewell dinners
  • Flight Kathmandu-Lukla-Kathmandu
  • All meals during trek and climb
  • Accommodation in tea houses during trek
  • Tents at base camp and high camps
  • Professional guides (Sherpas)
  • Cooking staff at base camp
  • Porters and yaks for gear transport
  • Climbing permits and fees
  • Group climbing gear (ropes, etc.)
  • Emergency oxygen (for use, not for climbing)
  • Satellite phone for emergency use

What’s Not Included

  • International flights to Kathmandu
  • Nepal visa ($50)
  • Travel insurance (required)
  • Personal climbing gear
  • Tips for guides and staff
  • Extra drinks and snacks
  • Personal expenses
  • Rescue costs if needed

Additional Costs

  • Travel Insurance: $300 to $500 for a policy covering climbing to 7,000 meters. This is mandatory and must include helicopter rescue.
  • Tips: $300 to $500 total. Distributed among guides, cooks, and porters.
  • Personal Gear: $0 to $6,000 depending on what you already own.
  • Extra Nights in Kathmandu: $50 to $150 per night depending on hotel.

Total Expedition Cost

A realistic total for a first-time climber, including all expenses:

  • Mid-range expedition package: $10,000
  • International flights: $1,500
  • Insurance: $400
  • Tips: $400
  • Gear (if buying some new): $2,000
  • Miscellaneous: $500

Total: Approximately $14,500

This can be lower if you already have gear or choose a budget company. It can be higher if you choose luxury services.


PART 6: Weather and Conditions

Climbing Seasons

There are two main climbing seasons for Ama Dablam:

Spring (March to May):

  • Warmer temperatures
  • Longer days
  • More stable weather
  • More crowded
  • Some risk of afternoon snow

Autumn (October to November):

  • Most popular season
  • Clear skies
  • Cold but stable
  • Less wind than spring
  • Best views

Most climbers choose autumn for the best conditions.

Temperature Ranges

Base Camp (4,570m):

  • Day: 5°C to 10°C
  • Night: -5°C to -10°C

Camp 1 (5,700m):

  • Day: -5°C to 0°C
  • Night: -15°C to -20°C

Camp 2 (5,950m):

  • Day: -10°C to -5°C
  • Night: -20°C to -25°C

Camp 3 (6,300m):

  • Day: -15°C to -10°C
  • Night: -25°C to -30°C

Summit (6,812m):

  • Summit morning: -20°C to -25°C (with wind chill much colder)
  • Can drop to -30°C in bad conditions

Wind

Wind is a major factor on Ama Dablam. The mountain is exposed and wind can be strong, especially at higher camps. Wind speeds of 50-80 km/h are common. Stronger winds can make climbing impossible.

Precipitation

Snow can fall at any time. Autumn generally has clear weather but afternoon clouds are common. Spring has more precipitation. Heavy snow increases avalanche risk and makes climbing harder.

Sun

The sun at high altitude is intense. UV radiation is much stronger than at sea level. Snow reflects sunlight, increasing exposure. Sunburn can happen quickly even when air temperature is cold.

Visibility

Clear mornings are common, with clouds building in afternoon. Summit day starts early to take advantage of good morning visibility and return before afternoon weather.


PART 7: Daily Life on the Expedition

Base Camp Life

Base camp is at 4,570 meters on rocky ground near the mountain. It has:

  • Sleeping tents for climbers
  • Kitchen tent with cooking equipment
  • Dining tent with tables and chairs
  • Toilet tent
  • Storage tent for gear

Daily routine at base camp:

Morning:

  • Wake around 7 am
  • Breakfast in dining tent (porridge, eggs, bread, tea)
  • Prepare for the day’s activities

Day:

  • Training or acclimatization walks
  • Gear maintenance
  • Rest and reading
  • Eating and drinking

Evening:

  • Dinner in dining tent
  • Team meeting about next day
  • Early bed (8-9 pm)

Food on the Expedition

Expedition food is simple but plentiful:

  • Breakfast: Porridge, eggs, Tibetan bread, chapati, muesli, tea, coffee
  • Lunch: Noodles, soup, sandwiches, rice dishes
  • Dinner: Dal bhat (rice and lentil soup), pasta, vegetables, meat dishes, dessert
  • Snacks: Cookies, chocolate, nuts, energy bars, hot drinks

At higher camps, food is simpler – freeze-dried meals, soups, hot drinks.

Health and Hygiene

Staying healthy on the mountain requires attention:

  • Hydration: Drinking 3-4 liters of water daily is essential. Dehydration makes altitude sickness worse.
  • Hygiene: Wet wipes are used for washing. Hand sanitizer is used constantly. Toilets are basic but kept clean.
  • Altitude: Most climbers feel some effects – headache, poor sleep, low appetite. These are normal. Serious symptoms require immediate descent.

Common Issues:

  • Headaches
  • Nausea
  • Constipation
  • Cough (from cold dry air)
  • Sunburn
  • Blisters

Communication

Most expeditions have:

  • Satellite phone for emergencies (expensive for regular calls)
  • Radio between camps
  • Limited internet at base camp (slow and expensive)

Climbers cannot stay in regular contact with home. Families should understand this before the expedition.

PART 8: Day-by-Day Itinerary

Phase 1: Arrival and Trek to Base Camp (Days 1-8)

Day 1: Arrival in Kathmandu (1,400m)

  • Arrive at Kathmandu airport
  • Transfer to hotel in Thamel district
  • Rest and recover from flight
  • Evening welcome meeting with expedition team
  • Overnight in hotel

Day 2: Kathmandu Preparation

  • Final gear check with guides
  • Equipment shopping if needed
  • Permit paperwork
  • Sightseeing optional (Boudhanath Stupa, Pashupatinath Temple)
  • Expedition briefing
  • Overnight in hotel

Day 3: Fly to Lukla (2,840m) and Trek to Phakding (2,610m)

  • Early morning flight to Lukla (30 minutes)
  • Meet porter team
  • Begin trek, descending to Phakding
  • Walk through forests and villages
  • Cross suspension bridges over Dudh Koshi River
  • Overnight in tea house

Day 4: Trek to Namche Bazaar (3,440m)

  • Follow river upstream
  • Climb steadily through pine forests
  • First views of Everest (weather permitting)
  • Enter Sagarmatha National Park
  • Arrive at Namche Bazaar, main town of Khumbu region
  • Overnight in tea house

Day 5: Acclimatization Day in Namche

  • Rest day for altitude adjustment
  • Hike to Everest View Hotel (3,880m) for better acclimatization
  • Views of Everest, Lhotse, and Ama Dablam
  • Visit Sherpa Culture Museum
  • Rest and hydration
  • Overnight in tea house

Day 6: Trek to Pangboche (3,930m)

  • Leave Namche and follow main trail
  • Visit Tengboche Monastery (3,867m)
  • Continue through forests and villages
  • Views of Ama Dablam getting closer
  • Arrive at Pangboche village
  • Overnight in tea house

Day 7: Trek to Ama Dablam Base Camp (4,570m)

  • Leave main Everest trail
  • Head toward Ama Dablam
  • Final approach to base camp
  • Arrive at base camp, meet support staff
  • Settle into tents
  • Orientation to camp facilities
  • Overnight at base camp

Day 8: Rest and Preparation at Base Camp

  • Rest after trek
  • Organize personal gear
  • Training session with guides (crampon use, rope techniques)
  • Hydration and acclimatization
  • Briefing on climbing plan
  • Overnight at base camp

Phase 2: Acclimatization and Rotation (Days 9-14)

Day 9: Rest and Training at Base Camp

  • Continued rest
  • Practice climbing skills on nearby terrain
  • Check all equipment
  • Team meeting about upcoming rotation
  • Overnight at base camp

Day 10: Climb to Camp 1 (5,700m)

  • Early start from base camp
  • Climb through rocky moraine
  • Reach fixed ropes and begin technical climbing
  • Ascend to Camp 1 on small ledge
  • Settle into tents
  • Hydrate and rest
  • Overnight at Camp 1

Day 11: Climb to Camp 2 (5,950m) and Return to Camp 1

  • Continue up steep ice to Camp 2
  • Experience higher altitude
  • Rest at Camp 2, eat snacks
  • Descend back to Camp 1
  • “Climb high, sleep low” for acclimatization
  • Overnight at Camp 1

Day 12: Return to Base Camp

  • Descend from Camp 1 to base camp
  • Rest and recover
  • Eat and drink plenty
  • Discuss rotation experience with guides
  • Overnight at base camp

Day 13-14: Rest at Base Camp

  • Complete rest days
  • Eat well, drink well
  • Prepare gear for summit push
  • Mental preparation
  • Weather monitoring
  • Final briefing before summit attempt

Phase 3: Summit Push (Days 15-18)

Day 15: Move to Camp 2

  • Leave base camp early
  • Climb to Camp 1 (brief rest)
  • Continue to Camp 2
  • Settle in for summit push
  • Hydrate and eat
  • Early sleep
  • Overnight at Camp 2

Day 16: Move to Camp 3 (6,300m)

  • Wake early
  • Climb steep terrain to Camp 3
  • Camp 3 is on small ice ledge
  • Very limited space
  • Rest and prepare for summit
  • Try to eat and drink
  • Difficult sleep at this altitude
  • Overnight at Camp 3

Day 17: Summit Day (6,812m) and Descent to Camp 2

  • Wake at 2 am
  • Put on all clothing
  • Headlamp on, harness on
  • Start climbing at 3 am
  • Climb through dark, very cold
  • Reach Yellow Tower (rock climbing section)
  • Continue to summit ridge
  • Reach summit around 8-9 am
  • Short time on summit for photos
  • Begin descent immediately
  • Down to Camp 3 (brief rest)
  • Continue down to Camp 2
  • Arrive Camp 2 afternoon/evening
  • Collapse into tent
  • Overnight at Camp 2

Day 18: Descent to Base Camp

  • Wake at Camp 2
  • Pack up and descend
  • Down to Camp 1
  • Continue to base camp
  • Arrive base camp afternoon
  • Celebration with team
  • Rest and recovery
  • Overnight at base camp

Phase 4: Return to Kathmandu (Days 19-22)

Day 19: Trek to Pangboche

  • Leave base camp
  • Trek back to Pangboche
  • More oxygen, easier walking
  • Hot shower at tea house
  • Celebration dinner
  • Overnight in tea house

Day 20: Trek to Lukla

  • Continue descent
  • Pass through Namche Bazaar
  • Final section to Lukla
  • Last night in mountains
  • Team dinner
  • Overnight in tea house

Day 21: Fly to Kathmandu

  • Early morning flight from Lukla
  • Arrive Kathmandu
  • Hotel check in
  • Hot shower, real bed
  • Free time for shopping
  • Farewell dinner with team
  • Overnight in hotel

Day 22: Departure

  • Transfer to airport
  • Flight home
  • Expedition complete

PART 9: Risks and Safety

Objective Hazards

These are dangers from the mountain itself:

  • Avalanche: Ama Dablam has some avalanche risk, especially after fresh snow. Routes are chosen to avoid avalanche paths.
  • Rockfall: Rocks fall from cliffs above. Helmets are essential at all times on the mountain.
  • Crevasse: Some crevasses exist on the route. Fixed ropes and careful navigation reduce risk.
  • Weather: Sudden storms can make climbing impossible or dangerous. Good forecasts and conservative decisions are essential.

Subjective Hazards

  • These are dangers from human factors:
  • Altitude Sickness: Can affect anyone regardless of fitness. Symptoms range from mild headache to life-threatening conditions. Immediate descent is the only treatment for severe cases.
  • Decision Making: Poor decisions – pushing too hard, ignoring symptoms, bad weather judgment – cause many accidents.
  • Equipment Failure: Gear can break or be used incorrectly. Proper maintenance and training reduce this risk.

Safety Measures on Expeditions

  • Good expeditions have multiple safety measures:
  • Fixed Ropes: The route is equipped with fixed ropes that climbers clip into for security.
  • Experienced Guides: Sherpa guides know the mountain well and make good decisions.
  • Communication: Radios between camps allow coordination and emergency response.
  • Emergency Oxygen: Available at base camp for serious altitude sickness.
  • Emergency Plans: Guides have plans for evacuation if needed.
  • Acclimatization Schedule: Slow ascent allows bodies to adjust to altitude.

When to Turn Back

Successful climbers know when to turn back. Reasons include:

  • Weather deteriorating
  • Feeling sick with altitude symptoms
  • Exhaustion affecting judgment
  • Route conditions too dangerous
  • Time running late (must turn around by set time)

Turning back is not failure. It’s smart decision making that allows you to climb another day.


PART 10: Training for Ama Dablam

Physical Training

Good physical preparation is essential. Training should start 6 months before the expedition.

Cardiovascular Fitness:

  • Running 3-4 times per week, building to 10-15 km
  • Cycling for endurance
  • Stair climbing with weighted pack
  • Hiking on weekends with elevation gain

Strength Training:

  • Leg strength: squats, lunges, step-ups
  • Core strength: planks, sit-ups
  • Upper body: pull-ups, push-ups for rope climbing

Specific Preparation:

  • Practice with climbing gear if possible
  • Train at altitude if you live near mountains
  • Hike with your expedition pack weight

Sample Training Schedule (Last 3 Months)

  • Monday: Rest or light stretching
  • Tuesday: Run 8-10 km + core workout
  • Wednesday: Gym session (legs and upper body) + stair climber 30 minutes with pack
  • Thursday: Run 8-10 km
  • Friday: Gym session (full body) + stair climber 30 minutes with pack
  • Saturday: Long hike 4-8 hours with heavy pack (15-20 kg)
  • Sunday: Rest or easy walk

Mental Preparation

Mental training is as important as physical:

  • Research: Learn about the mountain, the route, what to expect.
  • Visualization: Imagine yourself climbing successfully, handling challenges calmly.
  • Acceptance: Understand there will be discomfort, fear, and hard moments. Accept this ahead of time.
  • Flexibility: Be ready for plan changes due to weather or conditions.

Skills to Learn

Before the expedition, learn:

  • How to use crampons on ice and snow
  • How to use an ice axe for balance and self-arrest
  • How to use ascenders and descenders on ropes
  • How to tie basic climbing knots
  • How to layer clothing for cold conditions
  • How to manage altitude symptoms

Many expedition companies offer training courses or can recommend where to learn these skills.


PART 11: Frequently Asked Questions

How long does the expedition take?

The full expedition from arrival in Kathmandu to departure takes about 3 weeks (21-24 days).

What is the success rate?

With good guides and proper preparation, success rates are 70-80%. Weather is the main factor affecting success.

Can beginners climb Ama Dablam?

“Beginners” need definition. Complete novices should not attempt Ama Dablam. But climbers with some experience and good fitness can succeed with guided support.

Do I need previous high altitude experience?

Previous high altitude experience helps but is not essential if you follow the acclimatization schedule and listen to your body.

How cold does it get?

At high camps, temperatures can drop to -30°C at night. Summit morning is usually -20°C to -25°C with wind chill making it feel colder.

Is there internet or phone service?

Limited and expensive. Some base camps have satellite internet. Higher camps have no service. Families should expect limited communication.

What if I get sick?

Guides monitor everyone for altitude sickness. Mild cases are managed with rest and medication. Severe cases require immediate descent. Expeditions have emergency plans and communication for rescue.

Can I rent gear in Kathmandu?

Yes. Many shops in Thamel rent climbing gear. Quality varies, so check carefully. For critical items (boots, crampons), many climbers prefer to bring their own.

What is the best season?

Autumn (October-November) is most popular for stable weather and clear skies. Spring (March-May) is also possible but has more variable weather.

How much does it cost?

Total cost including all expenses is typically $12,000 to $18,000 depending on expedition choice and gear needs.


PART 12: Environmental and Cultural Considerations

Leave No Trace

Climbers should minimize their impact on the mountain:

  • Pack out all trash
  • Use established toilet facilities
  • Leave campsites clean
  • Respect wildlife

Respect Local Culture

The Khumbu region is home to the Sherpa people with rich Buddhist traditions:

  • Walk clockwise around stupas and mani walls
  • Remove hats inside monasteries
  • Ask permission before photographing people
  • Learn a few words of Nepali or Sherpa (Namaste = hello, Dhanyabad = thank you)
  • Respect local customs and dress modestly in villages

Supporting Local Communities

Expeditions provide employment for many local people – guides, porters, cooks, yak handlers. This is an important part of the local economy. Tipping staff appropriately acknowledges their hard work.


Summary

Climbing Ama Dablam is a significant undertaking that requires preparation, fitness, and commitment. The rewards are unforgettable – standing on one of the world’s most beautiful mountains, surrounded by the greatest peaks on earth.

This guide has covered everything needed to understand what an Ama Dablam expedition involves. From equipment and costs to daily life and risks, the information here provides a complete picture of this remarkable adventure.

For those considering the climb: prepare well, choose a good expedition company, respect the mountain, and enjoy every moment of the journey.

For those just curious: thank you for reading. May this guide help you appreciate what climbers experience on this beautiful mountain.


This guide was created from general expedition knowledge and multiple climber accounts. Individual experiences may vary based on weather, conditions, and expedition choices.

Respect nature and local culture

Climbers should honor the Himalayan environment and Sherpa traditions by minimizing waste, following sustainable practices, and showing respect for local customs, ensuring the journey is responsible and culturally mindful.

Namaste

Why we Need Adventure in our Life? In our life Long  Making history .

Introduction

Life is busy. We work long hours. We stare at screens. We follow the same routine every day. Sometimes, we feel stuck or tired for no reason.

That is why trekking and tours are so important. They are not just fun activities. They are a way to hit the reset button on life. Here is why getting out there matters.

1. It Clears Your Head

When you are in the office, your mind is full. Emails. Deadlines. Problems.

When you travel or trek, your mind empties. You focus on the path in front of you. You look at the trees, the sky, or the new city around you. This break helps you relax. It lowers stress. When you come back home, your head feels lighter and clearer.

2. It Makes You Healthier

Walking is the best exercise. Trekking means walking for hours. It makes your heart stronger. It builds muscle in your legs. It helps you sleep better at night.

Tours also get you moving. Instead of sitting on a couch, you are walking through museums, markets, or historical sites. Your body thanks you for it.

3. It Builds Confidence

Have you ever found your way in a place you have never been? Have you ever climbed a hill and looked down?

It feels good. You prove to yourself that you can do hard things. You learn to solve problems on your own. You become more independent. That confidence stays with you when you go back to work or home.

4. It Brings People Together

When you travel with family or friends, you make memories. You share laughs. You help each other. You have stories to tell for years.

If you travel alone, you meet new people. On a tour or a trek, you are with others who like the same things. You make friends from different places. The world feels smaller and friendlier.

5. It Teaches You New Things

Books are good, but seeing is better.

When you visit a new place, you learn how others live. You try new food. You hear new languages. You understand why people are different. This makes you more open-minded. It makes you less judgmental.

6. It Makes You Happy

Think about a good memory. Is it from sitting at home? Or is it from a trip?

Most of our best memories come from adventures. Waiting for a sunset. Trying strange food. Reaching the top of a mountain. These moments make life exciting. They give us joy.

Conclusion

You do not need to travel for months. You do not need to climb the highest mountain.

A short trip. A weekend trek. A new city for two days. It is enough.

It pulls you out of your routine. It gives you fresh energy. It reminds you that the world is big and beautiful.

So, plan that trip. Book that tour. Put on those walking shoes. You need it. And you deserve . Join with us in our Journey we will help our dream comes True .

Himlung Himal a Complete Blog

What It Is and Why Climbers Are Obsessed with This Himalayan Giant?

Imagine standing on a knife-edge ridge at 7,000 meters. The sun is rising, painting the Tibetan Plateau in shades of gold and crimson. To your left, the massive bulk of Manaslu (8,163m) pierces the jet stream. To your right, the entire Annapurna range stretches for a hundred miles. And beneath your feet? A mountain so remote, so pristine, that even today, only a few hundred people have ever stood where you are standing.

This is Himlung Himal.

In the world of mountaineering, there are celebrities and there are hidden gems. Everest is the celebrity—crowded, famous, and outrageously expensive. But Himlung? Himlung is the secret that serious climbers whisper about. It is the mountain that offers the full Himalayan expedition experience without the traffic jams, the egos, or the circus.

But what actually is Himlung Himal? And more importantly, why are people from all over the world—from seasoned alpinists to ambitious first-timers—choosing to spend a month of their lives and thousands of dollars to climb it?

Grab a cup of tea, get comfortable, and let me take you on a journey to one of Nepal’s best-kept secrets. By the end of this article, you won’t just understand Himlung Himal—you’ll probably want to climb it yourself.

Part One: What IS Himlung Himal?

The Basics: A Mountain with an Identity

Let’s start with the hard facts, because every great mountain deserves a proper introduction.

Himlung Himal is a 7,126-meter (23,379-foot) peak located in the Peri Himal, a sub-range of the mighty Himalayas in north-central Nepal . If you look at a map, you’ll find it sitting right on the border with the Tibet Autonomous Region of China, approximately 28°46‘N latitude and 84°25’E longitude .

Here are the vital statistics in simple terms:

  • Elevation: 7,126 meters (23,379 feet)
  • Location: Manang District, Gandaki Province, Nepal
  • Range: Peri Himal (Himalayas)
  • Prominence: 876 meters (meaning it rises significantly from the surrounding terrain)
  • First Ascent: 1992 by a Japanese expedition (though there is some debate about a possible 1983 ascent)
  • Difficulty Rating: PD+ (Peu Difficile Plus) on the Alpine scale, or “Moderate” on most commercial operator scales

But numbers on a page don’t capture what this mountain really is. To understand Himlung, you have to understand where it sits.

A Geography Lesson: The Nar Phu Valley

Himlung is not one of those mountains you can see from the road. It doesn’t loom over a busy trekking route like Ama Dablam or Island Peak. To reach it, you have to go deep into one of Nepal’s most fascinating and historically restricted regions: the Nar Phu Valley.

This valley was only opened to trekkers in 2002 . Before that, it was a hidden Himalayan kingdom, culturally and ethnically Tibetan, isolated from the modern world for centuries. The approach to Himlung takes you through this valley, and honestly? For many climbers, the trek in is almost as good as the climb itself.

You start from the roadhead at Koto (2,600m), which is actually on the famous Annapurna Circuit. But instead of turning right with the crowds heading toward Thorong La, you turn left. You cross a suspension bridge, and within an hour, the tea houses thin out, the trail narrows, and you enter a different world .

The trail winds through dramatic gorges carved by glacial rivers, past ancient Buddhist monasteries with prayer flags snapping in the wind, and through villages like Phu Gaon (4,080m) —a settlement of flat-roofed stone houses that looks like it was transplanted directly from Tibet . The people here are of Tibetan origin. They speak their own language. They practice a form of Buddhism that has all but disappeared in other parts of the Himalayas.

This cultural immersion is part of the Himlung package. You don’t just climb a mountain; you journey through a living, breathing slice of Himalayan history.

The Mountain Itself: What Does It Look Like?

Himlung is not a sharp, technical “technical” peak like K2 or even Ama Dablam. It has a distinctive dome-shaped summit that rises from a long, elegant northwest ridge . From base camp, it looks imposing but achievable—a long sweep of snow and ice leading to a rounded top.

The mountain has three main faces:

  1. The West Face: Dominated by the Pangri Glacier, this is the side you approach from. It’s a broad, heavily crevassed icefall that leads up to the upper mountain .
  2. The East Face: Steeper and more technical, this side feeds the Thoche Glacier and is rarely climbed .
  3. The North Face: This face looks directly into Tibet. It’s a massive wall of ice and rock that catches the full force of the Tibetan weather systems.

The standard climbing route follows the Northwest Ridge, which is considered the most logical and safest way to the top .

A Brief History: Who Got There First?

Like many Himalayan peaks, Himlung’s early history is a bit murky. There is a record of a Japanese expedition claiming the first ascent in 1983 via the South Ridge and East Ridge . However, later climbers have cast doubt on this, suggesting that the 1983 team may have actually climbed the neighboring peak, Nemjung.

The universally accepted first ascent is credited to another Japanese expedition in 1992, led by Akio Tamura, who climbed the Northwest Ridge . This is the route that virtually everyone uses today.

For years after that first ascent, Himlung remained quiet. It wasn’t until the early 2000s, when Nepal officially opened the peak for climbing and the Nar Phu Valley was opened to tourism, that things started to change . Even then, the numbers remained small. As recently as 2013, when the UK-based company Adventure Peaks ran their first expedition, there had been only one recorded British ascent of the mountain .

Today, the numbers are still modest. In a given year, only about 77 to 90 climbers successfully summit Himlung . Compare that to Everest, where nearly 1,000 people can summit in a single morning, and you start to understand the appeal.

Part Two: Why People REALLY Want to Climb Himlung Himal

Okay, so we know what Himlung is. But why climb it? Why spend a month away from family, endure freezing temperatures, risk altitude sickness, and shell out thousands of dollars for this one particular mountain?

The answer is surprisingly complex. People climb Himlung for different reasons, but there are some powerful themes that emerge when you talk to those who have been there.

Reason #1: It is the Perfect “Stepping Stone” to 8,000-Meter Peaks

This is, by far, the most common reason climbers give for choosing Himlung. If you dream of climbing Everest, Lhotse, or K2, you cannot just show up and do it. You need to build a resume. You need to know how your body reacts at extreme altitude. You need to master the logistics of high-altitude camping, fixed rope travel, and glacier navigation.

Himlung is widely regarded as the ideal training ground for the 8,000-meter giants .

Think of it like this:

  • Mountain Elevation Difficulty Role
  • Island Peak 6,189m Easy/Moderate Intro to high-altitude climbing
  • Himlung Himal 7,126m Moderate The “finishing school” before 8,000m
  • Manaslu 8,163m Difficult Your first 8,000m peak
  • Everest 8,848m Extreme The ultimate prize

Himlung sits in that perfect sweet spot. It’s high enough that you experience the real challenges of the “Death Zone” threshold (above 7,000m, your body is literally dying). But it’s not so high that you require supplemental oxygen or multiple Sherpas to carry your gear.

As one expedition guide put it: “For anyone stepping toward 8,000-meter ambitions, Himlung builds confidence exactly where it matters most” .

Reason #2: The Technical Challenge is “Just Right”

Let’s be honest: not everyone is a rock star climber. Many of us are weekend warriors, fit and motivated, but not necessarily ready to tackle a vertical ice wall at 7,000 meters.

Himlung’s Northwest Ridge route is technically moderate, but it’s not a walk in the park. Here’s what you actually face on the mountain :

  • The Slopes: The climbing involves snow and ice slopes ranging from 30 to 45 degrees. That’s steep enough to feel exciting and require good technique, but not so steep that you feel like you’re going to fall off the planet.
  • The Ice: There are crevasses on the route, particularly between Camp 1 and Camp 2. You’ll need to travel roped up and know how to manage yourself on a glacier.
  • The Ropes: The steepest section, a 400-meter push above Camp 3, is protected with fixed ropes. This means you use mechanical ascenders (jumars) to clip into the rope, making it very safe. You won’t be leading difficult pitches or placing your own protection.
  • The Exposure: The summit ridge is exposed, meaning there are significant drops on either side. For climbers with a head for heights, this is exhilarating. For those afraid of exposure, it can be a mental battle.

One detailed climbing report described the final section perfectly: “C3 to the summit is long and steep, with 600 meters of fixed rope. It starts with an exposed 30-degree snow slope, then hits the steepest section: a 400-meter, 35-degree slope. The risk of a slip is real” .

The takeaway? You need to be proficient with crampons, an ice axe, and jumars. You need to be comfortable on steep snow. But you don’t need to be a master ice climber.

Reason #3: The Remote Location and Solitude

This is the reason that tugs at the heartstrings of true adventurers.

In an age where Everest Base Camp looks like a festival grounds with yoga tents and latte bars, Himlung offers something increasingly rare: authentic wilderness .

One expedition leader described the feeling perfectly: “Himlung simply hasn’t developed the name recognition of peaks like Ama Dablam or even nearby Manaslu. The lack of publicity works in our favor—fewer climbers means more authentic experiences and less environmental impact” .

When you’re on Himlung, you are genuinely remote. The nearest road is a 5-7 day trek away. There are no helicopter tours buzzing your camp. There is no Wi-Fi at base camp (usually). There are no queues for the fixed ropes.

This remoteness filters the crowds. The people who make it to Himlung are there for the right reasons. They are serious about climbing. They have done their training. They respect the mountain. The camaraderie on these expeditions is often cited as a highlight, precisely because everyone is in the same boat—a small team, far from home, facing a big challenge together .

Reason #4: The Unbeatable Summit Views

Climbers don’t admit it often, but a huge part of the motivation is the view from the top. And on Himlung, the view is absolutely world-class.

From the summit of Himlung, you are perched on the edge of the Tibetan Plateau. The world unfolds beneath you in a way that photos cannot capture .

  • To the south: The mighty Manaslu (8,163m) dominates the skyline, just 28 kilometers away. Its massive bulk fills the horizon .
  • To the southwest: The entire Annapurna massif stretches out, including Annapurna II (7,937m) and, on a clear day, the intimidating south face of Annapurna I (8,091m) .
  • To the north: The dry, brown expanse of the Tibetan Plateau rolls away into the distance, dotted with unclimbed peaks and vast emptiness .
  • To the east: You can see the Ganesh Himal and, further beyond, the peaks of the Langtang region.

One climber described the moment: “On the upper slopes of Dhaulagiri you can see hundreds of peaks in all directions, including the two other giants of the region. Himlung offers the same panoramic feast” .

Reason #5: The Success Rate is Encouraging

Let’s face it: nobody wants to spend a month of their life and a small fortune to fail. While failure is always a possibility in the mountains (weather, illness, conditions), Himlung has a statistically favorable track record.

Experienced operators report success rates in the range of 75% to 90% for their Himlung expeditions . Adventure Peaks, a UK-based company, boasts that they have summited on every single one of their Himlung expeditions since 2013 .

Why is the success rate so high compared to other 7,000-meter peaks?

  • Stable weather: The spring (April-May) and autumn (September-October) seasons offer predictable weather windows .
  • Moderate objective dangers: The route has low avalanche risk and few serac (ice cliff) dangers compared to peaks like Ama Dablam or Baruntse .
  • Good logistics: Because the mountain is popular with training expeditions, the infrastructure (fixed ropes, camp supplies) is well-established.
  • Acclimatization-friendly: The approach trek through the Nar Phu Valley naturally acclimatizes you. You’re walking at 3,000-4,000 meters for a week before you even see the mountain.

Of course, success is never guaranteed. The mountain demands respect, and every year, climbers turn back due to weather, altitude sickness, or personal reasons. But if you are well-prepared, Himlung offers some of the best odds in the high Himalayas.

Reason #6: The Adventure of the Approach

I’ve touched on this, but it deserves its own section. The trek to Himlung Base Camp is not just a means to an end—it’s a core part of the experience.

The Nar Phu Valley trek is often described as a “Hidden Valley” trek. It combines the best elements of Himalayan travel :

  • Dramatic geography: The trail follows the Phu Khola river through a deepening gorge, with walls that rise thousands of feet on either side.
  • Tibetan Buddhist culture: The villages of Meta, Chyaku, and especially Phu Gaon are living museums. You’ll see ancient chortens (stupas), mani walls (long stone walls carved with prayers), and gompas (monasteries) that have stood for centuries.
  • Wild camping: Unlike the crowded Annapurna Circuit with its tea houses every hour, much of the Nar Phu trek involves camping in pristine wilderness. You’ll fall asleep to the sound of the river and wake to the sight of snow-covered peaks.
  • Acclimatization: The gradual ascent from Koto (2,600m) to Base Camp (4,900m) over 5-7 days is the gold standard for altitude adaptation. Your body gets the time it needs to build red blood cells and adjust to the thin air.

One expedition operator notes: “The trek to Base Camp takes 5-7 days from the nearest road. That’s significantly longer than approaches to popular peaks like Island or Chulu East. This remoteness filters out climbers seeking convenient options” .

Reason #7: The Price Point (Relative to 8,000ers)

Let’s talk money, because it matters.

  • Climbing an 8,000-meter peak is eye-wateringly expensive. A permit for Everest alone costs $11,000. A full-service Everest expedition can run $45,000 to $85,000. Manaslu, the cheapest 8,000er, still costs around $20,000 to $30,000.
  • Himlung, by comparison, is a bargain for a 7,000-meter peak.
  • Here is a rough breakdown of what you can expect to pay:
  • Expense Category Approximate Cost (USD)
  • Permit Fees (Climbing + Restricted Area + ACAP + TIMS) $500 – $700
  • Guide Service / Expedition Operator $4,500 – $6,000
  • Food & Accommodation (Kathmandu, trek, base camp) $1,200 – $1,800
  • In-Country Transportation (Jeeps, etc.) $400 – $600
  • Tips for Staff (Guides, cooks, porters) $300 – $500
  • Personal Gear (If you need to buy/bring) $2,000 – $4,000
  • International Flights (to Kathmandu) $800 – $1,500
  • Travel Insurance (High-altitude evacuation cover) $300 – $600
  • Estimated Total (excluding personal gear) ~$8,000 – $12,000
  • Some operators offer all-inclusive packages. For example, Adventure Peaks lists a land-only price of £7,995 (approx. $10,000) for their 30-day expedition . Local Nepali operators can sometimes offer lower prices, in the range of $7,000-$8,000 for a similar service level .

Is it cheap? No. But is it a fraction of the cost of an 8,000-meter expedition? Absolutely. For climbers building a resume, Himlung offers incredible value.

Part Three: What the Climb Actually Feels Like

Now for the part you really want to know: what is it actually like to be there? I’ve compiled insights from climbers who have been on the mountain to give you a sensory, emotional picture of the Himlung experience.

The Good: The Beauty of Simplicity

One of the most striking things about a long expedition is how simple life becomes. Away from emails, news, social media, and the endless noise of modern life, your world shrinks to the essentials.

A seasoned expedition leader put it this way: “On an expedition it’s just sleep, eat, poo, repeat! The simplicity is beautiful. Your body is put under serious physical stress on a mountain, especially during a summit push, but your mind gets such a beautiful rest” .

This “beautiful rest” of the mind is something that many climbers don’t expect but end up cherishing most. You have hours to just sit and look at mountains. You have real, uninterrupted conversations with your teammates. You learn to find joy in simple things: a cup of hot tea, a pair of dry socks, a patch of sunshine.

The Bad: The Relentless Cold

Now for the honest truth: Himlung is a very, very cold mountain .

One climber, Jënni Jalonen, wrote a brutally honest account of her attempt on Himlung in October 2023. Her description of the cold is haunting:

“It had been so cold in the night and I had slept terribly. At 6 am I couldn’t take it anymore and sat up to melt snow on my gas stove—one bottle of hot water to put inside my sleeping bag and one cup of hot tea to drink. Hot water was one of the things I valued most on this expedition, as I spent almost every night (even in BC) freezing to the bones” .

At Base Camp (4,900m), daytime temperatures can be pleasant, reaching 15-20°C in the sun. But once the sun dips behind the ridge, the temperature plummets. At Camp 2 (6,000m) and Camp 3 (6,350m), night-time temperatures can drop to -20°C or even -30°C .

The cold is not just uncomfortable; it’s a safety hazard. It can freeze your stove fuel, making it impossible to melt water. It can give you frostbite if your gear fails. It can sap your will to continue.

The Scary: Altitude Sickness is Real

Altitude sickness is the great equalizer on high mountains. It doesn’t care how fit you are or how much you’ve trained. It can strike anyone.

Jënni’s story takes a frightening turn on her summit push. After feeling relatively strong, she started to deteriorate rapidly at Camp 2:

“I was having a terrible headache and felt incredibly fatigued along with a lost appetite… The night was freezing cold… I’ve started having diarrhoea… I’m still having a headache and I’m feeling nauseous and a little unstable on my feet… Then, all of a sudden I start vomiting” .

These are classic symptoms of High Altitude Cerebral Edema (HACE) , a potentially fatal condition where the brain swells due to lack of oxygen. Fortunately, her teammate recognized the severity and immediately ordered a descent. “Only I am entirely incapable of packing my things, I don’t know what to pack and the effort feels extreme” .

This story has a good ending—she descended with help and survived—but it illustrates a crucial point. Himlung is safe and moderate compared to other peaks, but it is still a 7,000-meter mountain. It can and will kill you if you don’t respect it. The mantra of every safe climber is: “The summit is optional, but the descent is mandatory.”

The Triumphant: The Summit Moment

So why endure the cold, the risk, the discomfort?

For the moment when you top out.

Imagine this: You’ve been climbing for 6 to 8 hours from High Camp. It’s been dark most of the way, your world limited to the beam of your headlamp. You’re exhausted, running on pure willpower and sips of frozen water. Your Sherpa guide, moving with practiced ease, keeps the rope taut between you.

Then, the angle eases. The ridge broadens. And suddenly, you are there. The summit of Himlung Himal.

There is no “top” in the sense of a single point—the summit is a broad, domed crest . You walk those last few steps, and the world opens up. The sun is up now, warming your frozen face. You see the curve of the earth. You see Tibet. You see mountains that have no names.

One climber described the feeling as a mix of “exhaustion, joy, and profound gratitude.” You hug your guide. You take the obligatory photos. And for 15 or 20 minutes, you are the highest person for miles in any direction.

Then, you turn around and start the long, careful descent. But you are changed. You have done something that most humans will never do. You have stood on the roof of the world.

Part Four: A Practical Guide for the Dreamer

If you’ve read this far, there’s a good chance you’re considering climbing Himlung yourself. Here is a straightforward checklist of what you need to do to turn that dream into reality.

Step 1: Build Your Foundation (12-6 Months Out)

  • Gain altitude experience: If you’ve never been above 5,000m, consider a “warm-up” trek or a climb of a trekking peak like Island Peak (6,189m) or Mera Peak (6,476m).
  • Start training: A 4-6 month training plan is essential. Focus on:
  • Cardio: Long hikes with a heavy pack (20-25 kg), stair climbing, running.
  • Strength: Legs and core are your engines. Squats, lunges, deadlifts.
  • Endurance: You need to be comfortable moving for 8-10 hours at a time.
  • Get your gear: Start acquiring your personal kit. The big-ticket items are mountaineering boots (insulated doubles), a down suit or heavy down jacket, and a -30°C sleeping bag. Rentals are available in Kathmandu, but your own gear is always better .

Step 2: Logistics and Planning (6-3 Months Out)

  • Choose an operator: Do your research. Look at UK-based companies (like Adventure Peaks), international companies (like Earth’s Edge), and Nepali operators (like Marvel Treks or Seven Summit Treks). Compare prices, inclusions, and guide-to-client ratios .
  • Book your flights: Aim to arrive in Kathmandu at least 2-3 days before the expedition starts for sightseeing and gear checks.
  • Secure insurance: This is non-negotiable. Your insurance MUST cover helicopter evacuation and climbing at altitudes above 7,000m. Read the fine print carefully .

Step 3: The Month of the Climb

A typical 30-day itinerary looks like this :

Days Activity

  • 1-3 Arrive in Kathmandu (1,345m). Gear checks, permit briefings, sightseeing.
  • 4-5 Drive from Kathmandu to Koto (2,600m) via Besisahar. Long, bumpy but scenic days.
  • 6-10 Trek through the Nar Phu Valley: Koto → Meta (3,560m) → Phu Gaon (4,080m). Acclimatization day in Phu.
  • 11 Trek to Himlung Base Camp (4,850-4,900m).
  • 12-14 Rest, acclimatization, and Puja ceremony at Base Camp.
  • 15-23 Climbing Phase: Rotations to Camp 1 (5,450m), Camp 2 (6,000m), and potentially Camp 3 (6,350m). Descents back to Base Camp to rest. Summit push during a weather window.
  • 24-27 Return trek from Base Camp to Koto.
  • 28-30 Drive back to Kathmandu. Celebration dinner, free time, and flight home.

Step 4: Mental Preparation

Finally, prepare your mind. Read accounts like Jënni’s to understand the real challenges . Talk to your operator about what to expect. As one guide wisely said:

“Everyone draws their motivation and their strength from different places. For me, it comes from being confident in one’s ability to reach the summit. This confidence comes from the training you complete and your previous experience… Combining that confidence with the understanding that weather or other factors outside your control may result in you not being able to summit results in a very powerful combination” .

Conclusion: Is Himlung Himal for You?

So, let’s bring it all together.

Himlung Himal is a 7,126-meter peak in a remote corner of Nepal, offering a perfect blend of challenge, culture, and wilderness. It is technically moderate but physically demanding, cold but beautiful, remote but accessible.

People climb Himlung because:

  • It is the ideal training ground for 8,000-meter peaks.
  • The technical challenge is achievable for fit amateurs.
  • The remote Nar Phu Valley offers a true adventure experience.
  • The summit views are among the best in the Himalayas.
  • The success rate is high for a peak of its stature.
  • It costs a fraction of an 8,000-meter expedition.

Is it for you?

  • If you are a fit trekker who has wondered what it feels like to stand above 7,000 meters, yes, Himlung could be your mountain.
  • If you are a climber with some 6,000-meter experience looking to take the next step, yes, Himlung is the perfect bridge.
  • If you crave solitude, adventure, and the camaraderie of a small team in a big landscape, yes, Himlung is calling your name.

But if you want a guided walk-up with hotels and Wi-Fi and zero risk? Look elsewhere. Himlung is a real mountain. It demands respect, preparation, and a willingness to suffer a little for something beautiful.

And for those who answer that call? The reward is a memory that will last a lifetime. A memory of a dome-shaped peak on the edge of Tibet, of frozen nights and brilliant sunrises, and of the quiet satisfaction of knowing you climbed your own mountain.

Have you climbed Himlung Himal? Are you planning an expedition? I’d love to hear your questions and stories in the comments below. If you found this guide helpful, please share it with fellow adventurers who might be dreaming of the high Himalayas.

API Himal Treks Special: Your Complete Guide to Trekking in Nepal’s Far West

Introduction: Meet API Himal Treks

Have you ever dreamed of trekking in Nepal but want something different from the busy Everest or Annapurna trails? Let me introduce you to API Himal Treks & Expedition, a friendly trekking company that can help you discover the real, untouched Nepal.

API Himal Treks is a well-known trekking agency in Nepal that specializes in organizing peak climbing, treks, and expeditions throughout the Himalayas . With years of experience, they provide tailored trips for climbers and trekkers who want to explore Nepal’s stunning mountains. Whether you are a first-time trekker or an experienced climber, they have something special for you.

The company is named after Mount API Himal, a beautiful peak in far-western Nepal that stands at 7,132 meters . The name “API” comes from the local Byash language and means “grandmother” – a name that shows respect and protection . Just like a caring grandmother, API Himal Treks looks after their guests with warmth and care.

In this special blog, we will explore everything about API Himal Treks – from the services they offer to the amazing treks and climbs you can do with them. We will cover popular peaks like Island Peak, Mera Peak, and Yala Peak, as well as the remote and beautiful API Himal Base Camp Trek in far-western Nepal. Get ready for a friendly guide that will help you plan your next Himalayan adventure!

About API Himal Treks: Who They Are and What They Do

API Himal Treks & Expedition is a trusted trekking company based in Kathmandu, Nepal. They have built a strong reputation over the years for organizing safe and enjoyable adventures in the Himalayas .

Their Mission

The team at API Himal Treks believes in showing guests the real Nepal. They want you to experience not just the mountains, but also the culture, the people, and the simple beauty of Himalayan life. Their guides are not just employees – they are friends who share their home and heritage with you.

Services They Offer

API Himal Treks provides a complete range of services to make your trekking dream come true :

Trekking Peak Expeditions – They organize climbs on popular peaks such as Island Peak (6,189m) , Mera Peak (6,476m) , Lobuche Peak (6,119m) , and Yala Peak (5,520m) in various regions of Nepal . They also arrange expeditions to lesser-known peaks for more adventurous climbers.

Guides and Support – The company provides experienced, certified guides and Sherpas with extensive knowledge of the mountains and climbing techniques . This is essential when you are climbing at higher altitudes. Their guides are trained in safety, first aid, and emergency procedures to ensure your well-being.

Climbing Gear and Equipment – API Himal Treks arranges all the necessary climbing gear – things like crampons, ice axes, ropes, and helmets – for your expeditions . You can rent or purchase equipment directly through them, which saves you the trouble of bringing heavy gear from home.

Permits and Documentation – They help with all the permits you need, including climbing permits, TIMS cards, and national park permits . This ensures you follow all the rules for trekking and climbing in Nepal. For certain peaks, they also arrange a liaison officer if required.

Customized Itineraries – Whether you want to climb Yala Peak or trek to a remote base camp, API Himal Treks customizes your itinerary based on your fitness level and available time . They design your trip with proper rest days to help you avoid altitude sickness and maximize your chances of a safe and happy journey.

Supportive Services – They provide porters to carry your trekking gear and help with logistics during the trek . This makes your experience easier and more enjoyable. They ensure that all parts of your journey – transport, accommodation, food, and permits – are well taken care of.

Why Choose API Himal Treks?

Here are some good reasons to pick this company for your Nepal adventure :

  • Expert Knowledge and Experience – They have years of experience organizing trips across Nepal’s varied peaks. They know the challenges and terrain of each climb, so you are well-prepared.
  • Safety First – Safety is their top priority. All guides are trained to handle emergencies, making them a safe choice for your adventure.
  • Local Experience – With deep understanding of Nepal’s mountain regions and local contacts, they offer an authentic cultural experience.
  • Affordable Packages – They offer competitive pricing without cutting corners on quality. Packages fit different budgets.
  • Comprehensive Service – From permits to gear to guides, they provide everything in one place.
  • Personalized Attention – They customize itineraries to match your fitness, interests, and experience.

Overview of API Himal Base Camp Trek

Mount API Himal towers at 7,132 meters and is the highest peak in far-western Nepal . It remains unknown to many adventure lovers, which makes it perfect for trekkers seeking solitude .

The trek takes you through some of the most untouched landscapes in Nepal . You’ll see cascading waterfalls, glacial rivers, dense forests, and amazing mountain views. The region is part of the Api Nampa Conservation Area, which protects the area’s natural beauty and wildlife .

Major Highlights

Here are the special places you’ll visit on this trek :

Kalidhunga Lake

Kalidhunga Tal is a sacred glacial lake at 4,100 meters . It lies east of API Himal Base Camp and takes about 2-3 hours to hike from base camp. The clear, glacial water reflects the surrounding peaks perfectly, creating stunning views . Locals consider this lake holy and treat it with great respect.

Chameliya River Cradle

The Chameliya River is the main river of far-western Nepal, flowing through Darchula district . The trek follows this powerful river as it carves through beautiful valleys and gorges. The river originates from high-altitude glaciers near Api Himal and offers picturesque views along the route .

Ringdepani Lake

Ringdepani Lake is truly unique – it has two triangular shapes that resemble the national flag of Nepal . About 4 hours from base camp, this lake offers beautiful views of Nampa, Kaiyakor, Bobaya Himal, and Jethi Bahurani Himal.

People and Culture

The far-western region is home to diverse ethnic communities like Bohara, Chhetri, Byansi, Thakuri, and Lohar people . These communities have preserved their age-old traditions for centuries .

Most people are devoted to Lord Shiva . You’ll notice that families raise cows rather than buffalo, as cow products are considered sacred and used in religious ceremonies .

The locals are generous, loving, and hardworking . Many people spin sheep wool into thread to weave warm garments like coats, sweaters, and socks . They also grow their own organic vegetables and crops.

There is even a nomadic community called “Raute” who traditionally lived in caves . In summer they go up to Api Himal Base Camp, and in winter they descend to warmer areas .

Best Time for API Himal Base Camp Trek

Spring (March to May) and Autumn (September to November) are the best seasons . These months offer clear skies, pleasant weather, and beautiful surroundings. In spring, rhododendrons bloom across the hills. In autumn, the views are crystal clear.

You can also trek from August to early November when Nepal celebrates many festivals . This is a wonderful time to experience local culture.

May to July is when locals harvest Yarsagumba – the world’s most expensive herb . The base camp area becomes busy like a bazaar, offering a unique glimpse into this traditional activity.

Difficulty Level

The API Himal Base Camp Trek is considered moderate to challenging . While the maximum altitude (4,100 meters) is not extremely high compared to other treks, the remote location, rugged terrain, and limited infrastructure make it demanding .

The trail includes steep ascents, descents, narrow paths, and some uneven sections . Good physical fitness is essential. The section from Dhauli Odar to Base Camp can be especially challenging.

Always be prepared for unpredictable weather, especially in winter when snow can add difficulty .

Food on the Trek

Food on the API Himal trek is simple but tasty :

  • Lunch and Dinner: Kidney beans (rajma dal), rice, and vegetable curry with seasonal veggies like potato, spinach, and barela, plus ghee
  • Special Treats: Occasionally sheep meat if you’re lucky
  • Drinks: Buttermilk (mohi), local curd, and barley-based vodka (save this for the way back!)
  • Breakfast: Roti tarkari (chapatti and veg curry), puri tarkari, noodle soup, herbal tea

After leaving villages, you’ll stay in shepherd’s properties, so food options become more basic .

Accommodation

Accommodation is basic but comfortable :

  • Rooms have simple beds with thin mattresses and blankets
  • Sometimes you’ll share a large bed with other trekkers
  • After leaving villages, you stay in shepherd’s shelters
  • Bring a warm sleeping bag – it’s essential!

Permits and Costs for API Himal Trek

The API Himal region requires special permits :

  • Restricted Area Permit: USD 90 per person for first week, USD 15 per additional day
  • TIMS Card: USD 20 per person
  • National Park Entry Fee: USD 30 per person

Transportation Costs

Since this is a remote region, transport costs are higher than popular areas :

  • Kathmandu to Dhangadhi Flight: USD 160 one way
  • Dhangadhi to Gokuleshwor (Jeep): USD 150 per vehicle
  • Gokuleshwor to Trek Start Point: USD 100 per vehicle

Hiring Guides and Porters

You’ll need guides and porters for this remote trek :

  • Trekking Guide: USD 35-40 per day
  • Porter: USD 25-30 per day
  • Porter-cum-Guide: USD 30-35 per day
  • Female Guide (on request): USD 40-45 per day

Accommodation and Food Costs

  • Accommodation: USD 10-15 per night (basic teahouses or camping)
  • Food (3 meals daily): USD 25-30 per day
  • Drinking Water: USD 2-3 per liter (boiled or bottled)

Sample Itinerary: API Himal Base Camp Trek

Here is a typical itinerary for the API Himal Base Camp Trek . Remember, API Himal Treks can customize this for your needs!

Day 1: Arrive in Kathmandu (1,400m)

Upon arrival at Tribhuvan International Airport, an API Himal Treks representative will greet you and transfer you to your hotel . After resting, you’ll receive information about your adventure. Overnight at hotel.

Day 2: Kathmandu Sightseeing and Preparation

Explore the cultural wonders of Kathmandu Valley . Visit Pashupatinath Temple (sacred Hindu site), Boudhanath Stupa (one of Asia’s largest stupas), Swayambhunath (Monkey Temple), and Kathmandu Durbar Square. Your guide will help with last-minute trek preparations. Overnight at hotel.

Day 3: Fly to Dhangadhi and Drive to Dadeldhura

Take a scenic 1-hour flight to Dhangadhi in the Terai plains . Then drive about 4 hours through villages and winding roads to Dadeldhura (2,090m), a beautiful hill town . Experience the sudden change from hot plains to cool mountain climate. Overnight in Dadeldhura.

Day 4: Drive to Gokuleshwor and Makarigaad

Morning exploration of Dadeldhura’s markets and temples with Himalayan views . After lunch, drive 4-5 hours to Gokuleshwor (900m) on the riverbank, then 2 more hours to Makarigaad (1,300m) – your trek starting point . Overnight in Makarigaad.

Day 5: Trek to Sitigaun (2,200m) – 6-7 hours

Begin your trek! Ascend steadily through forests, terraced fields, and small villages . Lunch break at Nwali (1,800m). The trail opens up with views of distant peaks. Arrive at Sitigaun, a charming hilltop village with traditional homes . Overnight in Sitigaun.

Day 6: Trek to Dhauliodar (3,100m) – 5-6 hours

Continue gradual ascent as the trail enters alpine zone . Pass through forests and isolated villages. Lunch at Simar (2,600m). Reach Dhauliodar, a breathtaking campsite tucked under rocky ridges of Api Himal range . The mountain landscape becomes dramatic here. Overnight at Dhauliodar.

Day 7: Hike to API Base Camp (3,850m) and Kalidhunga Lake (4,100m)

Early start for one of the trek’s most rewarding days . About 1.5 hours to Api Base Camp with magnificent views of Mount Api and neighboring peaks. Continue to Kalidhunga Lake, a sacred high-altitude lake surrounded by rocky cliffs and glaciers . Return to Dhauliodar for night. Overnight at Dhauliodar.

Day 8: Contingency Day / Optional Hike to Ringdepani Lake

This extra day allows for weather issues or altitude rest . If conditions allow, hike to Ringdepani Lake (about 4,000m) – another stunning alpine lake shaped like Nepal’s flag . Otherwise, rest and enjoy the alpine scenery. Overnight at Dhauliodar.

Day 9: Trek back to Sitigaun (2,200m) – 5-6 hours

Begin descent back to Sitigaun along familiar trails . The views are even more delightful on the way down. This day is easier than the climb up, allowing time to relax and interact with locals. Overnight in Sitigaun.

Day 10: Trek back to Makarigaad (1,300m) – 5-6 hours

Continue descending from Sitigaun through forests and villages . Reach Makarigaad where your trek began. Celebrate completing your journey! Overnight in Makarigaad.

Day 11: Drive to Dhangadhi

Drive back to Dhangadhi, retracing your route through Gokuleshwor and Dadeldhura . Enjoy farewell dinner with your trekking crew. Overnight in Dhangadhi.

Day 12: Fly to Kathmandu

Morning flight back to Kathmandu . Rest of the day free to relax or shop for souvenirs. Evening farewell dinner celebrating your adventure. Overnight at hotel.

Day 13: Final Departure

Your API Himal Treks representative will transfer you to the airport for your flight home . Safe travels!

Other Treks in Far-Western Nepal

API Himal Treks also offers other remote adventures in far-western Nepal :

Saipal Himal Base Camp Trek

  • Height: Saipal Himal (7,031m)
  • Permit Cost: USD 90 first week, USD 15 per additional day
  • Duration: 18-22 days

This trek explores the Saipal Himal range with stunning mountain views and pristine wilderness .

Limi Valley Trek

  • Permit Cost: USD 100 first week, USD 15 per additional day
  • Duration: 15-20 days

Trek through the remote Limi Valley near the Tibetan border, experiencing unique culture and landscapes.

Important Tips for Your API Himal Adventure

Altitude Sickness Prevention

Altitude sickness is common above 3,000 meters . Here’s how to stay safe:

  • Acclimatize properly by taking rest days
  • Stay hydrated and avoid alcohol
  • Ascend gradually and don’t overexert yourself
  • Know the symptoms: headache, nausea, tiredness, loss of appetite
  • If symptoms appear: Stop, don’t go higher, rest, drink water, and tell your guide immediately

Physical Fitness

You don’t need to be super fit, but you should be comfortable with your weight and size because walking on uneven terrain is strenuous if you’re overweight . Before your trek, consider :

  • Morning walks
  • Swimming
  • Cycling
  • Rock climbing
  • Hiking with a backpack

Travel Insurance

Travel insurance is required for any trek in Nepal . Make sure your policy covers :

  • Physically demanding activities like trekking
  • High-altitude trekking (up to your destination height)
  • Emergency helicopter evacuation
  • Medical expenses

This gives you peace of mind and financial protection in case of unexpected accidents .

Packing List Essentials

Here’s what to bring for your API Himal adventure :

Clothing:

  • Thermal base layers
  • Fleece jacket
  • Down jacket
  • Waterproof jacket and pants
  • Trekking boots and gaiters
  • Warm gloves and hat
  • Sunglasses with UV protection

Gear:

  • Sleeping bag (-20°C recommended)
  • Trekking poles
  • Headlamp with extra batteries
  • Water bottles and purification tablets

Personal:

  • First aid kit and medications
  • Sunscreen and lip balm with SPF
  • Energy bars and snacks

Why Choose API Himal Treks for Your Adventure

Experienced and Licensed Guides

API Himal Treks provides licensed, experienced guides who know the mountains intimately . They are trained in safety, first aid, and emergency procedures . Many speak excellent English and are passionate about sharing their culture.

Safety Commitment

Safety is their number one priority . From proper acclimatization schedules to emergency plans, they take every precaution to ensure your well-being .

Local Knowledge

With deep roots in Nepal’s mountain communities, API Himal Treks offers an authentic cultural experience . They know the best local teahouses, the kindest hosts, and the most beautiful side trails.

Affordable and Transparent Pricing

They offer competitive pricing without hidden costs . Packages can be tailored to your budget, whether you want basic teahouses or more comfort .

Complete Service

From the moment you land until you depart, everything is arranged . Permits, transport, accommodation, gear, guides, porters – they handle it all so you can focus on enjoying your adventure.

Customer Satisfaction

Past trekkers rave about their experiences. As one client said, “I went to Nepal with the idea to do some trekking… I didn’t make any concrete plans and told Rajendra (manager of Api Himal) that I wanted to decide while I was there. They helped me create the perfect trip” .

Conclusion: Your Himalayan Adventure Awaits

Whether you dream of standing on a trekking peak like Yala Peak or exploring the remote valleys of API Himal Base Camp, API Himal Treks & Expedition can make it happen.

With this company, you’re not just a customer – you’re a guest. Their experienced guides become your friends. Their careful planning becomes your peace of mind. Their beautiful country becomes your unforgettable adventure.

From the crowded trails of the Everest region to the untouched wilderness of far-western Nepal, API Himal Treks offers something for every kind of adventurer. Beginners can try their first climb on Yala Peak. Experienced trekkers can challenge themselves on Mera or Island Peak. And those seeking true solitude can lose themselves in the majestic landscapes around API Himal.

The mountains are calling. The trails are waiting. And API Himal Treks is ready to guide you every step of the way.

So what are you waiting for? Start planning your Nepal adventure today. Contact API Himal Treks, pack your bags, and get ready for the journey of a lifetime.

The Rolwaling Trek: A Friendly Guide to Nepal’s Hidden Valley

Introduction: A Special Place in the Mountains

Have you ever wanted to go somewhere really quiet? A place where you can walk for hours and hear nothing but the wind and your own footsteps? Let me tell you about the Rolwaling Valley in Nepal.

This valley sits between two very famous trekking places: Langtang and Everest. But here is the good part – almost no one goes there! While thousands of people walk to Everest Base Camp every year, only about 4,000 people visit Rolwaling in a whole year . That means you can have the mountains almost all to yourself.

The Sherpa people who live here have a special name for this valley. They call it “the grave.” That sounds a little scary, right? But don’t worry! They mean it in a good way. They say that when you enter this valley, you fall in love with it so much that you never want to leave .

The name Rolwaling comes from an old story. In the Tibetan language, it means “carved by a plough” . The story says that a god once plowed this valley like a farmer plows a field. That is why the valley has steep sides and a flat bottom .

For Buddhist people, this is a very special place. It is one of seven hidden valleys in the Himalayas. These valleys are called Beyuls. Long ago, Buddhist saints made these places as safe hiding spots for people who were in danger . Walking here is not just a trek. It feels like you are walking through a sacred place.

So, if you want to see real mountain life, walk on quiet trails, and feel like you have discovered something special, the Rolwaling trek might be perfect for you.

In this guide, I will tell you everything you need to know. We will talk about the best time to go, what to pack, where you will sleep, and how to walk safely. Let’s start this adventure together!


Where is Rolwaling? A Look at the Land

Before we talk about walking, let’s understand where we are going. The Rolwaling Valley runs from west to east. It sits right below the border with Tibet .

Big mountains stand on both sides of the valley. On the south side, you have Gaurishankar (7,134 meters) . This mountain is so holy that for a long time, no one was allowed to climb it . People still respect it deeply. On the north side, you have Melungtse (7,181 meters) . These two giants watch over the valley like guards.

The valley floor is not flat like a road. You will walk up and down, through forests, past waterfalls, and across rocky paths. The highest point for most trekkers is Tsho Rolpa Lake at about 4,580 meters . That is very high! To give you an idea, that is almost five times higher than the tallest mountain in the UK.

Because the valley is so deep and the mountains are so high, the weather can change fast. You might start your day in warm sunshine and end it in cold wind and snow. That is normal here.


Best Time to Visit: When Should You Go?

Choosing the right time for your trek is very important. The weather decides if you will have clear mountain views or if you will walk in rain and clouds. Here are the seasons explained simply.

Spring (March to May)

Spring is a beautiful time in Rolwaling. The weather is warm and nice during the day. But the best part is the flowers. The lower parts of the trail have many rhododendron trees. These trees bloom with red, pink, and white flowers . It looks like someone painted the forest.

The days are comfortable for walking. But remember, the higher you go, the colder it gets. Always pack warm clothes, even in spring.

Autumn (September to November)

This is the most popular time for trekking in all of Nepal. After the summer rains stop, the air becomes very clean. You can see the mountains so clearly, they look close enough to touch .

The mornings are cold and crisp. The days are sunny and pleasant. This is the best time for taking photos. If you want the best views of Gaurishankar and the other peaks, come in autumn.

Winter (December to February)

Winter is only for very strong trekkers. Snow blocks the high trails. The small villages at the top of the valley, like Na, become empty. The teahouses close because no one is there .

The temperature at night can drop to -15°C (5°F) or even colder . That is freezing! If you want to trek in winter, you must bring very warm gear. You might also need to carry a tent and food because the teahouses will be shut.

Monsoon (June to August)

This is the rainy season. It rains almost every day. The trails become slippery and muddy. In the forests, you might find leeches – small creatures that suck blood . They are not dangerous, but they are annoying.

Also, the clouds hide the mountains most of the time. You might walk for days without seeing any peaks. Landslides can also block the roads. I do not suggest this time for your first visit.


Getting There: From Kathmandu to the Trail

Your adventure starts in Kathmandu, the busy capital of Nepal. From there, you need to get to the trailhead. This is not a short trip. It takes a whole day.

Most people take a bus or a private jeep. You drive for about 7 to 10 hours . The road winds through hills and follows rivers. You will pass small villages with green farms on the hillsides. It is bumpy and dusty, but it is also very interesting to watch.

The drive takes you to a place called Chetchet. This is at about 1,400 meters . Here, the road ends. From this point, you must walk. There are no more cars.

If you have more money and less time, you can take a helicopter. Some companies offer helicopter drops to Beding village . This saves you about three days of walking. But it costs a lot more money.


The Villages You Will Meet

Walking through Rolwaling is like going back in time. The villages are small and simple. The people live the same way their grandparents lived. Here are the main places you will stop.

Simigaon (2,000 meters)

Your first village after leaving the road. To get here, you must climb a steep hill with many stone steps. It is hard work on your first day! Simigaon is a mix of Sherpa and Tamang people. These are two different groups who live in the mountains. The houses are made of stone with roofs made from flat stones called slate . If the sky is clear, you will see a amazing sight. The big mountain Gaurishankar stands right above the village. It looks so big, you feel like you can almost touch it .

Beding (3,690 meters)

After a few days of walking through forests and past waterfalls, you reach Beding. This is the biggest village in the valley. It feels like the main town here. At the entrance to the village, there is a monastery (gompa) . This is a Buddhist place for prayer. Just above the village, there is also a holy temple for Gaurishankar . Beding is very important for your body. The air here is thin because you are high up. Most trekkers take a rest day here. This helps your body get used to the height. You can walk around the village or climb a small hill nearby. Just do not go too high or too fast.

Na Village (4,183 meters)

As you walk higher, the trees disappear. The land becomes rocky and open. You can see far in every direction. Na is not a normal village. People do not live here all year. In summer, yak herders come here with their animals. Yaks are big, hairy animals that look like cows. They give milk and wool . The views from Na are amazing. Snowy mountains stand in a circle around you. You feel very small, but also very lucky to be there.

Tsho Rolpa Lake (4,580 meters)

This is the main goal for most trekkers. From Na, you walk for a few hours. The path goes along the side of the Rolwaling Glacier . A glacier is a huge river of ice that moves very slowly.

Then you see it. Tsho Rolpa is a huge lake with bright turquoise water. The color is so blue-green, it does not look real. It is one of the biggest glacial lakes in Nepal .

Sometimes you can see small pieces of ice floating in the water. They break off from the glacier and drift in the lake. Standing here, with mountains all around and this beautiful lake in front of you, is a moment you will never forget.

But there is a sad story too. The lake is getting bigger every year because the glacier is melting. This is because the world is getting warmer. Scientists worry that one day the lake might flood the valley below .


Trekking Routes: Two Main Choices

Most people do the Rolwaling trek in one of two ways. Let me explain both.

Option 1: The Classic In-and-Out Trek

This is the simpler choice. You walk up the valley, see the lake, and then walk back the same way. This takes about 12 to 14 days from Kathmandu and back .

Here is a simple plan:

  • Days 1-2: Drive from Kathmandu to Chetchet. Walk to Simigaon.
  • Days 3-4: Walk to Beding. Rest day in Beding.
  • Day 5: Walk to Na.
  • Day 6: Walk to Tsho Rolpa Lake. Return to Na or Beding.
  • Days 7-10: Walk back down to the road. Drive to Kathmandu.

This is good for people who want a peaceful trek without too much risk.

Option 2: The Big Adventure – Crossing Tashi Lapcha Pass

For strong trekkers, there is a harder choice. You can cross a high pass called Tashi Lapcha (5,755 meters) . This connects Rolwaling to the Everest region . This is very hard. You need ropes, ice axes, and special gear. You also need a guide who knows the way. The pass has steep ice and deep cracks in the glacier . If you cross Tashi Lapcha, you can walk all the way to Everest Base Camp after. This makes a very long trek of about 3 weeks or more .I do not suggest this for your first trek. Only do this if you have climbed on snow and ice before.


Where Will You Sleep? Teahouses and Camping

In Rolwaling, you have two choices for sleeping.

Teahouses

The easy choice is teahouses. These are simple homes that rent rooms to trekkers. They are not fancy hotels. The rooms are small with two beds. The beds have a mattress and a pillow. You bring your own sleeping bag . The toilet is usually outside. It might be a squat toilet (you have to squat down) or a western toilet. There is no shower with hot water. Sometimes you can pay for a bucket of hot water to wash. In the evening, you sit in the main room. This room has a stove burning yak dung for heat. You can drink tea, eat food, and talk to other trekkers. It is very cozy. The teahouses in Rolwaling are basic. Do not expect luxury. But the people are very friendly and kind.

Camping

The other choice is camping. You carry a tent and all your food. This gives you more freedom. You can stop anywhere you want. But camping is harder. You must carry more weight. You must cook your own food. And if the weather is bad, a tent is colder than a teahouse. Most people use teahouses because it is easier.


Food on the Trail: What Will You Eat?

You will not find pizza or hamburgers up here. The food is simple, but it tastes good after a long day of walking. The main food is dal bhat. This is rice with lentil soup. It often comes with vegetables or curry. The best part? You can ask for more. In Nepali culture, it is polite to give more rice to hungry guests .

Other foods you might find:

  • Noodles – cooked in soup or fried
  • Tibetan bread – fried bread that is warm and yummy
  • Eggs – boiled, fried, or in an omelet
  • Potatoes – boiled or fried
  • Tea – milk tea or black tea
  • Soup – vegetable soup or garlic soup

Garlic soup is very popular here. People believe it helps with the high altitude. I always order it at dinner. You should bring some snacks from Kathmandu. Chocolate, nuts, and energy bars are good to have in your pack.


About Altitude: The Thin Air

This is very important. Rolwaling is high. Very high. The air has less oxygen than at sea level. Your body needs time to get used to it. If you go up too fast, you can get sick. This is called altitude sickness. The signs are:

  • Bad headache
  • Feeling sick to your stomach
  • Feeling very tired
  • Not wanting to eat
  • Trouble sleeping

If you feel these things, do not go higher. Rest for a day. If you get worse, you must go down. Going down is the only cure.

Here are my simple rules for altitude:

  1. Walk slow. Take your time. There is no rush.
  2. Drink water. Lots of water. It helps your body.
  3. Sleep low. Try to sleep at a lower place than the highest point you walked that day.
  4. Listen to your body. If you feel bad, rest or go down.
  5. Take rest days. In Beding, take a day to do nothing. Your body needs this.

What to Pack: Your Packing List

Packing for Rolwaling is tricky. You need warm clothes, but you do not want a heavy bag. Here is a simple list.

Clothes

  • Base layer – long underwear that wicks sweat (top and bottom)
  • Mid layer – fleece jacket or wool sweater for warmth
  • Outer layer – waterproof jacket and pants for wind and snow
  • Trekking pants – comfortable pants for walking (2 pairs)
  • T-shirts – for warm days (2-3)
  • Underwear – enough for each day (plus one extra)
  • Socks – wool socks for warmth (3-4 pairs)
  • Hat – warm hat that covers your ears
  • Gloves – warm gloves or mittens
  • Sunglasses – good ones that block the sun

Gear

  • Sleeping bag – rated for -10°C or colder
  • Backpack – 40-50 liters is good
  • Water bottle – at least 1 liter (Nalgene bottles are good)
  • Water purification – tablets or a filter
  • Headlamp – with extra batteries
  • Trekking poles – they help your knees a lot
  • Sunscreen – the sun is strong up high
  • Lip balm – with SPF protection

Toiletries

  • Toilet paper – bring enough, and take your used paper with you (do not leave it in nature)
  • Hand sanitizer
  • Small towel
  • Toothbrush and toothpaste
  • Biodegradable soap

First Aid

  • Personal medicines
  • Pain killers
  • Plasters for blisters
  • Altitude sickness pills (talk to a doctor first)
  • Antibacterial wipes

Important Words to Know

The people in Rolwaling speak Sherpa and Nepali. Learning a few words helps a lot. People smile when you try.

Greetings

  • Namaste – Hello (said with hands together)
  • Tashi delek – Hello (in Sherpa language)
  • Dhanyabad – Thank you
  • Subha Prabhat – Good morning

On the Trail

  • Bato – Path or trail
  • Pani – Water
  • Khana – Food
  • Chiya – Tea
  • Kati – How much?
  • Mahango – Expensive
  • Sasto – Cheap

Directions

  • Baya – Up
  • Tala – Down
  • Sidha – Straight
  • Deura – Left
  • Dayra – Right

Emergency

  • Mala sankat cha – I have a problem
  • Doctor – Doctor
  • Sahayog – Help
  • Birami – Sick

Guides and Porters: Should You Hire Help?

You can trek in Rolwaling without a guide. It is allowed. But I think hiring a guide is a good idea.

Why Hire a Guide?

  • Safety – They know the trail and the weather. If you get sick, they can help.
  • Culture – They can talk to local people and explain things.
  • Language – They can translate for you.
  • No stress – You do not have to worry about where to go or where to sleep.

About Porters

A porter carries your heavy bag. You carry a small day pack with water and snacks. This makes walking much easier. Porters are strong people. They carry 20-25 kilos sometimes. They walk fast and work hard. Please treat them with respect. Give them food and a place to sleep. Pay them fairly. If you hire a guide and porter through a company, make sure the company treats them well. Ask if they get good wages, food, and insurance.


Money Matters: Costs and Budget

How much does Rolwaling cost? It depends on your style. Here are rough prices.

Permits

You need two permits:

  1. Gaurishankar Conservation Area Permit – about $30 USD
  2. Trekker’s Information Management System (TIMS) card – about $20 USD

You get these in Kathmandu before you go.

Guide and Porter

  • Guide – $25-30 USD per day
  • Porter – $15-20 USD per day

You also pay for their food and accommodation. This is normal.

Food and Lodging

  • Teahouse room – $3-5 USD per night
  • Meals – $5-10 USD per meal
  • Hot shower – $3-5 USD
  • Battery charging – $2-3 USD per device

Total

For a 14-day trek, budget about $800-1200 USD per person. This includes permits, guide, food, and lodging. If you go without a guide, it is cheaper. Bring cash. There are no banks or ATMs in the valley. You can exchange money in Kathmandu before you go.


Safety First: Staying Healthy

Your safety is your own responsibility. Here are some tips.

Water

Do not drink the water from streams. It can make you sick. Always treat it with tablets or a filter. Or buy boiled water at teahouses. It costs a little money, but it is safe.

Food

Eat food that is cooked hot. Avoid salads or raw vegetables. They might be washed in dirty water. Dal bhat is always a safe choice.

Blisters

Blisters hurt a lot. Stop as soon as you feel a hot spot on your foot. Put a plaster on it. Good socks and well-worn boots help prevent blisters.

Weather

Mountain weather changes fast. One minute it is sunny, the next minute it is snowing. Always carry your warm jacket and rain gear, even if the morning is clear.

Travel Insurance

Get insurance! This is very important. Make sure it covers trekking up to 5,000 meters or higher. It should also cover helicopter rescue. If you get hurt or very sick, a helicopter might be the only way out. This costs thousands of dollars. Insurance pays for it.


Responsible Trekking: Leave No Trace

The mountains are beautiful. Please help keep them that way.

What is Leave No Trace?

It is a simple idea: take nothing but photos, leave nothing but footprints.

  • Carry out your trash. Do not leave plastic, paper, or food on the trail. Bring a bag for your garbage.
  • Use the toilets. Do not go to the bathroom on the trail. Use the teahouse toilets.
  • Respect the culture. Dress modestly. Ask before taking photos of people. Walk around (not over) religious items like stupas and prayer walls.
  • Save firewood. Forests are small here. Do not ask for fires just for fun. Use the teahouse stove for warmth.

Conclusion: Why You Should Go

The Rolwaling trek is not the easiest trek in Nepal. The paths are rough. The teahouses are basic. The days are long. But it is also one of the most special places I have ever been. You will walk through ancient forests where the birds sing and the air smells like pine. You will cross rivers on simple bridges that swing as you walk. You will climb to a turquoise lake that looks like a jewel set in the gray rocks.

You will meet Sherpa farmers who invite you in for tea. You will sit by the fire at night, tired and happy, listening to stories in a language you do not understand but somehow feel in your heart. In a world that gets louder and faster every day, Rolwaling stays quiet and slow. The mountains do not care about your emails or your problems. They just stand there, old and wise, covered in snow, watching over the valley they carved so long ago.

If you go with an open heart and a respectful spirit, the valley will give you something precious. Not just photos or memories, but a piece of its peace. A quietness that stays with you long after you come home.

So pack your bag, learn your Nepali words, and go. The trail is waiting. The mountains are calling.

Namaste and happy trekking!

Gokyo Lakes Trek: Summit Ri for 360° Himalayan Panorama

Gokyo Lakes Trek”​​: This is the primary and most direct keyword, essential for search engine visibility. The Gokyo Valley Trek is a fantastic alternative to the more crowded Everest Base Camp trek, offering stunning turquoise lakes, incredible mountain views, and a rich cultural experience in a quieter setting. Below, you’ll find detailed answers to your questions to help you plan your adventure.

Here is a quick overview of the key details for the Gokyo Valley Trek:

Feature Details

  • Maximum Altitude 5,357m at Gokyo Ri
  • Typical Duration 12-14 days
  • Difficulty Level Strenuous / Challenging (requires good fitness)
  • Best Time to Trek Pre-monsoon (March to May) and Post-monsoon (September to November)

Key Highlights Gokyo Lakes, Gokyo Ri viewpoint, Ngozumpa Glacier, views of four 8,000m peaks


What are the main attractions in Gokyo Valley?

The Gokyo Valley is renowned for its unique combination of glacial landscapes, panoramic views, and authentic Sherpa culture. Here are the must-see attractions:

The Sacred Gokyo Lakes: The trek’s centerpiece is a series of six stunning turquoise and emerald-green glacial lakes, among the highest freshwater lake systems in the world . They are a Ramsar site, considered sacred by both Buddhists and Hindus . Most trekkers visit up to the third and fourth lakes, with a hike to the fifth lake (Ngozumpa Tsho) offering breathtaking reflections of Cho Oyu .

Gokyo Ri Viewpoint: The summit of Gokyo Ri (5,357m) is widely considered one of the best viewpoints in the entire Everest region . The early morning climb rewards you with a 360-degree panorama that includes four of the world’s 8,000-meter peaks: Mount Everest, Lhotse, Makalu, and Cho Oyu . You also get an unparalleled bird’s-eye view of the Gokyo Lakes and the massive Ngozumpa Glacier below .

Ngozumpa Glacier: As you trek towards Gokyo, you’ll walk alongside the largest glacier in the Himalayas. This dramatic, raw landscape of ice and moraine provides a surreal and unforgettable trekking experience.

Panoramic Mountain Vistas: Throughout the trek, you are surrounded by some of the world’s highest and most beautiful peaks. Besides the four 8,000-meter giants, you’ll have constant views of other majestic mountains like Thamserku, Ama Dablam, Nuptse, and Cholatse .

Sherpa Culture and Traditional Villages: The trail winds through charming Sherpa villages such as Namche Bazaar, Dole, and Machhermo . This offers a wonderful opportunity to experience the unique lifestyle, hospitality, and rich Buddhist culture of the local mountain people . A visit to the Khumjung Monastery or the Sherpa Culture Museum in Namche Bazaar adds a deeper cultural dimension to your trek .

How does Gokyo Valley compare to Everest Base Camp?

While both treks start in the Khumbu region, they offer distinctly different experiences. Here is a comparison based on your questions:

Feature Gokyo Valley Trek Everest Base Camp (EBC) Trek

Crowds Less crowded and more peaceful; only about 15-35% of trekkers take this route, offering a more off-the-beaten-path feel . Very crowded, especially during peak seasons, with busy teahouses and trails .
Key Landscapes Renowned for its stunning glacial lakes, the massive Ngozumpa Glacier, and incredible mountain views from a central vantage point (Gokyo Ri) . Famous for reaching the base of the world’s highest mountain (EBC) and the classic view from Kala Patthar.


Views From Gokyo Ri, you get a panoramic view of four 8,000m peaks (Everest, Lhotse, Makalu, Cho Oyu) and the lakes, all in one breathtaking scene . From Kala Patthar, you get a famously close-up view of Mount Everest and the Khumbu Icefall .

Route Starts on the same path as EBC but branches off at Namche Bazaar to follow a quieter valley, offering a more gradual acclimatization path for some . Follows a more direct and heavily trafficked route up the valley to the base of Everest.

Overall Experience Often described as more scenic, peaceful, and “raw,” offering a deeper connection with nature . A classic, iconic trek focused on the goal of reaching Everest Base Camp and experiencing the heart of mountaineering culture . In short, if you value solitude, pristine lakes, and expansive mountain panoramas, Gokyo might be the better choice. If your dream is to stand at the foot of Everest, then the EBC trek is for you. Of course, if you have the time and energy, you can combine both by crossing the Cho La pass for an even greater adventure .

What is the difficulty level of the Gokyo Valley trek?

The Gokyo Valley trek is graded as strenuous to challenging . It is not a technical climb, but it demands good physical and mental preparation due to several factors:

High Altitude: The trek reaches a maximum altitude of 5,357m at Gokyo Ri . The risk of Altitude Mountain Sickness (AMS) is real, and proper acclimatization is crucial. Most itineraries include rest days for this reason .

Long Trekking Days: You will typically walk for 5 to 7 hours per day, covering uneven and often rocky or rugged terrain .

Steep Ascents and Descents: The trail includes many steep climbs and descents, particularly on the way to Namche Bazaar and on the final push to Gokyo Ri .

Remote and Rugged Trail: The route beyond Namche is less commercialized, and the path can be raw, especially when trekking over the Ngozumpa Glacier moraine .

This trek is best suited for trekkers with good fitness and some previous trekking experience . If you are a novice trekker, it is achievable with thorough preparation, including a dedicated training regimen focused on cardio and stamina .

What is the best time to trek in Gokyo Valley?

The best times to trek in Gokyo Valley are during the two main trekking seasons when the weather is most stable and the views are clearest :

Spring (March to May): This season offers moderate temperatures and blooming rhododendron forests along the lower trails, adding vibrant color to the landscape. The days are longer, and the skies are generally clear in the mornings .

Autumn (September to November): Widely considered the peak trekking season. The weather after the monsoon is crisp and stable, with excellent visibility offering the most spectacular mountain views. The trails and teahouses are busier during this time .

It is possible to trek in the winter (December to February), but it can be extremely cold, especially at night, and there may be heavy snowfall at higher elevations. Trekking in the summer/monsoon (June to August) is not recommended due to heavy rain, leeches on the trail, and poor visibility .

What permits are needed for the Gokyo Valley trek?

To trek in the Gokyo Valley, you are required to carry two mandatory permits at all times :

Sagarmatha National Park Entry Permit: This permit grants you access to the UNESCO World Heritage Site of Sagarmatha National Park. It contributes to the park’s conservation efforts .

Cost: NPR 3,000 + 13% VAT for foreign nationals .

Where to Get It: You can obtain this permit at the Nepal Tourism Board office in Kathmandu or at the park entry checkpoint in Monjo .

Khumbu Pasang Lhamu Rural Municipality Permit: This local permit has replaced the old TIMS card for the Khumbu region. The fees directly support local community development projects, such as trail maintenance, schools, and waste management .

Cost: NPR 2,000 per person for foreign nationals (note that costs can vary, with some sources citing NPR 3,000, so it’s best to confirm) .

Where to Get It: This permit can only be obtained locally. You can get it at the checkpoint in Lukla after your flight or at the checkpoint in Monjo .

Documents You’ll Need:

  • A valid passport and a Nepali visa .
  • 2 to 4 passport-sized photos .
  • Your trekking itinerary .

It is highly recommended to carry cash in Nepalese Rupees for these fees, as card payments are not accepted at permit checkpoints .

Summary of Permit Costs

Permit Type Cost (Foreign Nationals) Where to Obtain
Sagarmatha National Park Entry Permit NPR 3,000 + 13% VAT Nepal Tourism Board (Kathmandu) or Monjo
Khumbu Pasang Lhamu Rural Municipality Permit NPR 2,000 Lukla or Monjo
Trekking without these permits can result in fines, being turned back at checkpoints, and invalidation of your travel insurance .

Tips for Your Trek

Acclimatize Properly: Don’t rush. Follow the “walk high, sleep low” principle and listen to your body to prevent altitude sickness .

Pack Smart: Bring layered clothing for varying temperatures, a good quality sleeping bag, trekking poles, a headlamp, and a comprehensive first-aid kit . A detailed packing list is available in several of the trekking guides .

Hire a Guide and Porter: Not only does this support the local economy, but a guide enhances your experience with cultural insights and ensures your safety. A porter allows you to trek more comfortably by carrying your heavy gear .

Get Travel Insurance: Ensure your policy covers high-altitude trekking (up to 5,500m) and emergency helicopter evacuation .

The Gokyo Valley Trek is a truly special journey that rewards you with some of the most beautiful and serene landscapes in the Himalayas.

Discovering the Heart of Sherpa Culture on the Everest Base Camp Trek

More than just a hike, the Everest Base Camp trek is a journey into the heart of Sherpa culture. Discover ancient monasteries, vibrant festivals, and the legendary hospitality of the Himalayas.

The alarm on my phone, a jarring, electronic beep, feels profoundly out of place. I fumble to silence it in the pre-dawn darkness of a teahouse in Dingboche. The air is thin and bitingly cold, a stark reminder that we are now at over 4,400 meters (14,400 feet). My body aches in a way that feels earned, each muscle a testament to the previous day’s climb through rhododendron forests and across glacier-fed rivers. But the discomfort fades the moment I pull back the thin cotton curtain.

There, framed by the frost on the windowpane, is Ama Dablam. The mountain, whose name means “Mother’s Jewelbox,” catches the first alpenglow, its icy peak blazing a fiery orange against the deep indigo of the receding night. For a moment, I can’t breathe, and it has nothing to do with the altitude. This is the postcard image, the one that launches a thousand trekking dreams. But what I’m learning, step by step, is that the true Everest Base Camp (EBC) trek is not just about this view. It’s about the people who live their entire lives in its shadow.

For many, the Everest Base Camp trek is a physical challenge, a bucket-list conquest to stand at the foot of the world’s highest mountain. And it is undoubtedly that. But to view it solely as a climb is to miss the point entirely. This legendary trail is a living, breathing cultural artery that beats through the heart of the Khumbu region. It is a pathway into the world of the Sherpa people, an indigenous community whose identity, spirituality, and legendary resilience are as much a part of the landscape as Everest itself .

This is the story of that other journey—the one that takes you not just to base camp, but into the soul of the Himalayas.

The “People from the East”: Who Are the Sherpa?

Before we put on our hiking boots, it’s essential to understand the ground beneath them. The term “Sherpa” is often incorrectly used as a job title for any mountain guide in Nepal. In reality, it is a specific ethnic group. The word Sherpa translates to “People from the East,” referring to their migration from the Kham region of eastern Tibet over the past 500 years . They crossed the high Himalayan passes and settled in the fertile valleys of Solu and Khumbu, bringing with them a rich tapestry of Tibetan Buddhism and a culture uniquely adapted to one of the most extreme environments on Earth.

For centuries, the Sherpas were subsistence farmers and traders. They herded yaks, grew potatoes (a crop introduced in the 19th century), and traversed the treacherous Nangpa La pass to trade barley and grains for Tibetan salt and wool . Theirs was a life of quiet isolation, deeply intertwined with the natural world and the spirits they believed inhabited it. This all changed in the 20th century when the outside world, in the form of British mountaineering expeditions, came knocking. The year was 1921, and the British were on their first reconnaissance of Mount Everest. They discovered that these “People from the East” possessed an almost superhuman stamina, a cheerful disposition, and an uncanny ability to navigate the high-altitude terrain. From that moment on, the Sherpa became an indispensable part of Himalayan climbing history, forging a legacy that continues to this day .

The Gateway and the “Sherpa Capital”: Lukla to Namche Bazaar

The journey begins, as it does for almost every trekker, with a flight into Tenzing-Hillary Airport in Lukla (2,845m). The flight itself is a rite of passage. The small plane buzzes through a corridor of valleys, the wings seemingly close enough to touch the lush green hillsides, before landing on a short, sloping runway that famously drops into a stone wall. It’s thrilling, chaotic, and a perfect metaphor for the adventure ahead.

As you take your first steps on the trail, you walk not just into the mountains, but into Sagarmatha National Park, a UNESCO World Heritage Site. The first day is a gentle introduction, a pleasant descent to the village of Phakding, where the trail follows the tumbling, turquoise waters of the Dudh Koshi (Milk River). You cross your first suspension bridges, heavy with prayer flags, and get your first taste of the teahouse culture that will be your home for the next two weeks .

The second day presents the first real challenge: the climb to Namche Bazaar (3,440m). The trail winds through pine and juniper forests, crisscrossing the river on increasingly high bridges. It’s a steep, unrelenting climb, but with every switchback, the views expand. And then, finally, you see it. Cradled in a giant horseshoe-shaped amphitheater of stone, Namche Bazaar appears like a shimmering mirage.

Namche is the unofficial “capital” of the Sherpa world. It is a bustling, colorful hub of activity, a place where centuries-old tradition meets the modern trekking industry. You’ll find internet cafes, bakeries serving apple pie, and gear shops stocked with everything from down jackets to trekking poles. But if you look closer, past the trekking crowds, you’ll see the real Namche. It’s in the Sherpa women in traditional aprons (pangi) bargaining in the market. It’s in the lines of colorful prayer flags strung between wooden homes. It’s in the distant, deep clang of a yak bell echoing off the hillsides.

Acclimatization in Namche is not just a physical necessity; it’s a cultural opportunity. On your rest day, take a short hike up to the Everest View Hotel. The slog up is worth it for your first unobstructed glimpse of Mount Everest, peeking over the shoulder of the mighty Lhotse-Nuptse ridge. But perhaps more rewarding is a detour to the nearby village of Khumjung. Here, you can visit the Khumjung Monastery, which famously houses what is purported to be a yeti scalp . More importantly, you can walk through a village where life continues as it has for generations, with potato fields and stone-walled farmhouses, offering a quieter, more authentic counterpoint to the commercial buzz of Namche.

The Heartbeat of Buddhism: Tengboche and the Power of Blessings

Leaving Namche, the trail contours high above the Dudh Koshi, offering staggering views of the region’s most beloved peak, the iconic Ama Dablam. The vegetation begins to change; the tall pines give way to dwarf rhododendron and juniper. The air becomes thinner, crisper. And then, after a descent through a beautiful forest to a bridge over the raging river, you face the final climb of the day. It’s a steep one, but at the top lies one of the most spiritually significant places in the Himalayas: Tengboche.

Tengboche Village (3,860m) is dominated by its famous monastery, the largest in the Khumbu region . Originally built in 1916, the monastery was tragically destroyed by an earthquake in 1934 and again by a fire in 1989. Each time, it was painstakingly rebuilt by the Sherpa community, a testament to its central role in their lives . As you walk through the gates, the world seems to quieten. The flapping of prayer flags and the murmur of monks’ chants replace the sound of your own heavy breathing. The setting is almost impossibly beautiful, with the monastery set against a backdrop of Everest, Nuptse, Lhotse, and Ama Dablam .

For trekkers and mountaineers alike, a visit to Tengboche is a profound experience. It is customary to attend the morning puja (prayer ceremony) . Sitting in the dimly lit hall, surrounded by intricate murals of wrathful and peaceful deities, the air thick with the smell of butter lamps and juniper incense, you witness the living faith of the Sherpa people. The deep, guttural chanting and the rhythmic clang of cymbals are not just a performance for tourists; they are a daily ritual, a calling to the gods for protection and peace .

This is where you truly begin to understand the Sherpa relationship with the mountains. While we see them as a challenge to be conquered, the Sherpa see them as the home of the gods. Mount Everest itself is known as Chomolungma, which translates to “Goddess Mother of the World.” She is considered a generous but easily angered deity, Miyo Lang Zangma . For generations, climbing these peaks was considered blasphemous. While this has changed due to economic necessity and outside influence, the spiritual respect remains.

It is at monasteries like this that climbers and trekkers stop to receive a blessing before venturing higher. A lama will tie a small, plastic-covered amulet containing sacred mantras around your neck and offer a khata (a ceremonial white silk scarf). This simple act is deeply moving. As one monk at the 600-year-old Pangboche Monastery (a smaller, older gem further up the trail) explained to a writer from Outside Magazine, when people come for a blessing, they are “asking for forgiveness and safe passage on the peaks without incurring the goddesses’ wrath” . You carry this blessing, a tangible piece of Sherpa faith, with you for the rest of the journey, a silent comfort on the rocky trails ahead.

Ascending with the Gods: Dingboche to Lobuche

Above Tengboche, the landscape transforms. The forests thin out and are replaced by scrubland and alpine deserts. The trail passes through Pangboche, with its ancient monastery, and climbs to the windswept valley of Dingboche (4,410m). Here, the fields are enclosed by low stone walls to protect barley and potato crops from the biting winds. Another acclimatization day here offers the chance to climb Nangkartshang Peak, a nearby ridge that provides breathtaking views of Lhotse, the world’s fourth-highest mountain, and the vast Imja Tse valley .

The trek from Dingboche to Lobuche (4,910m) is a journey through a high-altitude moonscape. The path is rugged, following the terminal moraine of the Khumbu Glacier. Near the village of Duglha, you’ll pass a field of stone monuments, or chortens, erected in memory of Sherpas and climbers who have lost their lives on Mount Everest. It is a somber and humbling place. Fluttering prayer flags offer prayers to the departed, a poignant reminder of the ultimate price that has been paid in these mountains. It is impossible to pass by these stones without feeling a profound respect for the Sherpa climbers who navigate the deadly Khumbu Icefall year after year. Pemba Nurbu, the monk-caretaker at Pangboche, knows this reality intimately; he narrowly avoided death in the 2014 avalanche that killed 16 of his fellow Sherpas .

Standing there, in the thin, cold air, you realize that for the Sherpa, this isn’t just a career. It is a life lived in constant negotiation with the sacred and the dangerous. They climb, as Pemba Nurbu puts it, to eat and provide for their families, but they do so with a deep-seated knowledge that they are walking on the body of a goddess .

The Goal and the Ultimate View: Gorakshep, EBC, and Kala Patthar

From Lobuche, it’s a final push to Gorakshep (5,164m) , the last stop before the ultimate goal. After a brief rest and lunch, you drop your bags and, with only a daypack, make the final journey across the Khumbu Glacier. The trail is a rocky, undulating path over the glacier’s lateral moraine. It’s a strange, almost otherworldly landscape of ice and rock. And then, after a few hours, you arrive. A flat expanse of ice and rock, littered with the colorful tents of climbing expeditions, surrounded by towering peaks.

Everest Base Camp (5,364m) itself is not the dramatic viewpoint many imagine. You cannot see the summit of Everest from here; it is hidden behind the massive Western Cwm and the Nuptse wall. But that doesn’t diminish the feeling. The sense of achievement is overwhelming. You are standing where legends have stood, at the foot of the world’s highest point. You can see the infamous Khumbu Icefall, a chaotic tumble of seracs and crevasses, the first great obstacle for those aiming for the top. For the Sherpa porters and guides moving through camp, it’s just another day at the office. For you, it’s a moment of personal victory.

But the true visual prize, the view that will forever be etched in your memory, comes the next morning. You wake long before sunrise, your water bottle frozen solid, your breath misting in the beam of your headlamp. You begin the slow, grueling, switchbacking climb up the black scree of Kala Patthar (5,545m / 18,192ft) . It is steep, exhausting, and at this altitude, every step is a conscious effort. You concentrate on the beam of light in front of you, on putting one foot in front of the other.

And then you reach the top. The sun begins to peek over the horizon. And as it does, it paints the world. The pyramidal summit of Everest, the sharp peak of Nuptse, the sheer face of Lhotse, and the elegant spire of Ama Dablam are set ablaze with golden light. The prayer flags strung across the summit snap violently in the frigid wind. You are surrounded by the highest peaks on Earth. In that moment, surrounded by strangers hugging and crying, you understand why you came. You feel the smallness of yourself and the immensity of the world .

Coming Home: The Descent and a Lasting Respect

The trek down is a revelation. What took days of struggle uphill is covered in a fraction of the time. The air gets thicker, the nights get warmer, and the landscape slowly greens. You pass through the villages you stayed in, but this time, you look at them with new eyes. You see the young Sherpa children walking to school, the elderly woman spinning prayer wheels, the teahouse owner who remembered your name and your tea order.

You realize that while you came to conquer a trail, you are leaving with something far more valuable: an understanding of a culture that doesn’t just live in the mountains, but with them. The Sherpa people have adapted their ancient faith and traditions to a modern world of trekking poles and satellite phones, all while maintaining an incredible warmth, resilience, and sense of community.

The Everest Base Camp trek is a physical challenge, yes. It will test your lungs, your legs, and your resolve. But its greatest reward is the cultural immersion. It is in the blessing at Tengboche, the butter tea in a family kitchen, the memorials at Duglha, and the smiling “Namaste” from a porter carrying twice his body weight. It is a journey to the roof of the world, but it is the heart of the Sherpa people that gives the trek its soul.

Planning Your Cultural Journey: Essential Trek Information

Ready to experience this for yourself? Here is a practical guide to help you plan your own Everest Base Camp trek.

Best Time to Trek

The optimal times for the EBC trek are during the two main pre-monsoon and post-monsoon seasons .

Spring (March to May): This season offers moderate temperatures and the spectacular bloom of rhododendron forests, painting the lower trails in vibrant reds and pinks. The weather is generally stable, but the trails can be busy.

Autumn (September to November): Widely considered the absolute best time. The skies are crystal clear after the monsoon, offering unrivaled mountain views. The days are crisp and pleasant, making for perfect trekking conditions. This is also the season for the fascinating Mani Rimdu Festival, usually celebrated in October or November at Tengboche and other monasteries. This three-day event features masked dances, prayers, and ceremonies, offering a deep dive into Buddhist culture .

A Sample Itinerary (14-16 Days)

While itineraries vary, a well-paced trek including acclimatization days is crucial. Here is a common and effective outline :

  • Days 1-2: Arrival in Kathmandu (1,350m). Sightseeing and trek preparation.
  • Day 3: Fly to Lukla (2,845m) and trek to Phakding (2,610m).
  • Day 4: Trek to Namche Bazaar (3,440m).
  • Day 5: Acclimatization Day in Namche. Hike to Khumjung or Everest View Hotel.
  • Day 6: Trek to Tengboche (3,860m). Visit the monastery.
  • Day 7: Trek to Dingboche (4,410m).
  • Day 8: Acclimatization Day in Dingboche. Hike to Nangkartshang Peak.
  • Day 9: Trek to Lobuche (4,910m). Pass the Sherpa memorials at Duglha.
  • Day 10: Trek to Gorakshep (5,164m), then hike to Everest Base Camp (5,364m). Return to Gorakshep.
  • Day 11: Early morning hike to Kala Patthar (5,545m) and descend to Pheriche (4,240m) or Pangboche.
  • Day 12: Descend to Namche Bazaar.
  • Day 13: Descend to Lukla.
  • Day 14: Fly back to Kathmandu.

Essential Permits

You will need two main permits :

Sagarmatha National Park Entry Permit: Can be obtained in Kathmandu or at the park entrance in Monjo.

Khumbu Pasang Lhamu Rural Municipality Permit: (Often referred to as the TIMS card for this region). This is obtained in Kathmandu.

Trekking with a Guide: A Note on Responsible Travel

While the trail is well-trodden and it is possible to trek independently, hiring a local guide and porter through a reputable agency is highly recommended. A good guide is more than just a navigator; they are a cultural bridge. They can introduce you to teahouse owners, explain the significance of the mani stones you pass, and share stories that bring the landscape to life. Employing a porter also directly supports the local economy in a meaningful way . Look for companies that follow ethical practices, ensuring fair wages and good treatment for their staff.

The Mani Rimdu Festival: A Cultural Highlight

If your schedule allows, timing your trek to coincide with the Mani Rimdu festival in Tengboche is an unforgettable experience. This sacred celebration, which typically lasts for three days, is a prayer for world peace and the well-being of all beings. The main events include the creation of a sand mandala, which is later ceremoniously destroyed to symbolize impermanence, and the famous masked dances (cham) performed by the monks. The monks don elaborate costumes and colorful wooden masks, portraying protective deities and historical figures, acting out the triumph of Buddhism over evil . It is a vibrant, colorful, and deeply spiritual event that offers an unparalleled glimpse into the heart of Sherpa Buddhism.

Giving Back: Supporting the Community You Visit

  • Stay in Locally-Owned Teahouses: This ensures your money goes directly to local families.
  • Buy Local Products: Purchase handicrafts, tea, and other goods from village shops rather than importing everything.
  • Be Mindful of Resources: Hot showers and Wi-Fi often cost extra, and electricity is limited. Conserve water and power.
  • Learn a Few Words: A simple “Namaste” (hello/greetings) and “Tashi Delek” (a Tibetan Buddhist greeting) go a long way.
  • Pack It In, Pack It Out: Respect the “Leave No Trace” principles. Carry your rubbish down to Lukla or Kathmandu .

The Everest Base Camp trek is a journey on multiple levels. It’s a physical journey into the high mountains, a personal journey of challenge and achievement, and most importantly, a cultural journey into the heart of a community that has mastered the art of living at the top of the world. Go for the views, but return for the people. You won’t be disappointed.

Translate »